
Larger than life, this 3D form imitates a
vintage
spinning globe baby toy. Dimensional handle has hexagon window
at
bottom end, twin arms arch that holds
accent-decorated globe that can spin
on
its wooden skewer post.
Fun nursery decor, baby shower prop or
cake-top
decoration.
Measures approx. 7" tall x 3.25" wide x 2.25" deep.
ASSEMBLY: 1. Identify and cut the shapes:
A & B sphere top and bottom
C sphere interior support disc with tabs
D sphere side panel accents
E sphere side end accent octagons
F sphere side strip accents
G dimensional handle
H dimensional handle reinforcement "box"
I dimen. handle hexagon opening boxing strip
J handle overlays (2)
K gusset to connect handle overlays
L handle interior reinforcements with end tabs
M & N handle accent overlays


 6. Prepare the interior support disc by bending
edge tabs forward or back.

 8. Bend the tabs inward slightly before
edges attach completely to allow . . .
 . . . the second half sphere to fit over the tabs
and seat snugly with rims next to each other.


 12. Form the strip into a ring (face side inward)
so that the side tab wraps over the opposite
straight edge, and glue in place.


 15. At handle bottom, bend tabs inward,
boxing panel into position to align with
handle angle edges, and glue in place.
 16. Repeat for opposite side, also tucking bottom
panel and tabs into position, and glue all in place.


 . . . push inward as far as possible.
 19. Bend handle top tab inward, tuck top end panel
into position and glue in place.

 21. To form each arm, position one left and one right
shape together so that center arc portions align,
with tabs bent out of the way, and attach center only.


 26. Prepare to align and attach the second handle
overlay shape in the same manner by positioning
the handle shape face outward, and repeating
the edge and perf fold alignment and gluing
as for the first arc edges in Steps 24 & 25.


 29. Insert a wooden skewer (approx. 7/64" diam)
through the end openings and interior disc
hole also. Skewer will act as spindle.


A & B sphere top and bottom
C sphere interior support disc with tabs
D sphere side panel accents
E sphere side end accent octagons
F sphere side strip accents
G dimensional handle
H dimensional handle reinforcement "box"
I dimen. handle hexagon opening boxing strip
J handle overlays (2)
K gusset to connect handle overlays
L handle interior reinforcements with end tabs
M & N handle accent overlays

1. Prepare the sphere hull shapes by bending
back on all perforation lines for panels, segments,
end octagons, side tabs and narrow wedge tabs, etc.
2. Position and attach the side cap accent octagons.

Here is another view showing all the bends
at perforations.

3. Bend the first two panels back to bring side
straight edges of lower segment of one (on left here)
to overlap the adjacent tabs to perforation lines
and glue that seam segment.

Bend sections a little more to align the upper
portion of the seam and join.

4. Continue to work all across the sphere half shape
to bend to align lower then upper seam segments
together and join. Then . . .

. . . bring the final seam straight edges to
overlap the opposite tabs, one at a time,
and join the 3 segments of that seam.
Repeat to complete 2 half spheres.

5. Bend the side accent shapes back slightly
at the center horizontal perf lines, then position
each in the center of each half sphere section
with the perf lines of each aligned, and glue in place.
Repeat for each of the 16 accent shapes.

edge tabs forward or back.

7. Apply glue to the inside edge of one half sphere rim,
then fit the reinforcement disc into the rim area,
so that bend edge rests near the corresponding
inward rim perforation line.

edges attach completely to allow . . .

and seat snugly with rims next to each other.

9. Prepare the rim band accents by bending back
slightly at center perf line, then position each over
two adjacent sphere sections of rim, with
perf and sphere seam lined up, with strip within
rim ridges on sides, and glue in place.
Repeat for all 8 accent strips.

10. Prepare the dimensional handle shape
by bending back on all panel edges,
tabs, etc.

11. Prepare the hexagon opening (pass-thru)
boxing strip shape by bending forward slightly
on each of the vertical panel perf lines,
and at side tab, and bending back
on upper and lower edge tabs.

so that the side tab wraps over the opposite
straight edge, and glue in place.

13. Apply glue to the ring tabs on first side,
then position that edge on the inside face of
the dimensional handle with panel perf edges
lined up as precisely as possible at hex opening
edges, adjust as much as necessary,
then apply pressure to tabs to glue in place.

14. Fold the handle shape roughly into a tube,
to bring the opposite handle face into position
so that the hex opening edges align with
second hex ring tab perf edges,
while at the same time
aligning and attaching the long edge seam,
and make adjustments so hex opening
and strip edges line up, as well as
long seam.

boxing panel into position to align with
handle angle edges, and glue in place.

panel and tabs into position, and glue all in place.

17. Prepare the dimensional handle interior support "box"
by bending back on all vertical perforation lines.
Take note of the narrow panel, which will act
as the attachment flange for this long tube "box",
with an interior flange beyond it that will end up
inside the box to help prevent collapse.

Next, form the shape into a tube
with the panel edge opposite the narrow
section on TOP, to overlap the narrow
section . . .

. . . with "extra" panel angled inside the tube
as shown here.
Attach the narrow panel to the top panel edge.

18. Apply glue to the wide panels, then insert
the reinforcement box into the top end
of the dimensional handle, and . . .


into position and glue in place.

20. Prepare the left and right pair of arch arm
reinforcements by bending the attachment tabs
(shown here near bottom of image) and top spindle
tabs forward respectively for both.

shape together so that center arc portions align,
with tabs bent out of the way, and attach center only.

22. Position one arm unit on each SIDE panel
of dimensional handle, with top of tabs centered
and even with top side edge, and glue tabs in place.

23. Prepare the handle overlay gusset shape by
bending back on edge tab perforations,
also bending forward on wedge panel cross
perforation lines.

24. Position one side of the gusset along
the arch segmented edge, with centers matched,
then position first tab perf bend along corresponding
angle segment, adjust for alignment, then
glue tab to backside of handle overlay.
25. Continue along same arc half to bend gusset
to align next two segment edges with tab perf edges,
then repeat along opposite arc half.

overlay shape in the same manner by positioning
the handle shape face outward, and repeating
the edge and perf fold alignment and gluing
as for the first arc edges in Steps 24 & 25.

27. Slide the dimensional handle between the front
and back of the handle overlay, until . . .

. . . it is fully into place and the hexagon opening
aligned over the pass-thru, and handle outer
edges are as aligned as accurately as possible.

At the arch tips, make sure that the front and back
ends DO NOT stick together.
Overlay shapes should attach to the arms of
the dimensional arms.

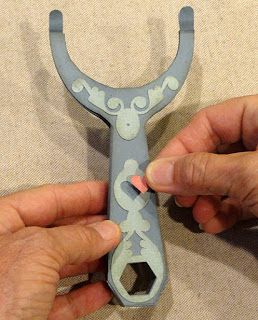
28. Position and attach to both front and back
the accent flourishes
at the bottom of the arch and over
the main handle with hex openings aligned.
Add the heart shape in its cutout.

through the end openings and interior disc
hole also. Skewer will act as spindle.

Extend spindle so that it can reach between
and beyond the arch arm end tabs.
Mark the cutting length at outer edge of each
arm. If desired, remove the spindle and paint
it to coordinate with the handle and sphere,
then re-insert through arms and sphere
and cut the ends off to be flush with arms.

30. Apply glue between the tip tabs to attach
the spindle ends in place . . .

. . . pinching the tabs around the spindle
\for a "molded", centered joining.

31. Add other embellishments such as a small
stud or jewel at the oval center of upper flourish,
studs at arm tips, glitter, ribbon ends through
hex opening, or around handle neck.
Here is the completed rattle form.

Wow I love it 👍
ReplyDeleteLove it, very unique!
ReplyDelete