
Impossible Card is the name of this style card
which is cut in one shape and then "twisted"
to produce the pop-up
center panel.
Accent
panels for 'L' shaped base,
plus two-layer "bridger" panels provide
scope
for using fun Halloween paper prints.

Card folds flat for sending, pops up for display
(use optional tall triangle
easel to assist with standing).
Card base measures 5x7, but center "stand
up"
will alter that flat measurement.
Happy Jack O Lantern is shown above.
Other versions feature Ghost, Cauldron and Bar Arch.
ASSEMBLY: 1. Identify and cut the shapes:
(Pumpkin card will be demonstrated in detail;
other card descriptions follow.)
A impossible card base shape
B base accent shapes
C "bridger" panel and accent (2 of each)
D middle pumpkin layer E front pumpkin layer
F back pumpkin layer G contrast face panel
H front stem accent I leaf and vine accent shapes
J "Greetings" letter cuts with Opt. position guide below
NOT SHOWN: easel stand shape (see Step 15)

Also cut "reversed" stem shape for backside
assemble (shown here with F back panel)

2. Prepare the single-shape impossible card base
by carefully bending forward at the center pop-up panel
base along perforation.

and back as shown, so that . . .

pop-up panel in its upright position.

4. Position and attach each of the base accent shapes
onto the card base "halves" with even offset margin around.

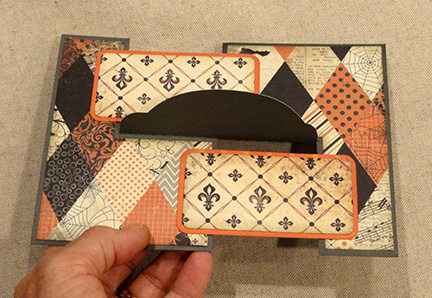
5. Attach each accent to face of each bridger base.

6. Use a grid to square up the base card assembly
along the 5x7 grid lines, then maintain square config.
while positioning bridger panel centered across
the gap, with equal margins of gap space above
and beow. Attach the overlapping side portions
of bridger to base.

7. Position the pumpkin face accent over the front
of the middle layer, with equal offset margin
around, and glue in place.
(NOTE this image erroneously shows the face
contrast already in place.)

Slip the face contrast shape into the recess
of the middle pumpkin layer, and glue in place.

9. Position and attach the front stem shape.

10. The word cut assembly will be prepared next.
This image demonstrates how the opt. positioning guide
is intended to be used, cut to match the shape to which
it will be attached, so that the guide "dissapears".

Position and attach each letter onto the guide.

over the center pop-up panel of the card base,
with bottom snugly along the panel perf line.

tucking ends under the pumpkin unit, with
leaf and curl on top, taking care . . .

. . . that the curl portion (shown left here)
rests on card surface - NOT pivoted so that it bends
or flexes, or it may interfere with the pop-up panel function.

13. Position and attach the backside pumpkin layer
to conceal the pop-up panel between layers.
Also position and attach the back stem.

front of the pumpkin (NOTE a color change
was made on the model project for improved contrast).

15. Prepare the easel shape by bending back
along the long vertical perf line, bending
the bottom tab forward.

16. Fold in half and glue the two triangle surfaces
together.

17. Position the easel behind the pumpkin
next to the bridger panel, adjusting closeness
to pumpkin pop-up in perpendicular position
to allow pumpkin to tip backwards slightly,
and glue base tab in place.

In upright position, the easel will keep
the heavy pumpkin assembly standing.

To fold pop-up flat, push the easel shape flat
toward center . . .

. . . then fold pumpkin back flat.

BAT ARCH IMPOSSIBLE CARD

18. Identify and cut the shapes as shown:
A impossible card base B impossible card accents
C bridger panels and accents
other shapes: arch layers, bat and accents, word cut and guide
(NOT SHOWN: second arch middle layer)

19. Follow steps 2-6 for pumpkin card to prepare
the bat arch base to this point of assembly.

20. Layer the bat accent wings and body onto base.
Position and attach each letter onto opt. guide.

21. Layer the front arch onto the middle layer.
Position and attach the bat unit onto the corresponding
portion of the arch assembly.

22. Position and attach the arch assembly
over the center pop-up area with arch edges aligned.
Position phrase cut assembly over bottom of arch
and attach.

23. On pop-up backside, position arch second middle
layer over pop-up and glue in place.

24. Position back arch over back middle layer
and attach.

CAULDRON IMPOSSIBLE CARD

25. Identify and cut the shapes:
A impossible card base B impossible card accents
C bridger panels and accents
other shapes: bubbles components (shown in detail step 27),
"inner" cauldron, cauldron rim and base, word cuts & guides
(NOT SHOWN: cauldron base for backside of pop-up,
opt. easel shape)

26. Follow steps 2-6 for pumpkin card to prepare
the cauldron base using base, base accents,
bridger shapes.
(Image unavailable)
27. Assemble the bubbles layered accent:
A) lay out the shapes

B) position and attach the first three shapes
over the largest shape base, matching up
edges that should align

C) Position and attach the three-bubble unit
at lower right position

D) position and attach the individual bubble circles.

28. Position and attach the rim shape onto
the top of the cauldron base shape.

29. Position the bubbles assembly unit over
the "interior" shape, tucking a tiny margin
of bubbles bottom under the lower slot edge,
and glue in place.

30. Position the bubbles/interior unit over the rim
of cauldron assembly, match up top edges,
and glue in place.

31. Position and attach cauldron assembly
over the pop-up portion of the card base assembly.

32. On backside of pop-up, position and attach
the back cauldron shape to cover the pop-up shape.
33. Refer to steps 15-17 to prepare and attach
easel shape to assist cauldron to stand upright.

GHOST IMPOSSIBLE CARD

34. Identify and cut the shapes:
A impossible card base B impossible card accents
C bridger panels and accents
other shapes: word arch letters with clear base arch,
ghost front with heart, middle with eye contrast,
back layer, pumpkin 3 layers
(NOT SHOWN: easel shape)

35. Follow steps 2-6 to prepare the ghost base
card to this point in the assembly.
36. Layer and attach offset front ghost onto middle layer,
with bottom edges aligned.

37. On backside of assembly, insert and attach
eye contrast oval into recess.

39. Layer and attach 3 pumpkin shapes, then
attach heart and pumpkin to front of ghost unit.
40. Position ghost unit centered over pop-up
of card base, and attach in place.
41. On backside, position and attach ghost back layer
to conceal pop-up assembly, with similar offset
at edges as with front-to-middle layer alignment.

42. Position and attach each letter cutout
over corresponding part of clear letter guide arch.

ends to front of ghost hands, ghost head
where it overlaps arch.

No comments:
Post a Comment