
Four gradated print-weight paper squares
are
folded to produce the dimensional "tiers" of
the classic Christmas
tree, then centered and
arranged from top to bottom on the card accent front
using guide marks, tips tucked under and into the level above.
Trunk
"stick" long shape can be used alone or
in combination with swirly
"stand" and base at bottom,
layered star at top.
End punched simple
bracket can complete the design,
where stamped or printed sentiment can be
added
(NOTE sentiment shown on sample card
is NOT included in the file).
Card
measures approx. 5x7 when closed.
ASSEMBLY: 1. Identify and cut the shapes:
A card base with center vertical fold
B card front with positioning guide perf lines
C tree "limb" or tier squares 1-4
D star and offset base
E trunk
F stand and offset contrast base
G plaque with end punch holes

 Step B: Fold on the second diagonal as before.
Unfold.


 Step D: Re-fold face sides together on
the side-to-side "square" fold to redirect
the fold to be "valley" as seen from front.
 Step E: push the side folds in to the center
while allowing the diagonal folds to stay in place,
so that the square now looks . . .
 . . . like this. Crease all folds.
 Step F: Lift top diagonal fold and curl it to
lay along the center fold line, then crease
the newly formed diagonal.
 Step G: Repeat for the second diagonal
to re-direct the point to match first point as shown.


 4. Turn the unit over and apply adhesive to
the triangle shape that is the back layer.
(Adhesive tape is applied to each tier in this
same manner.)

 6. Prepare the position tier #2 in the same manner,
first lifting the layers of tier #1 and sliding
the point underneath . . .
 . . . tip centered on the center
fold, center bottom aligned on the center per line,
and horizontal edge on the second perf line.
Attach in place.
7. Repeat the alignment and attaching steps
for the third and fourth tiers.

 9. Position the trunk shape by tucking up
under the bottom layers of tier #4.
Position stand overlapping trunk,
centered, and barely above bottom edge
of card front.
NOTE: the trunk can be used without the stand
if preferred.
 11. Position and attach the star.


 Here's the finished card.

A card base with center vertical fold
B card front with positioning guide perf lines
C tree "limb" or tier squares 1-4
D star and offset base
E trunk
F stand and offset contrast base
G plaque with end punch holes

2. Prepare each of the four squares as follows:
Step A: fold the square on diagonal with face sides together,
aligning edges as precisely as possible. Use cut mark guides
to assist with this. Unfold square.

Unfold.

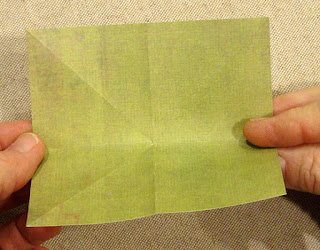
Step C: Fold in half as shown, then unfold
and fold in half in the other direction.
(These folds do not have any cut guide marks.)

This is what the square with its diagonal and
cross folds looks like at this point.

the side-to-side "square" fold to redirect
the fold to be "valley" as seen from front.

while allowing the diagonal folds to stay in place,
so that the square now looks . . .


lay along the center fold line, then crease
the newly formed diagonal.

to re-direct the point to match first point as shown.

This is the completed unit.

3. Identify the vertical center perforation guide line,
and the four crossing horizontal perforation
guide lines on the card front panel.
(NOTE these have been traced for visibility.)

the triangle shape that is the back layer.
(Adhesive tape is applied to each tier in this
same manner.)

5. Position the top tier first, centering
the point and center fold line underneath
on the center perforation guideline, and
placing the bottom horizontal cut edges
along the top horizontal guide line,
and attach in place.

first lifting the layers of tier #1 and sliding
the point underneath . . .

fold, center bottom aligned on the center per line,
and horizontal edge on the second perf line.
Attach in place.
7. Repeat the alignment and attaching steps
for the third and fourth tiers.

8. Prepare star and stand by attaching main shape
onto offset base shape.

under the bottom layers of tier #4.
Position stand overlapping trunk,
centered, and barely above bottom edge
of card front.
NOTE: the trunk can be used without the stand
if preferred.
10. Add a few dabs of glue to help keep
the tree tier layers less "dimensional", if desired.


12. Prepare the plaque with favorite stamp
sentiment, as desired, or hand letter, print, etc.

13. Position plaque across bottom of card
over stand, glue ends in place, then add mini brads
or studs, etc.

14. Position the card front assembly onto
the card base front panel, and center with
1/4" offset margin all around, and attach.


No comments:
Post a Comment