
Classic and functional mail box in its shelf-sitting form
has
panel dome top with swivel-up door flap front panel
that conceals the deposit slot.

Panel
accent overlays included for front, sides, dome.
Attach "Santa Mail"
letters across two dome panels -
perforations included for bends.
Left side
panel has lower panel access door,
with bracket at top that aligns with
match-up
bracket on mail box hull.
Thread 'O' Ring clasp through bracket holes
to keep door
closed.
(Or add the coordinated "Pad Lock 3D Model"
to fasten the
door.)
Measures approx. 10.5" tall x 7" wide x 4" deep.
Slot measures approx. 6" side to side x .6" top to bottom.

Place the mail box on a two-legged stand
by combining with "Santa Mail 3D
Box Pedestal".
Add other embellishments that are sized to fit
including
"North Pole Express Emblem" for front panel,
holly or cedar
clusters from "Winter Berry Sprigs",
Pad Lock 3D Model and Magical (Santa) Key.

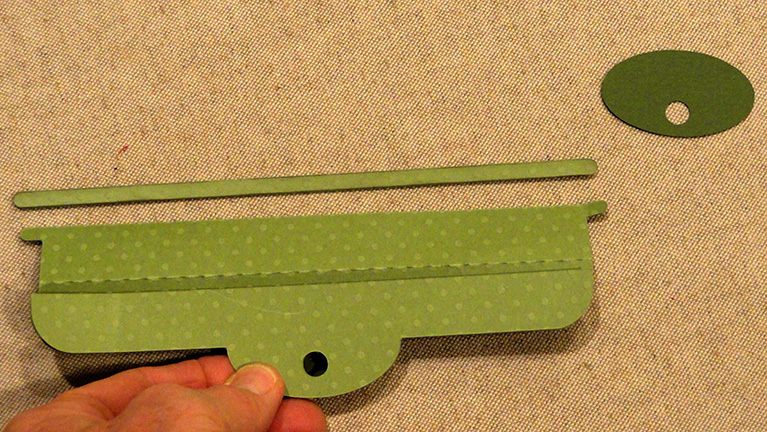
ASSEMBLY: 1. Identify and cut the shapes:
A front/left side hull main shape
(shown with front and side accents)
B back/right side hull main shape
(shown with side accent)
C hull top rim collar (reinforcement)
D build up layers for rim collar
E dome top main shape with overlay accents
F dome sides (2) with accents
G circle cutouts for dome side "rivets" (22)
H "SANTA MAIL" letter cutouts with guide
(NOTE: for I & J, select and cut the shapes
that include the knob post size for hardware selected)
I front flap main shape with build up spindles (3)
J flap overlays (2) with oval accent
K side door main shape
L door bracket with M bracket overlays (3)
N side door "stop" underlay
O side wall bracket with P bracket overlays (3)
Q door bottom hinge
R door underside build up shapes (7-8)
S bottom platform strut supports

SS bottom hull platform "box"
NOTE: if the mail box will be attached to
the pedestal, use the platform "box" shape
with hexagon openings for posts that
is part of the pedestal stand cut file.

Brackets left (4-5) and right (4-5) for
front door flap spindle

Holly & Berries decorations (2-3 sets)
HH cluster base, II and JJ (and reversed shapes)
for holly leaves; LL berries overlays;
KK contrast berries underlays

Lock Ring build up: 2 each of left and right
center, second layer, and top layer.
FOR STAND UPPER PLATFORM BASE:
support struts for space between post collars
(see Stand tutorial)

2. Prepare the main hull shapes by bending back on
section division vertical perforation lines,
and on side flanges.

along a side seam by overlapping the plain edge
over the flange to perforation line, checking
top and bottom ends for alignment before
joining seam.

and side accent frames.

5. If planning to create and attach the emblem to
the front of the mail box hull, it may be easier
to position and attach while the hull is flat.
Otherwise it can be attached when the mailbox
is completed.

6. Position the side door "stop" panel (which will
keep the door from pushing past "flush" and
into the compartment) behind the left side panel,
using bracket punch holes at top and bottom
as alignment tools, then . . .

(This image is showing how the "stop" panel
extends into the door opening behind the hull
to help the door "stop".)

7. Layer the under-door build up by stacking
and attaching the panels, one by one, keeping
edges and punch holes lined up as precisely
as possible.
NOTE: this shape will assist the door to "fit"
into the panel opening as narrowed by the "stop" panel.

(here and throughout this project)
such as the under-door panel in this step,
use a flat weight or heavy object to press the shape
during the gluing up process until the adhesive
is completely dry, to help avoid warping and curling.

the door panel using the punch holes to align
the two, and attach.

The build up stack on the underside of
door panel corresponds to the left side panel
opening, and will fit together snugly when
the door is in closed position.

9. Layer the bracket build-up shapes
and glue together - for both the four-hole
wall bracket, and the three-hole door top bracket.

10. Prepare the bracket base shapes by
bending at the cross perforation line.
11. Position the build up shapes in place
(with slight offset margin)
and glue to respective wall or door bracket base.

12. Position the wall panel bracket punched section
over the corresponding punch holes of wall panel,
adjust for alignment and glue in place.

13. Repeat the positioning and gluing
of the door top bracket to the door.

14. Position the door bottom hinge bracket
in place on door panel and glue in place.
15. Fit the door panel in place and align
hinge bottom portion with two holes of
wall panel, and glue in place.

16. Position and attach mini brads through bracket
and hinge holes.
This image shows the door attached and aligned.
to align and join the second side seam.

18. Prepare the hull upper reinforcement collar
by bending the outer edge flanges upward
(this image shows the main collar shape
upside-down).

19. Layer the reinforcement shapes into a stack
and join.
20. Position and attach the stack on top
of the collar with rounded rectangle cutout
edges aligned.

21. With the flanges upward, position the collar
into the hull upper opening and gently slide
downward into position until . . .

. . . top edge of each
flange aligns with corresponding hull edge.
Glue flanges in place to backside of hull walls.

22. Prepare the dome shape by bending back
along section division lines (horizontal lines)
and also bend end tabs down/inward.

by lining up the center top edge with the center
section of dome. Overlap the side panel straight
edge over flange to perforation line, and glue in place.

segment with the corresponding next section flange
of dome and glue in place. Continue to bend next
segment and section into position to attach each
edge of side panel and dome until both halves
of side panel are attached. Repeat the process
for the opposite side panel.

25. Position and attach the side accent panel,
offset within "curved" panel edge, and
with bottom edges matched.
Also position and attach the tiny circle "rivet"
circles in each of the circle cutouts of side walls.

26. Prepare the dome accent shapes by bending
back along the perforation lines of each.
27. Position and attach each accent shape into
the position for which it is intended,
matching up mail slot opening, angle bends,
and slightly offset at side edges, etc.

by positioning (centered) the guide cut shape
on the bottom of the top center accent panel,
with side rounded corners also aligned.
Tape in place with temp tape such as masking tape.

the dome accent bend angles.
Position and attach each letter in its place
according to guide.

29. With letters in place, gently remove
the positioning guide.

30. Layer and attach the spindle bracket shapes
into a left and right stack of at least 4 shapes each.

31. Here are the front flap assembly shapes.
Prepare the main flap shape by bending back slightly
on the horizontal (side to side) perforation line.

Layer and attach the spindle rod shapes in a stack,
taking care to align all edges as precisely as possible.

32. Prepare Layer the end section shapes in a stack and
attach to each other.
When dry, position and attach to corresponding
portion of the main flap shape.
33. Position and attach the built up spindle on top
of corresponding area of flap assembly.
Position and attach the accent oval also.

34. Prepare to attach the front flap to the hull
by positioning the flap assembly over the
two dome facets just below the "SANTA MAIL"
on front accent panel. Line up the perforation
line of flap with the corresponding angle of the dome,
and center from side to side. NOTE that
the spindle tips will extend slightly beyond
the edge of dome as indicated.

Use temp tape such as masking tape strips
to hold the flap in position while brackets are attached.

to left or right side onto the edge of the dome
with the hole inserted over the spindle tip,
and glue securely in place.
Once the brackets are relatively secure,
remove tape, and test to make sure the flap door
spindle action will pivot appropriately.

36. Apply glue to the top margin of main hull,
then fit the dome assembly on, easing it down
until there is a slight, offset margin
exposed above hull accent panels equivalent
to the offset at accent panel side edges.
Make sure dome is straight all around, then
secure in place until glue is dried.

Position and attach the painted knob or
purchased metal knob, etc. as desired.

This is the wooden knob used in the sample project,
prepared by hand trimming much of the post away.

37. Prepare the bottom platform "box" shape
by bending back on all panels, flanges and tabs.
(In this image, the top of the box is on the left.)

38. Prepare the support strut strip pair sections
by bending end tabs back, bending top and
bottom flanges back.

Join the pairs by means of the end tab on
one of the pairs.
Orient the strips so that one has edge slots
facing down (at top here) and the other
with slots facing up.

Bend the strips at angle so that slots line up,
then fit the two together to form a diamond X.

included stand, the platform used for this illustration
shows the post openings and collars. For the box alone,
please ignore these non-applicable details.)
Flip the platform shape face down, then position
the strut assembly so that ends and center bends
are within the main top panel, then glue flanges
in place.

40. Form the platform into a box by bending
side/top or side/bottom walls back to align
and join the four corner seams.
(Ignore post collars shown here.)
41. Fold attached box bottom into position
with three flanges tucked inside walls and
pushed fully into place and attached.

42. Position platform with wall extensions downward
under the main hull bottom opening, apply adhesive,
then fit the hull over the platform and carefully
slide fully down until bottom edges of platform walls
and hull walls line up.

decorations by layering the whole and half leaves
onto the silhouette base. Layer the berry top shapes
over the contrast base shapes, then position on
silhouette assembly - bottom two first, then top.
NOTE: the sample project uses 3 holly sprig units,
one for each side and one for front.

44. As side door flap securing device, prepare
the lock ring. Layer and attach the pairs of left and
right split ring shapes.

glue up process throughout.

45. Layer and attach the second tier and top
rings on top of each other for left and right stacks,
centering and matching the split cut edges.

46. Layer the left and right assemblies,
back to back, and attach to complete the ring.

Attach the lock ring by twisting slightly to
open the 'C', slide it into place so that upper end
can insert into the bracket opening, then
allow ring to close.

the Padlock 3D Model which can fit into place
with swivel shackle "hook", as shown.

The mail box constructed in this tutorial
can be "elevated" by attaching to prepared
Here is that completed project.

No comments:
Post a Comment