
Styled
to imitate a festive folded newspaper hat,
this dimensional place card is
assembled in pieces
for creative print pattern placement.
Center point is
folded first, with folded side panels
and narrow points added along diagonal.
Brim wraps at lower edge and sides.
Insert rounded toothpick (trimmed at top)
at top center hole and attach wrap-around
double-point name strip.

Double-layered pleated rosette with star can adorn
the
front, with scalloped and plain wrap bands at brim
(or substitute 3/8” wide
coordinated ribbon for
plain centered band if desired).
Measures approx. 5.125”
wide at base x 3.5” tall
without label flag.
(For a slightly larger place card, consider enlarging
all the shapes with aspect ratio preserved.
For instance, enlarging all at 117% would result in
a hat that is approx. 6" wide x 4" tall.
Enlarging at 127" would produce a hat that is
approx. 6.5" x 4.5" tall.)
(For a slightly larger place card, consider enlarging
all the shapes with aspect ratio preserved.
For instance, enlarging all at 117% would result in
a hat that is approx. 6" wide x 4" tall.
Enlarging at 127" would produce a hat that is
approx. 6.5" x 4.5" tall.)
ASSEMBLY: 1. Identify and cut the shapes:
A main hull/center point
B lower side overlays left & right
(shown here as non-wrapped shapes)
C angled point overlays left & right
D brim lower panels front and back (2)
E scalloped wrap band
(also provided as separate front, back bands)
F plain wrap band (shown here as substitute
3/8" wide ribbon)
G rosette pointed pleating bands (2)
H rosette scalloped pleating bands (2)
I rosette stabilizer circles (2)
J rosette front star accent
NOT SHOWN: front seam underlay 'liner' strip (see step 3)


 . . . re-fold the side back into position and glue that
side's flange in place to the underlay.
NOTE: gluing the underlay under the seam edges
will keep the front and back of the center point hull
from becoming glued to each other on the inside.

 . . . position the overlay so that it "wraps" over
the diagonal fold edge of the center point with
outer side edges aligned, and bottom edges
more or less lined up (paper thickness may affect
the exact alignment of lower edges). Repeat for
the second side overlay.
 OR, if preferred, use the non-folded shapes for left
and right to position and glue in place, without
the wrap-around at the diagonal edge.
(Cut and attach shapes on front of hat and on back.)
 6. Prepare the angled side point shapes by folding
back at the center line.
 7. Apply glue to the inward edge only, then position
to wrap over the assembly with the inward edge . . .


 . . . until the center point assembly bottom straight edge
is at the flange's bend line. Adjust from side to side
so that brim is centered, then glue in place.
 10. Bend the brim panel upward so that the upper
panel is tucked behind the brim face, and bend
the side tab inward . . .

 11. Repeat for the second brim panel, positioning it
and attaching the bottom flange to wrap to the inside
of the hat in the same way, with side tabs wrapping
around the side edges of the layers.
12. Spread the brim side edges and apply adhesive
between the side tabs, then press the brim edges together
at sides to join. NOTE that hat interior should still open up
as can be seen in the image shown with step 16.

 14. On backside, wrap scallop band and overlap ends,
glue in place.
 15. Position and center the plain band, and wrap
side edges around to back, overlap and glue in place
in a similar manner.
OR, as a substitute, position and attach a length of 3/8"
wide coordinated ribbon in place of the plain band.


 . . . the pleats come together and can be . . .
 . . . forced into the flattened position shown here.
Push the rosette edges inward to close the circle
as tight as possible, then quickly work to apply a glue
bead around the edge of circle, then . . .
 . . . position the stabilizer circle over the opening
to attach where the hot-melt glue was applied.
Continue to work to push the medallion outer edges
inward to tightest position, with uniform pleat distribution
as the glue solidifies.
 23. Reverse the pleat medallion to be face down,
then repeat the application of hot-melt glue at edge
of center hole, and position and attach the backside disc.


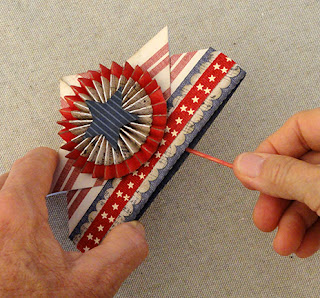 . . . the top point hole. Extend through slightly more
than half way, then quick-grab glue in place on the inside,
taking care that it is perpendicular to the brim bottom fold.

 . . . wrap the flag around the toothpick, bring ends
together and glue strip backsides together, including
the toothpick pole in the process.
Trim the toothpick excess with appropriate tool.


A main hull/center point
B lower side overlays left & right
(shown here as non-wrapped shapes)
C angled point overlays left & right
D brim lower panels front and back (2)
E scalloped wrap band
(also provided as separate front, back bands)
F plain wrap band (shown here as substitute
3/8" wide ribbon)
G rosette pointed pleating bands (2)
H rosette scalloped pleating bands (2)
I rosette stabilizer circles (2)
J rosette front star accent
NOT SHOWN: front seam underlay 'liner' strip (see step 3)

2. Fold the main hull edge flanges (shown on lower edge
in the photo above) under, then fold forward on
the diagonal perforation lines to bring the flange fold
edges together at the center front.
3. Lift away one side at the diagonal, then tuck the underlay . . .

. . .halfway under the center front fold edge,
with lower point even with bottom hull cut edges,
and glue in place (glue underside of flange to
face of underlay). Then . . .

side's flange in place to the underlay.
NOTE: gluing the underlay under the seam edges
will keep the front and back of the center point hull
from becoming glued to each other on the inside.

4. Prepare the lower overlay shapes for left and right
by bending back on the diagonal fold line.
5. Apply glue (here and for all the remaining overlays)
just along the edges to help the project continue to
imitate folded paper instead of a highly-glued project, then . . .

the diagonal fold edge of the center point with
outer side edges aligned, and bottom edges
more or less lined up (paper thickness may affect
the exact alignment of lower edges). Repeat for
the second side overlay.

and right to position and glue in place, without
the wrap-around at the diagonal edge.
(Cut and attach shapes on front of hat and on back.)

back at the center line.

to wrap over the assembly with the inward edge . . .

. . . aligned along the inward cut edge of the lower
wrap as indicated. NOTE that the bottom narrow point
should reach to or nearly to the center corner.
Check to ensure that edges on back are aligned
as desired as well, then glue in place.

8. Prepare the brim panels by bending back on all
perforation lines and panel sections, flange and side tabs.

9. Position and insert the bottom flange of brim under
the center point assembly FRONT, so that the flange
is going INTO the hat interior compartment . . .

is at the flange's bend line. Adjust from side to side
so that brim is centered, then glue in place.

panel is tucked behind the brim face, and bend
the side tab inward . . .

. . . so that it also wraps around the edge of the center
point assembly layers to the hat's interior,
and glue in place. Repeat for the other side tab.

and attaching the bottom flange to wrap to the inside
of the hat in the same way, with side tabs wrapping
around the side edges of the layers.
12. Spread the brim side edges and apply adhesive
between the side tabs, then press the brim edges together
at sides to join. NOTE that hat interior should still open up
as can be seen in the image shown with step 16.

13. Prepare the scallop band by bending back at
the perforations, then position, centered side to side
and top to bottom of brim, and attach in place.

glue in place.

side edges around to back, overlap and glue in place
in a similar manner.
OR, as a substitute, position and attach a length of 3/8"
wide coordinated ribbon in place of the plain band.

NOTE: as an alternative the second sample project
uses multiple prints for center, lower and side points,
plus uses the sectioned scallop strip that can be
put on front and back (the alt. uses it only on front),
as is shown here.

Place the scallop accent on brim panel, then check
the sides and trim any overlap beyond brim edges.

Here, the plain paper accent strip is centered
and attached, then ends folded around brim edges . . .

. . . (there are NOT any perforations to help fold it,
so that it can be customized to conform to the thickness
of the specific project's papers and card stock.)

16. At this point in assembly and later as needed,
flex the bottom of the paper hat open, taking care NOT
to flex too much to cause tearing or damage,
so that the hat will be self-standing.

17. Prepare the widest pleat strip by bending the pleats,
beginning at the non-tab end, to bend the first perf
line as "mountain", then alternate the fold direction all
across the strip. Complete the pleat folding for both strips.

18. Join the two strips by overlapping the straight end
(left) over the tab of the end of the other strip to fit snugly
into the bend at perf line, align bottom non-scallop edges,
and join seam.

19. Form the strip into a ring with face side outward,
then align and join the ends to complete the second seam.

20. Complete the same process for the narrower
pleat strips, bending to form pleats in both strips,
then joining first seam, forming ring, an joining second seam.

21. Layer the narrow ring onto the outside of the wider ring . . .

. . . lightly gluing along straight (non-scallop) edges
all around, then fit the pleating shapes together
so the two layers fit snugly together.

22. Pre-heat hot melt glue applicator.
With scallop points downward, begin to "gather"
and work the pleats into narrow formation at the straight
high edge, until little by little . . .


Push the rosette edges inward to close the circle
as tight as possible, then quickly work to apply a glue
bead around the edge of circle, then . . .

to attach where the hot-melt glue was applied.
Continue to work to push the medallion outer edges
inward to tightest position, with uniform pleat distribution
as the glue solidifies.

then repeat the application of hot-melt glue at edge
of center hole, and position and attach the backside disc.

24. Position and attach the accent star on front so that
the stabilizer circle is covered.

25. Position and attach the rosette onto the front
of the completed hat at center.

26. Prepare to attach the label flag by taking a round
toothpick such as this colored one, then . . .

. . . inserting it through hat's interior and out . . .

than half way, then quick-grab glue in place on the inside,
taking care that it is perpendicular to the brim bottom fold.

27. To prepare the label flag, use the Silhouette Cameo
"print and cut" feature, or cut the flag shape as
a template to position over a office-printed label,
then hand cut out. (NOTE sometimes it may be
easier to use the 'window' left by cutting the template
to position the lettering, then trace the cutting line.)
28. Add some curl to JUST the center of
the flag shape, then . . .

together and glue strip backsides together, including
the toothpick pole in the process.
Trim the toothpick excess with appropriate tool.

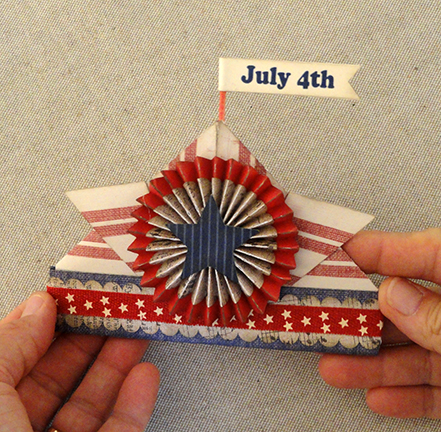
Here is the completed hat place card.

I am new to your blog, is there a link to the SVG files for the wonderful projects? Thank you.
ReplyDeleteWe are currently only offering our svg downloadable and cuttable designs as contributing designers through Silhouette America's online store. Search for Silhouette America and you should be able to find us. After signing in, there will be a list of options - click on "artists" near the bottom and scroll to find SnapDragon Snippets to be able to find our designs among the thousands there. Here's a link that might take you directly to our portfolio there: https://www.silhouettedesignstore.com/artists/17986
ReplyDelete