
Shaped lid fits snugly over base,
which are glued together to form the imitation “wood block”
onto which the layered, highly-detailed colonial figure is attached.
Plenty of details add to the charm of this lady,
styled to be displayed with
companion design “Colonial Gent Block Box”.

Measures approx. 4.5” wide x 7.5” tall x 1.5” deep.
ASSEMBLY: 1. Identify and cut the shapes:
A LID front panel with boxing strips as identified
B BASE back panel with boxing strips as identified
Base interior support strips 1 (top), 2 (middle) & bottom


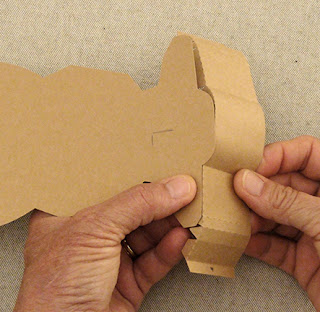

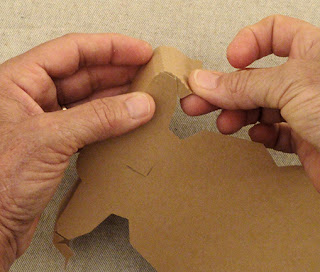
 10. Locate the strip with the matching symbols, then . . .


 . . . bend in to fit panel and final strip ends in
one step; glue in place.
14. Repeat steps 4-13 for the BASE of the box.


 B) Layer the fichu mid layer onto the base layer
using the punch holes to help align the two layers,
then position top left individual shape first,
then right.
C) Position and attach hat brim and crown onto
hair shape.
 D) Position stars left and right "show-thru" under-lays
(these have been modified in final cut file)
under the skirt so that they do not show, except
thru the star cutouts.
 E) Layer the cummerbund center shape on top
of the base shape, then position and attach
to skirt.
F) Position face shape onto head/neck base.
 G) Add cheek circles, mouth onto face.
H) Position eye 'whites' strip behind
eye openings in the rectangle cutout
of head/neck.
I) Layer eyes and attach in eye cutouts.
 J) Position neck edge of head/neck base
into corresponding edge of body base shape
and affix tiny pieces of temp cello or paper tape
on backside to hold in place.
 K) Position dress assembly on top of underskirt
and attach.
L) Tuck and attach sleeve lace shapes at sleeve ends.
 M) Position and attach hair/hat assembly over head
of base.
N) Position dress assembly over body base, using
punch holes to assist with alignment; before attaching
skirt fully, leave lace unattached so that . . .
 . . . hand/arm shapes can be positioned and tucked
under lace edges.
 O) Position and attach feet shape.
P) position and attach fichu assembly, flexing
to allow top neckline edges to wrap around slightly,
the glue in place.
 Here is the completed lady figure.
 19. Position and attach figure to lid front,
keeping even offset margin all around, except
for bottom of feet, which is even with panel's bottom edge.


 . . . quickly apply pressure along ALL edges,
so the LID conforms to BASE shape as closely
as possible.


A LID front panel with boxing strips as identified
B BASE back panel with boxing strips as identified
Base interior support strips 1 (top), 2 (middle) & bottom

C figure silhouette lower foundation
D figure head/hat silhouette upper foundation
(shows-thru as neck)
E eye 'whites' liner strip
F feet G hair H hat (brim and crown)
I eyes base layer and pupils, mouth
J face overlay with cheek circles
K hands left and right
L under-dress M stripes overlay
N fichu bottom, middle and separate top overlays
O dress P cummerbund base and center
Q lace cuffs R dress star 'liners' (modified)

2. To understand LID and BASE boxing assembly,
become familiar with the symbols cut into end tabs
or nearby that help identify section connections.
Lid strips have single symbols; base strips have paired.

3. Bend the LID boxing strips at cross-perforations
and bend edge tabs back. Re-direct the cross bends
to echo the main panel's edge segments.

NOTE that a cut in 'L' will help identify the LID
panel from the Base panel.

Also NOTE that the center of the top boxing strip
has a slight notch cut out to help identify and position it.

Two curved box segments on each left or right half
of the main panel will require a series of tiny tabs
that will allow boxing strip to curve and fit.
Identify these on the top strip at hat crown sides, and . . .

. . . at mid side strips for top of skirt.
4. Add some gentle back curve to these areas
to assist them to conform to the panel shape,
using a rod tool such as a round pencil or dowel
and thumb pressure (think 'curling ribbon').

5. To begin assembly, identify the first straight segment
of boxing and the corresponding panel edge, then
with tab bent back, position and align the panel edge
to overlap the tab to the perforation line; adjust ends
and glue in place.

6. Repeat step 5 for the opposite straight segment.
7. Ease in the center top straight edge tabs and multiple
"curve" edge tabs to fit the center panel edges,
and glue in place.

8. Continue around the panel edge to bend strip to match
tab perforations with panel edge, adjust, and glue in place . . .

. . . until all boxing strip edges are in place.
9. Repeat for the opposite end of strip.


. . . position and attach the strip ends, overlapping
the new strip end over the end tab to perforation line,
adjust and glue to attach.

11. Continue in the same fashion to bend, match,
fit and glue each segment of strip to edge of panel.
At the curved edge of skirt portion, fit the straight
portion, then ease in and fit the 'curved' portion.

12. Repeat for the opposite side of panel.
13. Position and attach the bottom strip, then . . .

one step; glue in place.
14. Repeat steps 4-13 for the BASE of the box.

15. The internal support strips of the BASE can be
identified by a cut in number for the top (1) and
middle (2). The bottom strip has no symbol,
but is the longest. Prepare strips by bending back
on bottom edge and side flange tabs.

16. Position #1 support strip as shown here,
at the angle at bottom of 'hat' area, so that
the side tabs perforation line/angle of strip lines up
with the wall bend. Glue bottom and side tabs to
inside surfaces of BASE.

17. Position and attach the middle strip at the next
angles below strip #1, and the lower strip at the bend
just above 'skirt'.

18. Assemble the figure:
A) position and attach the stripes overlay onto
underskirt, stripe bottom edges even with skirt.

using the punch holes to help align the two layers,
then position top left individual shape first,
then right.
C) Position and attach hat brim and crown onto
hair shape.

(these have been modified in final cut file)
under the skirt so that they do not show, except
thru the star cutouts.

of the base shape, then position and attach
to skirt.
F) Position face shape onto head/neck base.

H) Position eye 'whites' strip behind
eye openings in the rectangle cutout
of head/neck.
I) Layer eyes and attach in eye cutouts.

into corresponding edge of body base shape
and affix tiny pieces of temp cello or paper tape
on backside to hold in place.

and attach.
L) Tuck and attach sleeve lace shapes at sleeve ends.

of base.
N) Position dress assembly over body base, using
punch holes to assist with alignment; before attaching
skirt fully, leave lace unattached so that . . .

under lace edges.

P) position and attach fichu assembly, flexing
to allow top neckline edges to wrap around slightly,
the glue in place.


keeping even offset margin all around, except
for bottom of feet, which is even with panel's bottom edge.

20. To complete the box, fit the LID over the BASE
and slide together fully.
(NOTE the figure should be attached to LID at this point.)
If desired, prepare a baggie of poly beads or other
doll making weighting materials in bottom compartment
prior to closing the block box; attach in place as desired.

21. Either before fully closed, or after, apply quick-grab
adhesive between the LID and BASE walls all around
to help the LID hold its desired shape, then . . .

so the LID conforms to BASE shape as closely
as possible.

Here is the completed block box.

No comments:
Post a Comment