
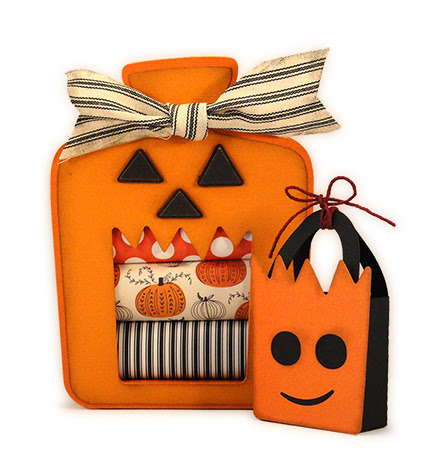
Pumpkin decoration that doubles as a candy tote
in two versions: open front with three paper-sleeve wrapped
“fun size” candy
bars; or clear vinyl window with loose candy inside.
Front and back pumpkin
panels are layered from
card stock for thickness, with front offset overlay.
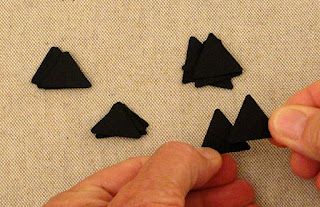
Eyes
are layered for “chunky” dimension.
Compartment between front and back is
approx. 3.25x4.25x.5,
and includes a bottom support and top closing flap
(with
thumb notch and opt. added tab-end strip for opening ease).
Tie a ribbon at
stem for extra panache.
Pumpkin front measures approx. 5” wide x 6.75” tall.
BONUS
design: To “upcycle” waste mouth shapes from
multiple layers, select the
designated front panel shape
that will yield mini groot-like face panels when
the larger panels are cut, then cut tote compartment,
assemble and fill to
create a few MINI SPOOKS!
NOTE: the 'open window' version for wrapped bars
will be described first, with variation for the vinyl panel
window following in Step 23. The Bonus little tote assembly steps
can be found at the end.
ASSEMBLY: 1. Identify and cut the shapes
(for the open window version):
A front build up layers (3-4)
B offset front face accent layer
C front underside layer with slots for tabs
D compartment E base 'tube' support strip
F back build up layers (3-4)
G back underside layer with alignment dash lines
H back offset accent layer
I-K eye base layers (6-7 each for layering)
and top accent layers (4 each for layering)
L candy bar wraps (3)

M front inside layer with window recess opening
N clear vinyl window panel


For optional miniature candy tote (conserving
the wide mouth opening 'waste'):
front face panel
tote compartment panel

For information purposes, this is the type and size
of candy bars ("fun size" and loose coated candies)
that were used in the model projects shown here.

2. Layer and glue together the layers for build up of
front, taking care (here and throughout) that all cut edges
are lined up as exactly as possible.
NOTE: DO NOT attach front INSIDE layer that includes slots.

As the glue up proceeds (using liquid adhesive), it is
HIGHLY advisable/required to press the glued stack under
a heavy flat object such as this wood plank section,
or a large book, until the drying is complete (may take
an hour or more - til the stack is no longer cool to touch).

3. Place the offset front accent shape over the top
of the stack and glue in place; press flat under weight.

 5. Layer and glue together the back panel build up layers,

4. Identify the inner back layer that includes the compartment
alignment cut dash lines for top edge, corners
and side edges, as indicated by pointing finger.

including the back inside layer identified in step 4 above;
press under flat weight.

 8. Position and attach eyes and nose accents onto

6. Layer the eyes and nose base layers;
press under weight while they dry.
7. Layer the eyes and nose accent (top) layers;
press under weight while they dry.

base stacks; press under weight while they dry.
 9. Position and attach each eye or nose stack into

the matching recess cutout of the front accent panel;
press under weight while they dry.

perforation lines for main panel, sides, bottom 'platform'
compartment, lid flaps and tabs, etc. . . .


11. Bend the lower portion - or baffle- into a tube as shown


 14. Re-fold the lower baffle into a tube, with the support strip

. . . referring to this diagram for the direction of folding
(as 'mountain' or 'valley' folds).

here, below, until the bottom-most segment turns under and
can be attached to the 'floor' of the main compartment --
but WAIT to attach!

12. Prepare the baffle support strip by bending tabs forward,
then alternating the vertical bending at perforations
to form a 'W' (shown inverted here).

13. Position the strip onto the backside of the compartment
panel along the same section that side tabs extend from,
and configure so that the ends at at the corner as shown.

(For understanding, the shaped side tabs will need
to eventually fold inward and tuck next to the strip
and the angled ends will not interfere when configured
this way.)
Glue the strip tabs to the compartment wall to attach.

being enclosed, then . . .


. . . apply adhesive between the main compartment 'floor'
panel and the baffle's top 'flange', and glue together . . .
. . . making sure that the compartment back wall
and that of the baffle are straight, even, with
their planes matched up, so that back panel can be
eventually glued flat along the whole length as one surface.

15. Tuck side tabs in and glue in place.
16. Apply glue to the baffle ends, then bend
compartment side panels into position and
glue to baffle ends - make sure bottom edges
of panel and baffle are squared up and even.

17. Insert the side panel tabs of compartment into
17. Insert the side panel tabs of compartment into
the slots of the inner front pumpkin layer . . .


. . . while also applying adhesive to the front wall
of the lower baffle compartment, then . . .

. . . bend the tabs outward and glue in place.
Also apply pressure where the baffle needs to
attach to pumpkin panel.
18. Position and attach the built-up stack of front panels
onto the front pumpkin inner layer (attached to compartment).

about being able to lift the top flap once the front
and back rigid layers are attached position the tab-ended
strip to the underside of the lid segment of compartment.

20. Position and attach the front/compartment assembly . . . taking care to align the compartment edges
20. Position and attach the front/compartment assembly
onto the inner wall of back stack . . .

and upper corners where the dash cut guide marks
show (on back panel) as well as aligning the bottom
compartment edge with bottom of back panel,
and glue firmly in place.


 . . . tuck the flap into place. Wrap with knotted bow

21. Wrap the fun size candy bars, if desired, in the
wrapper rectangles, wrapping the top and bottom ends . . .

. . . toward the back side, and centering the overlapped seam,
then securing with double-stick tape or adhesive of choice.

22. Insert the wrapped bars into the compartment
with seam to the back (hidden), then . . .

as desired (for images, see Step 27).
Here is the wrapped bars version, completed.


CLEAR WINDOW VERSION
23. For the clear window version, position and attach
the recess version behind the front panel stack,
taking care to align outer cut edges as precisely as possible.
Press flat until liquid adhesive is dried.
(NOTE the window recess and clear panel in the final version
are somewhat shorter than shown here).

24. Apply double-stick narrow adhesive to generous 1/8"
edge margin of clear vinyl panel, then position into recess
and attach in place.

25. Position the front stack with vinyl window layer
onto the front of the compartment-attached layer,
align edges, and attach in place . . .
. . . taking care that teeth edges of all layers
align as well as outer edges.

26. Complete the window version as with open front
version, following Steps 19-21.
27. Fill with loose candy as full as desired, then . . .

. . . tuck the side flaps and lid flap into place.

Here is the completed loose candy version
with clear vinyl window.

MINIATURE TOTE BONUS DESIGN
28. Here are the two shapes used for the mini tote.

29. Prepare the tote compartment shape by bending
back ("mountain" fold) on all panel, bottom flap and
flange perforation lines.
30. Form the shape into a tube to bring straight side edge
to overlap opposite side flange to perforation line
and glue seam.

NOTE that this seam can be pressed flat
to apply pressure along edges to secure.
Unflatten back into tube formation.

31. Bend bottom panel flanges in, then tuck
into the bottom of the tote, and . . .

. . . make sure edges are even with fronts and sides.
Reach fingertips inside to provide press-against
surface to apply pressure to secure seams.

32. Position the face panel over the selected 'front'
tote compartment wall, center and align bottom edges,
then secure in place.

Here is the completed mini tote.

No comments:
Post a Comment