
Paper hexagonal bowl for light duty snack
serving
or seasonal display features fold-in walls and
optional handles panel
overlay to include as two side panels.

Interior walls strengthen while hiding construction,
along with base and wall accents, outer wall offset accents
with swirl cluster decoration that peeks slightly above rim.
Add small stars and flakes, with optional jewels.
Finished bowl measures approx. 2.25” deep
(excluding handles) x 6” x 7”.
NOTE: this design will be released to public availability
in late mid December as part of a designer promotion
for SnapDragon Snippets portfolio in
the Silhouette America online store.
This post is a "place saver".
ASSEMBLY: 1. Identify and cut the shapes:
A hull with handles panel (2)
B hull without handles panel(4)
C bowl base hexagon with tabs
D offset overlay accents for handle panels (2)
E offset overlay accents for plain panels (4)
F interior offset accent panels (6)
G interior offset panel for base
H snow swirl overlays (6)
I snowflakes (18) and J stars (12) to decorate snow swirls

interior portion and side flange tabs back on both
handle and plain panels. Also bend the base panel flanges
forward.
3. Position and attach offset overlay accents
onto the exterior (lower) panels.
 4. Position and attach the interior offset wall accents

onto the interior portion of wall panels and base.
NOTE: for handle panels, the accent panel will be
inserted underneath the handle, onto the handle cutout
and the remainder of the interior panel.
 5. Assemble the snow swirl decorations by placing

and attaching the snowflakes in their silhouette positions.


placed at the top of the exterior panels with side edges
within the side edges of the handle or plain panels as
shown, with the top swirls extending slightly above
the level of the perforation that forms rim.
But for now, DO NOT attach them.

 7. Position and attach the four plain panels in

6. Prepare to assemble the bowl by placing the base
face down then center the bottom edge of the first handle
panel along one perforation of the base, overlapping the tab.
Adjust if necessary, then glue in place.
Next position and attach the second handle panel
on the opposite side of the base panel.

the remaining positions around base.
 8. Bend the first two walls back into position to align

the first side seam, overlapping the plain side edge
over the flange to the perforation line, make sure
that the rim lines match up. Repeat to align, adjust
and join remaining 5 side seams.
 9. Apply adhesive to the interior wall extensions

(four sides), then . . .
 . . . bend each wall inward, until . . .
 . . . the bottom edge seats at the bottom next to the tab


perforation line of the base, overlapping and camouflaging
the interior assembly tabs.
 10. Position and attach the snow swirl decorations

on the exterior of each wall section.
 11. If desired, position and attach small jewels

at the center of each snowflake.
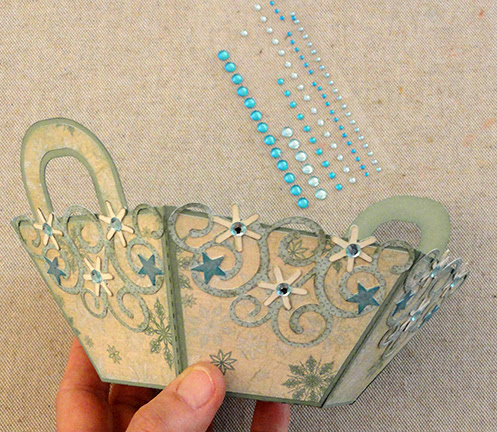
 Here is the completed bowl.


Beautiful Design perfect to give as a gift with sweets.
ReplyDeleteI loved making this bowl. It was so easy to follow your instructions!
ReplyDeleteesta muy hermoso, mil gracias, lo hare y lo disfrutare mucho.
ReplyDeleteThis is beautiful. Nice instructions! Thank you
ReplyDelete