
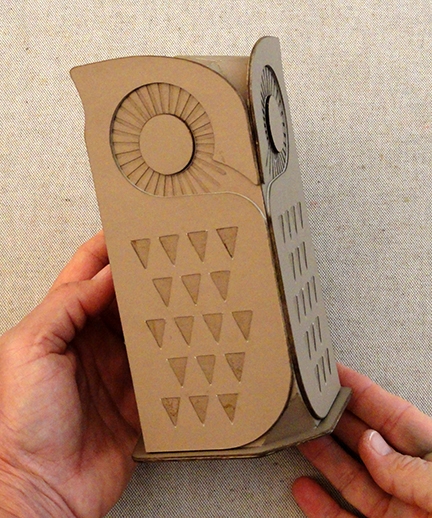
Modernist lines style this owl that is
actually a box,
with thickened platform base interior vessel that
fits snugly
inside bottom of hull to provide strength.
Side fronts are also built-up with
multiple layers

eye
impressions and texturing,
with triangles array suggesting feathers.
Create one for Halloween, or autumn decor, or
snowy owl to peek from
Christmas or winter evergreens.
Measures approx. 7.25” tall with
base 4.75”
wide x 3.375” deep.
A body front hull B body back hull
C & D left and right head front dome shapes
E left & right body front build up layers, 7 total layers ea.:
bottom plain with eye ctr punch;
body eye radiating slots texturing;
body build up layers (4);
body front layer with feather cutouts
F eyes build up layers: bottom with alignment center hole (2);
build up circle whole layers (12)
G BASE (interior vessel) front walls section
H BASE (interior vessel back walls section
I BASE floor J BASE upper opening collar
K BASE build up layers: top layer with guild marks (1);
build up layers (3)
L BASE "foot" build up layers (4)

2. Layer and glue up multiple cut shapes so that the stacks
can begin the drying process while other assembly proceeds:

A) layer the BASE build up stack with the top layer which
includes guide marks for the vessel 'footprint' on top . . .

. . . and 3 other whole shapes positioned and attached
below. NOTE: take care here and throughout the layering
and gluing process to align edges that are intended to match
as precisely as possible.

B) Position and attach the BASE 'foot' shapes.

C) Position and attach the whole shapes stack on top
of the 'foot' stack, aligning outer edges, and gluing
together the 'ring' surfaces that touch.

It is essential when stacking layers and gluing together
with liquid adhesive (suggested here) to press FLAT while
the adhesive is allowed to dry completely - usually
requiring hours - using a heavy flat object such as a large book
or this wood plank, to ensure a completely flat stack,
and avoid warping or curling.

3. Position and stack the whole eye circles into two
eye units of 6 circles each; press under weight until dry.
NOTE: the eye circle with center hole should remain
UNATTACHED at this point; it will be used to help
center and position the eye stacks later in assembly.

4. If selected card stock is a single color throughout as
is the case with the sample project, it may be worthwhile
to enhance the contrast at eye slot texturing and feathers
to highlight the areas that will be attached under those cutouts
prior to layering and attaching. Be sure to allow liquid
ink used to provide contrast to dry thoroughly prior to gluing up.

5. (The following right front stack does not show the highlighting
described in step 4).
Position and attach the eye slot textured body over the top
of the plain base shape (includes eye center hole only),
taking care to align all outer edges as precisely as possible.
Press under flat weight until dry.

6. Position and attach the middle layers in the same manner.
Press under flat weight until dry.

7. Position and attach the top 'feathers' layer onto
the middle layers stack (from step 6 above),
matching all outer edges.
Press under flat weight until dry.

8. Position and attach the middle/top layers stack
onto front of the back layer/eye texture layers
and align all outer edges as precisely as possible.
Press under flat weight until dry.

9. Repeat Steps 4-8 for the left front stack layers.
10. Position the eye base shape that includes the center
hole over the corresponding hole in the eye texture/
base layer, and attach in place.

11. Position the eye stack over the bottom layer eye circle
and align outer edges precisely; glue in place.
Repeat for both front assemblies.

12. Prepare the back hull shape by bending back
on ALL perforations for vertical rectangle panels,
top wedge sections, side flanges and tabs and
wedge tabs. Take care to bend and pinch the wedge tabs
back to the very tip of the seam.

13. Begin to join the top wedge seams by bending
the first segments back slightly to align the straight edge
of one side of seam over the adjacent wedge tab to
perforation line and glue the seam.

14. Continue with the same seam, bending the top portions
of the adjacent wedges back to align the edge over
adjacent tab to perforation line.

15. Work in the same manner to complete the two parts
of each of the remaining two seams.

16. Prepare the left and right front head dome sections
by bending back on all the perforation lines for sections
and tabs, except bend the bottom center front tab forward.

17. Begin to join the center front head seam by overlapping
the straight edge across lower tab to perforation line,
adjust for alignment for tip of seam and inward end,
then join the seam. Next . . .

. . . pivot the seam to complete the upper half,
encouraging the top head edges to align.

18. Position the front head dome straight edge along
the front edge tabs of the back hull, align centers . . .
. . then overlap straight front edge across tab to
perforation line, and join first one half, then
repeat for the opposite half. Finally . . .

. . complete the outer portions of the seam on each half.

19. Prepare the front hull by bending back along perforation lines.
Identify the small cutout symbols along
top long edge that correspond to symbols in tabs
along lower edge of front dome sections.

20. Bend along lines to align the angle panel
straight edge along the triangle panel tab and join seam.

21. Fit the front body edges over the peak edges
as shown and glue the first portion of arch seam
in place on each side of center.

Continue along each arch to align and join middle
segment and side segment on each side.

Finally, position and join the long front-to-back seams,
aligning bottom straight hull edges.
It may be helpful to invert the long edges on a flat surface
and insert finger into hull interior to apply pressure
along the seam until fully joined.

22. Position one of the built-up panel assemblies
over the front hull panel, aligning . . .

. . . the bottom, back and front straight edges,
then glue in place. NOTE: it may be helpful to use
a strong, quick-grab glue such as Fabri-tack.
Apply pressure to help the panel attach thoroughly
in place all around. Repeat for the other side.

23. Prepare the front and back interior (BASE) vessel
by bending back on all vertical panel perforations,
side flange tabs and bottom tabs.

24. Prepare the vessel collar by bending the edge flanges
forward.

25. Position and join the first side seam, then . . .

. . . then form the panel into a tube to align and join
the other side seam.

26. Bend the bottom tabs inward then apply glue to
the underside.

From the top of the tube, orient and then . . .

. . . insert the floor panel into the interior and . . .

. . . press down all around so that tabs attach
completely and securely.

27. Apply quick-grab adhesive to the bottom of the vessel
floor panel/tabs, then position on top of the base built-up
panel with corners aligned at guide marks on top layer.
Apply pressure - including from inside the vessl -
until firmly attached.

28. Apply glue to the outer surface of the collar's flanges,
then orient and . . .

. . . slip into the top opening of the vessel . . .

. . . until straight top flange edges align at vessel
top edges, and apply fingertip pressure to attach all around.
The collar will provide strength to the middle portion
of the owl form once it is inserted inside upper hull.
NOTE: if you prefer to use the owl form as a gift box,
that requires more room to accept contents,
allow the glue to dry thoroughly and harden, then
carefully trim away the "bridges" leaving the narrow margin
in place all around.

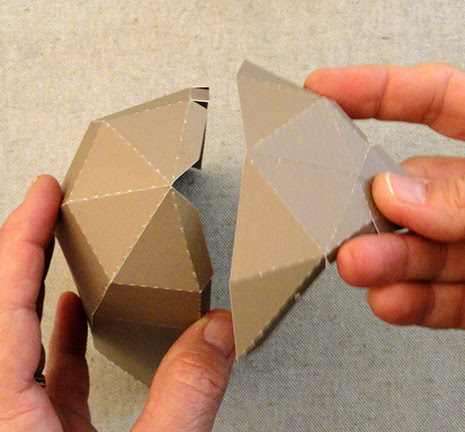
29. To close the box, align and insert the BASE
into the bottom of the hull . . .

. . . then push gently up into position until hull bottom edges
rest against the buildup rim.

Here is the completed form.


hi!!! I love your designs. Thanks for this tutorial. I don't know how to write to you privately.
ReplyDeleteI want to make a 3D shelf ladder, but I don't know where to start. I will give you the link to my Drive, where there are some photos that inspire me, but I don't know how to trace the staircase, can you do something similar? I will look forward to the design in the Silhouette Design Store.
https://drive.google.com/drive/folders/14G3vBB9RCLDnWegC8P3bvRPA2_m4O17N?usp=sharing
You can contact me (Jodi Warner) directly at hearthsewnpatterns@yahoo.com
ReplyDeleteIs this all cut from cardstock?
ReplyDeleteYes. Textured cardstock like Bazille or other good quality padded card stock.
Delete