
Pattern
play is on full display with this simple concept card.
Choose 14 “scraps” to
cut the double-pointed tabs
which align along the vertical center of card.

Fold
and “real” stitch by hand with twine or perle cotton
the pleated “ribbon” accent
that covers the seam.
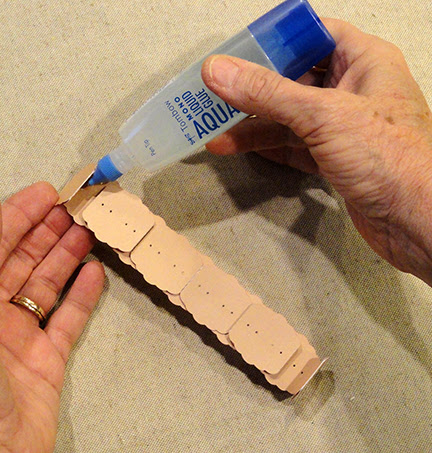
(Or glue alternate version.)
Add word cutouts “love” and “YOU”
plus
add purchased or paper stacked “buttons” as finishing touches.
Card
measures approx. 5x7 when side folded.
ASSEMBLY: 1. Identify and cut the shapes:
A card base with vertical perforation fold
B card front panel
C pleated "lace" shapes to join into single length
(NOTE: lace color was changed for final card model)
D 14 half tabs of varied, coordinated pairs widths/lengths
in a variety of harmonious prints and solids
E "love" word cut shapes for layered build up (2-3)
F "YOU" word cut shapes for layered build up (3-4)
G two sets of heart "button" accents, to layer
for build up (2 pairs of 4 shapes each)

2. Stack and glue together the built-up shapes
so they can dry/cure while other assembly progresses.
Take care to line up all cut edges as precisely as possible.
heart buttons: align and glue together 4 shapes
love: align and glue together 2-3 shapes
YOU: align and glue together 3-4 shapes

To assist the stacked and glued shapes, press under
a flat, heavy object such as a book or this fabric-covered
re-purposed free weight, until completely dried
(up to a few hours).

3. Identify the perforation guide marks cut into
the front panel to assist with tab array assembly.
Center guide mark will help with end-to-end placement.
Bottom guide mark will assist bottom tabs lower edge placement.

4. Position one of the bottom tabs at lower and
center guide marks, and attach, then . . .

. . . position and attach the opposite of the bottom pair,
taking care that ends abut snugly, and bottom edges align.

5. Continue to assemble the tabs, placing snugly
into positions abutting previously placed tabs.
NOTE: for some prints, it may be desirable to cut
a template and "fussy cut" the shape to capture
the desired portion of the print. Take care that
any tracing lines are CUT OFF to avoid expansion
of the stacks and misalignment at top panel margin.
In these cases, it may be helpful to "dry fit" the tabs
to see where top edge falls, and trim slightly as needed.

6. To prepare the stitched "lace" center accent,
follow these steps:
A) prepare the two lengths by bending at perforation lines
in a box pleating arrangement, beginning with the perfs
near one rounded-end (face up) to bend first line as "valley"
fold, then second as "mountain" fold.

B) Create the double box fold arrangement by bending
the third line as "mountain" fold and the fourth line
as "valley" fold, etc.

C) Continue in same sequence to create the double
box pleating where narrow segments bridge between
wider segments . . .

. . . with pleats abutting at front and back.
D) Complete pleat folding along both shapes,
including the tab fold ("valley") on connecting end
of shorter length.

7. Position and attach middle seam of lace,
with straight end edge of long shape overlapping
the tab to perforation line, then . . .

. . . re-bend in pleating sequence at seam.

(Here you can see the pleating continue across seam joint.)

8. Apply a little glue along the center - on each side
of the stitching holes - between the layers that will be
invisible when the lace is folded. And then . . .

. . . reverse the assembly and repeat for the underside
at along the center in the same manner.
Here is the completed lace panel, with the rounded
ends as bottom layer, under the long segment.

9. To complete the stitching, cut a length of twine or
perle cotton and thread onto the finest darning needle
possible (approx. no. 24). Anchor the non-needle end
of twine near the first stitch hole using a small piece of
cello tape.

Insert needle front to back, through the first hole
- through all layers - and draw twine through to front,
pulling us slack (here and throughout).

On front, insert needle through all layers, push through,
and draw twine through.

Continue the back to front alternating stitch through
holes in sequence across the length.

At opposite end, when twine is pulled through to back fully,
trim excess twine leaving a 1/2" tail.
Anchor tail end near final stitch hole with small piece
of cello tape.

10. Position the completed lace assembly down
center of tabs to hide the "seam", and attach center.

Here is the completed card.

No comments:
Post a Comment