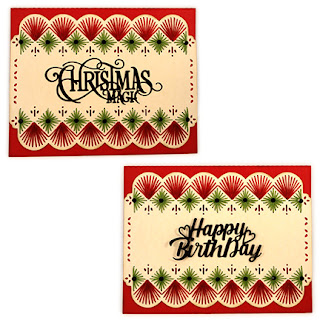
Hand-stitches
give this card its unique pizzazz.
Top-fold card features a hole-punched panel
to stitch
geometric square & fan borders at upper, lower shaped edges.
Stitching holes allow for 3-ply floss stitches to be added,
then panel is
mounted on front of card.
Center other designs or greeting words in the open
center area,
such as “Christmas Magic” or “Happy Birthday” flourish
welded words
(separate designs).
Change color combination and added embellishments
to use
this card for varied occasions.
Card measures approx. 5.5”x7” when folded
(slightly larger than a standard A7 card;
use the specially sized envelope
design
“Env Scalloped Flap Oversized A7” separate design).
ASSEMBLY: 1. Identify and cut the shapes:
A stitching panel (2 for thickness & strength)
B care base
C optional word cut center sentiment
D embroidery 6-ply floss in 2 coordinated colors
2. Prepare the stitching hole punched shapes by
using a tool (such as this un-bent paper clip)
to push through all "chad" cut outs that may still
be attached or in pre-cut positions. Brush off
all "crumbs" possible. (Image from a different project.)
so that all the stitching holes align as exactly
as possible. Use the punch-out tool to help with alignment,
if necessary, then attach layers in place.
4. To assist the shapes to attach well and remain flat
and not warp or curl during the liquid adhesive
drying process, press flat on a flat work surface using
a heavy flat weigh such as this large, thick book volume,
possibly with something heavy on top.
(Shown with a shape from different project.)
5. Select the 6-ply embroidery floss color for the fans
and squares motifs. Shown are the two used in
sample project. Cut lengths of 20-24" long.
Then separate out three plies and line up the lead ends,
straighten out the lengths so there will be no tangling.
7. Insert needle UP through fan center bottom hole,
and pull through completely, leaving no slack.
8. Insert needle DOWN through left end hole at
arc of fan. (NOTE this image shows stitch made at
right side of fan - begin at left end for better continuity.)
Pull through completely, leaving no slack (here
and throughout process).
9. Continue working in the same manner across fan
motif, inserting needle and floss UP through center
bottom hole and DOWN at next open stitching hole,
until fan stitches are complete.
10. Though only one motif is shown in following image,
stitching would continue to next fan motif, where
the bottom-most long stitches of adjacent fans
share the same stitching hole.
As stitching continues, the floss on needle will get
used up. Prior to "tying off", end with the needle and floss
on backside. Use a small piece of cello tape to anchor
trimmed end in a convenient place near last stitch.
Then re-thread needle as previously described and
anchor ends near where stitching will re-start.
11. Follow the same starting procedure to stitch
contrast half & full square motifs. When one motif is
completed, move to the adjacent motif. Tie off and on
as needed.
12. When stitching is complete, apply a good adhesive
such as Fabri-Tack to backside of stitched panel
then position, centered from top to bottom of card front,
and with side edges of panel and card front,
and attach in place.
13. Finish the card by placing and attaching a sentiment
shape, such as "Christmas Magic". . .
. . . or "Happy Birthday" at stitching panel center.
Here is one version of the finished card, with black
jewels placed at centers of square stitch motifs.
Since this card is slightly oversized from typical A7
card, a custom "oversized" envelope is available
that coordinates.


No comments:
Post a Comment