
Ten
stitched partial or complete “wheel” motifs in four rows
create the Christmas
tree silhouette with simple cross-stitched trunk.
Stitching holes allow for
3-ply floss stitches to be added
as “spokes” through center holes.

Optionally
add colored jewels or studs to cover centers.
“Print & cut” front panel includes printed words “MERRY CHRISTMAS”
across bottom. Middle overlay creates a narrow contrast border.
Card measures
approx. 4.63” wide x 6.25” tall when folded.
Pattern and quantity of stitches
is simple enough
for children to help stitch.
ASSEMBLY: 1. Identify and cut the shapes:
A side fold card base
B offset accent panel
C front "print & cut" front panel with stitching holes
D tree shape with star overlay

2. Follow basic "print & cut" instructions to prepare
and print the white cardstock panel page, then . . .

. . . position the page on the cutting sheet . . .

 4. Position and attach the star overlay.
 5. Position and carefully align the tree shape

. . . and cut the front panel shape with the "MERRY
CHRISTMAS' printed words.
3. Prepare the stitching hole punched shapes by
using a tool (such as this un-bent paper clip)
to push through all "chad" cut outs that may still
be attached or in pre-cut positions. Brush off
all "crumbs" possible.


on the front of front panel so that all the stitching holes
align as exactly as possible. Use the punch-out tool
to help with alignment, if necessary, then attach in place.
 To assist the shapes to attach well and remain flat

and not warp or curl during the liquid adhesive
drying process, press flat on a flat work surface using
a heavy flat weigh such as this large, thick book volume,
possibly with something heavy on top.
 6. Select the 6-ply embroidery floss color for the wheel

tree accents.
 Then separate out three plies and line up the lead ends,

straighten out the lengths so there will be no tangling.

Thread lead ends through eye of blunt-tip tapestry
needle size 24 or equivalent.

sample project begins at top wheel.
Use a small strip of cello tape to secure the tail ends
near beginning point.
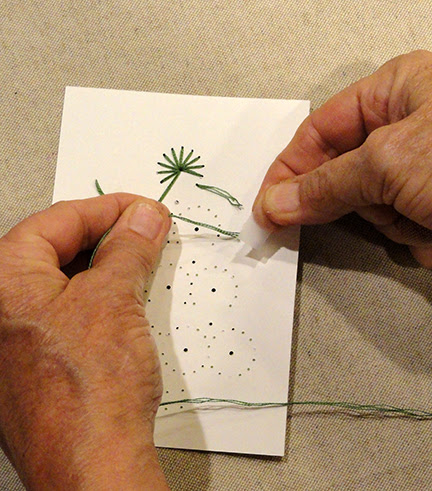
 8. Insert the needle through the first hole to begin

the first wheel unit. Suggested starting point is
top wheel lower left outer hole.
Pull thread all the way through
leaving no slack.
 9. Insert needle down through center wheel hole.
 10. Continue the stitching UP through the next up adjacent


stitching hole, and down through the center hole,
and repeat until all stitches in top wheel are complete,
as shown here. Thread ends on backside.
 11. Move downward to the closest unstitched wheel

and continue to stitch. When floss length is completely
used, finish with needle on backside, trim ends to
.75"-1" and secure with small cello tape strip.
 12. Re thread another set of 3 strands of floss,

and tape ends near re-start position.

that are shared by the adjacent wheels
on second, third and fourth rows.
 15. As stitching is completed to mid-point of

bottom row, move down to complete the trunk
cross stitches: first complete the slant stitches
in one direction across top row, then work back
across row to complete the slant stitches of same row.


and floss on the backside, tape off and trim floss.
 17. Position and attach stitched panel securely

on accent panel with narrow margin exposed
all around.
 18. Position and attach the front panel assembly

onto the front panel of card base with even margin
exposed all around.


No comments:
Post a Comment