Classic fir tree shape shape is composed of patchwork sections
and trunk of closely-spaced straight stitches.
Use three holiday colors of perle cotton no. 5 (or 6-ply floss)
and
darning needle to make the stitches,
then mount on front of card base for 5x7
card.
(Or be creative and select preferred colors.)
Also included is an up-arch
two-part banner.
Employ “print & cut” features to create
the “merry
christmas” banner’s front panel.
(Plain banner shape also included for
customizing with
stamp or hand-penned sentiment.)
(This tutorial is under construction.
Please return soon to view the complete
stitching and assembly guide.)
ASSEMBLY: 1. Identify and cut the shapes:
A front panel with stitching holes
(2 to glue in a stack for strength)
B card base, side fold
C star accent
D banner front panel (print & cut "merry christmas" shown)
E banner base with double point ends
Also shown is 3 selected colors of DMC no. 5 perle cotton:
off white, red 666 and green 702

using the tapestry needle that will complete the stitching,
or a "tool" formed from an un-bent standard paper clip.

then position it over top of second front panel,
taking care the align outer cut edges as precisely
as possible, and also . . .
 . . . using the paperclip tool to push through

randomly-selected holes in critical places in
the pattern to ensure that the stitching holes align.
 Immediately place the glued-up stack under a heavy

flat object such as this thick book volume, with something
heavy on top.
 4. Obtain tapestry needle size 24 (or the finest blunt end

needle that can be threaded with the no. 5 perle cotton.
Allow the panels to be pressed for several hours or
overnight, to help prevent warping or curling of shapes
glued together with liquid adhesive.
Cut a length (36-38 inches) of green perle cotton and
thread needle, leaving a several-inches long tail
at end threaded through eye.
 5. For demonstration purposes, this sample project

will begin stitching at lower left hole.
 Reverse the panels and attach the long tail to

the backside near to the beginning hole.
(This is the "tying on" process.)
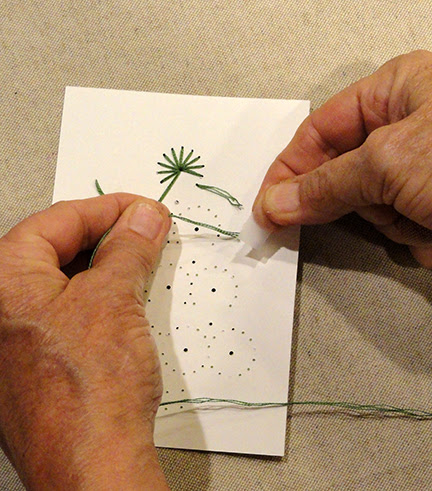
 6. Insert the needle from back to front through

first hole . . .
 . . . and draw through fully to the front, allowing

the tape anchor to hold tail in place on backside.
6. Move up across the section (refer to the thumbnail
at the beginning of this post to see the direction of
the straight stitches of this section), then insert needle
into first available hole. Pull needle and yarn fully through
to create the first "long" straight stitch.
 7. To reduce backside bulk and economize on thread,

insert needle into the next neighboring hole that
completed previous straight stitch, and pull thread through.
8. Move across section again to insert needle in hole
next to first insertion hole to complete straight stitch #2.
 9. Continue in the same manner to create the long

straight stitches on front side of panel, with short
"connector" stitches . . .


10. When the first section is completed, string
the needle and thread across and upward to insert
needle in lower left "first" hole, to begin the next
section which uses the same color.

hole in the sequence along the opposite side of
section to create the first long straight stitch
of this section.

straight stitches in the sequence.
 13. When the thread in the needle is used up,

at a time when there remains a convenient length
anchor a tail. Remove needle from thread, trim excess
away to leave approx. 1/2" final tail, then anchor
to panel's backside with a small piece of cello tape.
 14. Continue to complete sections, moving

to next closest section, until all same-color
sections are complete. Anchor off as described
in Step 13 when sections are completed.
Here is the panel with
green straight stitches in place.
 15. Here is the panel with

 18. Position and attach the card panel onto

green and red straight stitch sections in place.

Refer the image in Step 17 to see
all straight stitch sections in place.
16. Use print & cut tools and procedures to complete
and cut the banner front shape with "merry christmas"
printed on selected white or offwhite card stock.
Position banner front onto banner base, aligning cut
edges that match up.

17. Position and attach the star accent above the stitches
"point" of tree. Position and attach banner with
punch holes aligning with matching holes in panel.

front of folded card base.
 Here is the completed card.