Simple concept and quick prep create any of these
stylized leaves for seasonal table setting accent,
as part of a napkin ring sprig, to decorate a gift package,
or as a pick for floral arrangement.
The left two leaves begin as “engineered” triangles
which are fan-folded, then center edges are brought together
and
joined to create a plain or serrated edge oval leaf.
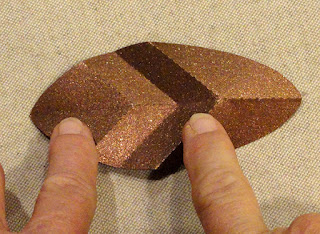
The right pair have center perforated folds, plus three angled fold
lines
on each half create a “low relief” dimensional,
plain or serrated edge oval leaf.
For all, a small base end “backer” shape
assists with
glue-attaching a wrapped heavy gauge floral wire.
Leaves measures
approx. 4.125” tall at center x 2” wide.
Fan fold leaves are approx. .5" deep.
Mix and match any of the folded leaves in this collection.
ASSEMBLY: 1. Identify and cut the shapes:
A fan fold plain edge main shape
B bottom end base backer
C fan serrated edge main shape
D bottom end base backer
E sculpt fold plain edge main shape
F bottom end base backer
G sculpt fold serrated edge main shape
H bottom end base backer
Also prepare a 3" heavy gauge stem.
(Sample stems are silver wire wrapped with
brown florist tape.)
For reference, the metallic decorative papers used
in the models shown here were purchased at
Hobby Lobby, as shown below. NOTE that they
are lighter weight than regular cardstock,
somewhat lighter than 65 lb. which makes the folding
and shaping easier.
* * * The fan fold style will be explained first.
Sculpt fold style begins in step 7 ***
FAN FOLD LEAVES
2. Begin at the straight wide edge to bend back
the edge flanges. Then . . .
. . . bend the top section forward in fan folding action.3. Continue to alternate back folding with forward
folding through the remaining perf line sequence.
Set the creases by pressing firmly and thoroughly
that are stacked to bring the top edge flanges
glue shown here along one of the flanges, then . . .
. . . bend then together to fully touch and join.
. . . bend then together to fully touch and join.
Use fingertips along the full length of the seam,
with special care at the tip to hold in place until
fully joined.
5. At the base tip, the split will allow the dimensional
transition to happen with less stress at the first folds.
However, pulling the split edges together as muchas possible will also help with create
the characteristic leaf shape.
Turn the leaf face side down, then apply quick-grab
glue to the bottom segment halves fully to
bottom edge. Then immediately . . .
. . . place the reversed backer shape (bent on line)
face-together behind the leaf. Line up the bottom edges
of both, working to ease the split center edges to come
together as closely as possible. This easing together
will force the first couple of folds to arch, which is
the desired effect, but the dimensional shape
will resist.
. . . insert the prepared 3" wire stem through the
bottom hole that is above the bottom segment
and slide through so that approx. 1" is behind leaf.
Immediately spread the lower folds outward to
slightly expand and amplify the leaf roundness,
while also securing the stem in place.
Here is the completed plain edge fan fold leaf
as part of a napkin ring sprig.
Shown here is the serrated fan fold leaf.
SCULPT FOLD LEAVES
7. For understanding about the simple folding used
to create this low-dimension leaf,
become familiar with the direction of
the folds at the cut perforation lines shown here.
8. Begin by bending and folding the center lengthwise
fold as a "mountain" fold, folding sides back. Crease
9. Next, begin at the top of the leaf to bend on
top-most diagonal line on each side to bend along . . .
. . . the perf line as "mountain" fold, ending the crease
at the center line - NOT beyond!
10. Repeat for the second pair of diagonal lines,
except bend the lines as "valley" folds.
11. Repeat the bending and creasing for the bottom
pair of diagonal lines, creasing as "mountain" folds.
12. The center perf line will need to be re-bent as
"valley" folds - sometimes this happens almost
automatically while the diagonal bending and creasing
is being accomplished. If not, carefully work these
segments to re-bend as described.
Help to lock in the bends by accordion-condensing
the shape as shown here, until . . .
. . . the leaf is configured as shown here.
Lock in ALL creases by pressing firmly
on fold edges. Then . . .
. . . unfold to present the sculpt folded leaf.
13. Prepare the backer by bending as "mountain" fold.
This is a preview of where the backer shape will go
This is a preview of where the backer shape will go
position top 1" or so of wrapped stem in place
where adhesive has been applied, and hold to secure.
Add glue to backside edges of backer, then position
Add glue to backside edges of backer, then position
to enclose stem, with bottom edges matched . . .


I tried to finish the first leaf, but it doesn't make sense why that little piece has a folding line while it stays flat (isn't it?). Love the paper you used!
ReplyDeleteI can see your point. Just consider it a center alignment line.
Delete