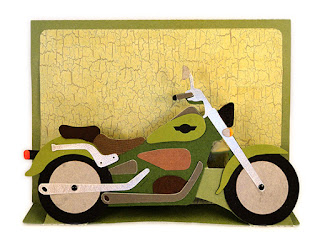
A7 card features stylized, detailed motorcycle
2D figure
attached to a pop-forward “box” which holds it
in front of top-folded
card base.
For display, “pop” out the motorcycle,
then fold flat
for insertion in standard size
envelope for 5x7 card.
Embellish front panel behind
cycle with
coordinated “Banner Enjoy the Ride with Dad Tag”
separate designs if
desired.
Companion envelope available:
“Env Motorcycle Cut Out Flap” separate
design.
ASSEMBLY: 1. Identify and cut the shapes:
A 5x7 top-fold card base with tab slot
B front panel overlay with tab slot
(NOTE that bottom straight edge is NOT offset,
but rather aligns flush with bottom card base edge.)
C pop-out "box" panel to attach to lower front of base
D motorcycle silhouette
E rear wheel assembly (tire, hub, fender, up-pipe)
F front wheel assembly (tire, hub, fender)
G gas tank ( main tank plus contrast underlay)
H seat assembly (seat base plus rear seat overlay)
I handle bar with mirror stem, mirror overlay)
J headlamp, blinker lamp and yellow bulb
K front wheel "fork"
L handle bar grip base tip and overlay
M tail light stem and tip overlay
N body accents (2 shapes)
O exhaust pipe
P muffler pipe and muffler box base
2. Prepare the card base by bending across perf line
as "mountain" fold, then positioning and attaching
the front accent panel onto front of base, with offset
margins at sides and top, bottom straight edges flush.
Take care that slot openings align as precisely as possible.
3. Prepare the "box" extension by bending back on
all perforations for upper tab, top platform, front
shaped panel (where cycle assembly will attach)
bottom "floor" platform and bottom tab.
4. At bottom front of card base assembly, with "box"
face down, align straight edge along bottom platform
perforation bend, side ends even, with "box" tab
on the inside of card. Adjust so that card edge is
snuggly into bend/fold, then attach securely.
5. Rotate top tab upward to insert into front panel slot . . .
. . . and push tab inward so that slot edge and tab
perforation align. Bend tab up and attach in place
to backside of card base front panel.
Here you can see the pop-out "box" in its open
position.
To prepare for giving or sending as a flat card,
push/press the "box" upward.
6. Prepare the detailed units of the design, shown
in arrangements ready to assemble.
NOTE that the gas tank top (gray) layer was
eliminated in the final cut file design.
A) overlay gas tank front onto contrast underlay;
B) overlay blinker light over bulb base;
C) overlay mirror at top of handlebar array base;
D) overlay tail light lamp at end of stem;
E) overlay handle bar over "tip" base;
F) overlay back seat shape onto seat base.
7. Prepare wheel and muffler unit assemblies:
G) muffler "pipe" onto base;
H) hubs onto back and front wheel bases, using
center holes as alignment guides;
I) back and front fenders onto wheel assemblies;
J) up pipe onto back wheel fender, using double
punch holes as alignment guides.
7. Prepare to position and attach units onto
silhouette body base, often where edges
will act as positioning guides:
a) wheels onto front and back lower edge;
b) gas tank; c) handle bar stem with mirror;
c) seat; d) tail light & stem; e) handle bar;
f) front wheel fork using wheel punch as bottom guide;
g) head lamp; h) blinker light;
i) muffler unit (somewhat echoing lower body angles)
j) exhaust pipe (punch hole not visible here will
align with back wheel center hole as guide, plus
parallel with muffler "pipe")
k) body accent shapes (rear center shape back edge
will align flush with rear tire edge).
Here, below, is the fully assembled motorcycle unit.
8. Prepare to position and attach the unit assembly
by "auditioning" placement on "box" front, to check
to what level the two will connect.
Apply adhesive ONLY where the two surfaces meet.
Position and attach unit to box . . .
. . . using box front panel shape to align wheel
and lower body edge. Use a heavy flat weight
placed on top of flattened card to help secure
the motorcycle assembly to box front, until dry.
OPTIONAL BANNER AND TAG ASSEMBLY
9. Use the positioning guide cut shape placed along
the bottom of the front arch shape . . .
. . . to position the large word cut out lower edges
will show, adding adhesive to word backsides
and attaching in place to banner. (NOTE take care
not to attach words to guide).
Remove guide.
10. Position "the" between the two words on an angle.
11. Position and attach the front arch assembly onto
the base arch, with narrow offset margin all around.
12. Position and attach arch to "background" panel
behind motorcycle, centered side to side, and
approx. 1/4" margin between arch top center and
top of front accent panel.
13. If desired, assemble the "Dad" oval tag by
centering shapes on oval base and tying with twine.
Position and attach as desired.
14. "Pop" the motorcycle forward for display, or . . .
. . . flatten by pushing upward (so that card silhouette
remains at 5x7) for inserting in envelope.
Ready for giving or sending.


I buy this but I miss the 3th part of the tank in the files. The most bottom one
ReplyDeleteIf you can email me at hearthsewnpatterns@yahoo.com and help me understand which shape you are missing, I can try to correct that for you.
DeleteWhere do I purchase the Enjoy the Ride & Envelope file?
ReplyDeleteThrough the Silhouette America online store.
Delete