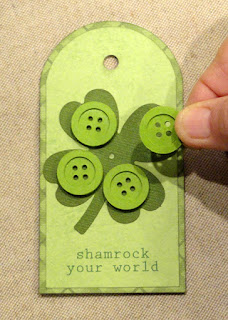
with back base that bends away below
punch hole
to provide concealed sentiment or greeting area.
On front, offset
accent overlay holds four-leaf shamrock
decorated with 4 layered-for-thickness
buttons.
A center punch hole can accept a jumbo (18mm)
decorative brad if
available, or stack and attach
a paper disc, if desired.
Optional “print &
cut” front accent panel which
includes phrase “shamrock your world”
can be
substituted.
Add ribbon loop accent, then attach to gift or treat
for St.
Patrick’s Day fun.
Tag measures approx. 4.5” tall x 2.35” wide
when fully assembled
and closed
(a standard plastic gift card can be attached
inside or to back).
ASSEMBLY: 1. Identify and cut the shapes:
A tag front B tag back with upper perforation
C tag front accent, with opt. "print & cut" phrase
D shamrock
E discs to layer as substitute for brad
F button rim rings (4 sets of 3)
G button body discs (4 sets of 4)
tools and procedures to set up the tag front accent
which includes the "shamrock your world" phrase . . .
. . . then lift the printed and cut accent from mat.
3. If using paper disc cutouts in place of jumbo brad,
. . . then lift the printed and cut accent from mat.
3. If using paper disc cutouts in place of jumbo brad,
layer and attach into a stack, taking care to align
all outer cut edges as precisely as possible. Then . . .
. . . place under a heavy flat weight such as this
. . . place under a heavy flat weight such as this
fabric covered re-purposed free weight bar and leave
in place until stack is completely dried, for several
hours or over night. Pressing in this manner will help
prevent warping or curling of layered shapes glued
together with liquid adhesive.
. . . also the button bodies, stacking and gluing
the prescribed or desired quantity of shapes,
and then pressing until thoroughly dried.
NOTE that it may be helpful to use a pointy tool such as
this stylus to clear out all interior openings of the stack
or of individual layers.
5. Layer the rim ring stack onto the front of
the button body stack, and attaching together,
taking care that outer cut edges are aligned
all around.
Repeat until there are 4 complete buttons.
6. Prepare the tag front by centering and attaching
the accent shape over the front tag shape,
taking care to align the ribbon hole precisely,
and making sure that there is an even, narrow
offset margin all around accent shape edges.
Press under flat weight until dried.
7. Use the middle punch hole to align the center
of the shamrock shape, then rotate the shamrock
slightly so that leaf edges overhang accent
panel edges a tiny bit at sides, then . . .
. . . glue in place.
8. Bend the top portion of the tag back base forward,
then apply glue above the perforation.
Reverse the front tag to be face down, then
position the backside of tag rounded upper portion
over the matching portion of tag, adjust so that
cut edges align, then . . .
. . . attach together. Press until dried.
Here you can see how the tag is intended
to look, with a hinging action where back panel
can bend away from front tag.
9. Position the four prepared button stacks onto
the leaves of the shamrock so that they are
equi-distant from the center alignment hole,
centered more or less within the leaf,
and attach in place.
10. Position the substitute disc stack
at center of buttons so that it overlaps
them in a balanced or even way,
then glue in place.
To help the discs look more like a brad,
consider using Nuco Chrystal Glaze
liquid on the disc front, then allow to dry.
(Otherwise, use the jumbo brad to
insert through front tag only layers
at the positioning guide hole.)
To help the discs look more like a brad,
consider using Nuco Chrystal Glaze
liquid on the disc front, then allow to dry.


No comments:
Post a Comment