
Cut your card stock weight paper to create
separate chunky components
for head, body, ears, feet,
nose and tummy. Assemble these together to build
this whimsical shelf-sitting critter to add to your spring
and Easter decor. Components
are composed of
LID and BASE halves that fit and are glued snuggly
together to
resemble cut wood shapes.

Nose and tummy are one sided and tab-fit inside
cut
outs on lid “faceplate” overlay shapes.
Curved edges are created by fitting
shaped panel inside
its corresponding boxing shape, with a “cosmetic” overlay
panel to conceal assembly tabs. This double-wall
construction makes the bunny
extra strong for
repeat display for many seasons.
Position and attach forms
together, body and head
stacked with square post (wrapped 1/4” dowel)
inserted
for strength & stability.

Place metal washers or pellet weights inside body
box
for extra stability. Add a bow around its neck,
and before long, this
playful bunny will spread cheer.
Figure measures approx. 8.75” wide x
10.5”
tall (including ears) x 2.5” deep when
fully assembled.
(Requires 12x12 cutting
mat and card stock
for longest shapes; when cut as sample is colored,
main structures use
all or parts of (6) 12x12 sheets.)
ASSEMBLY: 1. Identify and cut the shapes:
(each page of shapes has it's own letters for ID)
A head LID front panel B head LID front overlay
C two-part head LID boxing strip
D head BASE back panel E head BASE overlay
F two-part head BASE boxing strip
G top-of-head post opening cover patch
H face features: eyes overlays, pupil inlays,
eyebrow overlays
I nose bump-out front panel, boxing strip, overlay
J collar stack for head BASE bottom post opening
J post collar stacks for body (2 sets)
K square post
L body LID front panel M body LID overlay
N body LID two-part boxing strips
(with body BASE two-part boxing strips below)
O body BASE back panel P body BASE overlay
Q tummy bump-out front panel R tummy boxing
S tummy bottom boxing strip T tummy front panel

C right ear LID boxing strip
D right ear BASE back panel
E right ear BASE overlay F front panel accent
G right ear BASE boxing strip
H & M ear interior support triangle strip
I left ear LID front panel J left ear LID overlay
K front panel accent L left ear LID boxing strip
N left ear BASE back panel
O left ear BASE overlay
P left ear BASE boxing strip

A front LID panel B LID boxing strip
C LID overlay panel with pad cut outs
D accent shapes to fill in cut outs
E BASE back overlay
F BASE back panel
G boxing strip H interior support strip
 A Head interior support box

B Body interior support box
 2. To aid with assembly, get to know the symbols system.

For instance, head boxing strips shown here include
the circle (cut out) symbol showing which boxing strips
should be joined to complete the head boxing.
These are often located at the end boxing tab,
and in the closest top/bottom flange or tab of
the opposite strip to be joined.
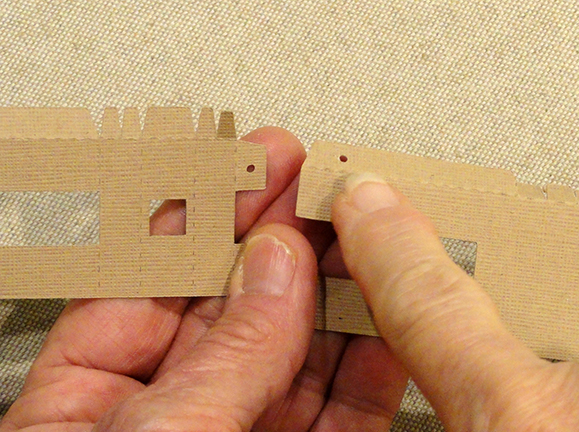
Single symbols show the strips will join to
the LID; double symbols indicate BASE strips.

3. As more preliminary information, NOTE that
boxes for head, body, ears, paws are composed of
LID and BASE. LID assembly for any of these includes
the front panel to which boxing is attached,
plus an overlay which often includes cut outs for
nose (as shown here) or tummy.

BASE includes back panel to which boxing is
attached (this head panel includes the one "bite"
half-circle cut out along bottom edge) and a cut-in
letter such as the 'B' indicating this is BASE.
The BASE back overlay has no identifying marks
since any would show in the finished surface.

4. Preliminary prep: prepare the 3 or 4 center
post collar stacks that will help stabilize the head
and body by stacking and gluing together 4 collar
shapes, taking care that interior square window
edges align as precisely as possible.

Press each stack under a heavy flat weight
until completely dry, for a minimum of several
hours or overnight.

HEAD
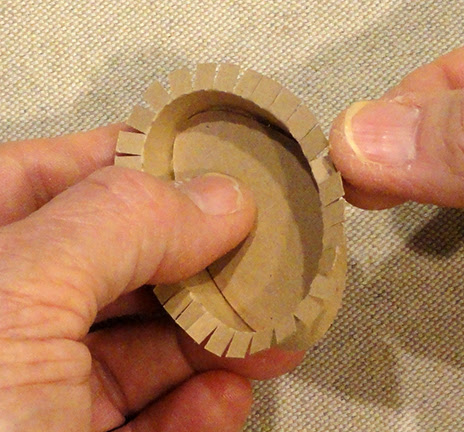
5. Prepare the head LID boxing strips by adding
back curl to the multi-tab section which indicates
the boxing will follow the curve of the head panel.
Use a narrow dowel or the barrel of a standard
round pen as shown, drawn along the backside
of strip with thumb pressure, similar to curling ribbon.
Make a couple of passes to replicate the curved shape
of the head panel.

NOTE where the straight long plain section flange
shows where the panel has a straight, non-curved edge,
and leave this portion uncurled.
6. Bend the multiple tabs and plain flange tabs back,
as well as the end tabs.

7. Align the off-center seam, overlap the straight 2-segment
edge across the opposite two-part tab . . .

adjust to ensure top and bottom edges are continuous
across the joining strips, then join the seam.

8. Repeat the process for the bottom seam.
Bend upper edge tabs inward to 90 degrees.

9. Identify the front LID panel with nose cut out
and orient it with narrow end toward top so that
it imitates the boxing "ring". Then . . .

. . . invert both so that panel is face down and
strip unit is tabs down.

Apply adhesive to the backside of the tabs all around.

Insert the panel (still face down) . . .

. . . and align bottom straight segment edge of panel
with the straight bottom segment of strip, taking care
that the panel corners tuck into the corresponding
corners of the boxing.

Push the panel inward until it
snugly fits inside the ring. Quickly work to make any
slight adjustments for alignment between the two. Then . . .

. . . apply fingertip pressure all around until ALL
tabs and flanges are completely attached in place.

Check for attachment, then allow to dry.

10. Repeat Step 9 for the head BASE.
(NOTE that this process described in Steps 9-10 is
used for all the LID/BASE boxes in this project.)

11. Prepare the head overlay shape by adding
cheek highlighting, positioning and adding
eyebrows where partial cuts show location.
Retain eyes and pupils for Step. 13.

12. Position the head "face" overlay onto front of
the prepared LID, adjust for precise alignment
all around, then adhere in place. HINT: it will help
to invert the assembly face-down onto the work surface
to apply fingertip pressure to help with adherence.
Also consider adding small weights inside the LID
to help the panel remail smooth and un-warped
while glue dries. (See Step 44 with paw for an idea.)

13. Position and attach the eyes into the eye cut outs,
pupils into sockets.

NOSE
14. Prepare the nose boxing strip (marked with
'N' in a tab) in similar way to head, except . . .

. . . the end tab is NOT bent back, in order to preserve
the rounded nature of the 3D nose.
Instead, simply overlap the opposite straight edge
to the perforation guide marks at tab, adjust
and glue the seam.

15. Continue with the usual process, inserting
the nose panel face down from back of strip ring,
orient the shape so that the seam is at the center
bottom, and narrow tabs sequence at each side.
Press around the panel to ensure tab attachment.

16. At bottom edge, bend the tabs outward.
Position and attach the nose front panel onto box
and press or weight in place until secure.

17. Insert the nose through the nose window
of the head front LID, and push through completely
until the tabs bend catches the LID edge.
Glue tabs in place to inside of head LID.

EARS
18. Complete preliminary prep by positioning the inner
ear accent, centered over the ear overlay, and
attach in place.
Also prepare the interior support strip by bending at
perforations to form the triangle, with top and bottom
edge tabs bent outward.

Prepare and join the triangle seam.

19. Become familiar with the RIGHT and LEFT ears,
which are different from each other (parts are NOT
interchangeable), and the ways to identify them as
L & R, LID and BASE. (Apologies: the letter symbol
labeling got a bit mixed up in the final cut file.)
Both ear front LID panels are marked with 'R' but you
can find the tiny 'L' for left and 'R' for right in the bottom
end tabs. Likewise, both ear back BASE panels are
marked with 'L' but the ID that will matter is the 'L' and
'R' in the bottom tabs. In addition, the BASE panels have
the double "bite" semi-circle cuts at the tab edge as shown.
LIDS are straight.
BASES have bites.

The boxing strips likewise have tiny 'R' or 'L' symbols
in the end tabs, and the BASE boxing has the dbl bite.

20. Add back curl to the boxing in the usual way,
but then also add . . .

. . . tight curl at the 'center' where the narrow tabs
are, using the pen or dowel tool to roll the strip.

21. Locate the non-tabbed boxing strip long tab
near one bottom edge, and the corresponding
straight edge of the ear panel.

22. Bend the strip tabs inward. Invert the shapes . . .

. . . then add glue to the backside of the tabs,
align the first strip end's tab bend at panel lower edge
tab perf line, tuck the panel edge snugly into
the perf bend to shape the boxing around the panel.

Apply pressure as the joining progresses until . . .

. . . the final tab perforation aligns with the panel
bottom end tab perf line. Release and adjust if the strip
seems too long or too short.

The boxing may tend to curve outward at the top sides,
so push inward and apply pressure all along edges
to set the panel to boxing strip seam.

23. Repeat the boxing-to-panel process for
remaining BASEs and LID panels. NOTE that
BASE boxing strips do not have bottom tabs,
so ends are lined up with panel end tab edges.
24. For BASES, position, adjust and attach
the plain camouflaging panels. Watch to make sure
the straight bottom edge does not interfere with
the bending outward of bottom flange tab.
25. For LIDS, position, adjust and attach the panels
with inner ear accents.

26. Position the interior support inside the BASE
for the coordinated LID and BASE pair, gluing
the tab(s) to the backside of the panel.

27. Add glue to the remaining support triangle tab(s),
outside surface of BASE, then "close" the ear . . .

. . . with LID edges on the outside of the BASE structure.
Adjust for accurate fit with bottom boxing edges
aligned, then add pressure to outer edges to join.
28. Repeat for the other ear.

29. To attach the ears to head, orient ear correctly
with accent inner ear toward front, insert end tabs
into opening in head boxing and push into place until
the tabs are fully through to inside.

On the inside, apply glue behind tabs, then press
into place to join securely in place.

BODY
30. Follow the same assembly procedures for
the body "box" to join boxing strips . . .

. . . fit panels inside, etc.

31. Prepare the tummy insert in similar way,
with curved boxing upper strip attaching . . .

. . . to straight bottom segment at ends with seams.

Position and attach tummy front panel within boxing.

Position and attach the overlay front panel.

32. Next add glue to the face surfaces of tummy
tabs, position and attach the body LID front
overlay so that . . .

. . . inner curved edge aligns at front bottom edges
and around curve of bump-out.
Apply fingertip pressure all around until
thoroughly secure in place.

33. Prepare the four-segment interior support in much
the same way as for the ear interior supports,
joining end seam, bending tabs outward, etc.

34. Position the support with longest base wall touching
centered, and attaching to tummy bump out
bottom boxing, then adding glue and attaching
the other tab(s) to backside of tummy wall.

35. Position the body accent over the top LID front,
adjust for edge alignment, and attach in place.

MORE INTERIOR SUPPORTS
36. Prepare the body interior post support box
by bending back at perforations for walls,
flanges, tabs and flap.

37. Invert the box shape face down then position
a collar stack at each post square hole, precisely
align, then glue in place. Continue assembly
when both are secure.

38. Bend front, back and side walls into place
to form the box. If desired, pause to prepare . . .

. . . and insert selected style of weights, and
secure in place. For sample, stacks of 1" metal
washers are glued together, then positioned at
"floor" panel on each end, keeping post hole unblocked.

Close the box top and secure tabs and flanges.

38. Position the box, centered, along bottom
of body BASE box, and attach bottom and
back panels with glue. NOTE: it is vital that
the box is aligned correctly, so take care that
box and BASE's post openings align.

39. Close the body LID and BASE assemblies . . .

. . . fully, then glue the walls together all around.
Take care that top (narrow) end post holes align.

40. For the head interior support box,
follow similar steps (36-39) to prepare shape,
attach collars in place . . .

. . . form shape into a box and join side seams . . .

. . . close and secure lid. Position at bottom of
head BASE taking care that post holes align.

41. Insert head BASE into LID, adjust and
join with glue between walls.

PAW FEET
42. Complete 1 left paw and 1 right paw.
Follow LID and BASE assembly procedures
to prepare the boxing strips, joining straight
segment with curved length at end seam.

Insert front and back panels into LID and BASE
boxing "rings" as appropriate, matching the straight
bottom edge and boxing first, then . . .

. . . press the panel into place, allowing the boxing
to be shaped to fit.

43. Prepare triangle interior support, then . . .

. . . position and attach into paw BASE.

44. Position and attach back panel onto BASE,
front 'pad' panel onto LID, and attach in place.

Position and attach pad shapes into
corresponding recess openings.

HINT: to help add weight to the pad LID and BASE
(as well as other box halves in this project),
consider adding uniform shapes such as these thread
spools inside the inverted paw assembly, then placing
a reasonable weight on top of these to press
together the layers of the glue up.

45. Position, slide together and join each paw pair.

FINISHING
46. Prepare the post wrap tube by bending
back on all long perforations and end tabs.

47. Form the shape into a square tube by overlapping
the straight edge across the long flange that has
angled ends, aligning edge with flange perf line.
and gluing seam.

Apply pressure all along, running fingertips across the full
surface until secure. NOTE that this may be most
easily accomplished with a long length of dowel in place.

At end, bend tabs inward, top down, adjust to
square, and glue in place.

48. Insert the dowel and slide end fully in until it
stops at the end cap. Mark the tube length onto
the dowel, then remove and cut to length at line.
Reinsert dowel and glue inside tube.

49. Complete final assembly by adding dab of glue
(such as Fabri-Tack) at bottom end of tube, then
inserting it through body top hole, fishing it around
inside to find interior box top hole, then continuing
to push inward until it seats into the bottom collar.
Apply pressure and hold in place until secure.

50. Apply glue to the body top panel, then . . .

. . . slide head onto post, fishing around until it
exits top interior support box hole, and then
through to top of head hole.

NOTE that the post has intentionally be drafted to be
slightly shorter than needed, so that it does not
extend through. If possible add glue to help it stay.

51. Bend the top cover slightly at perf lines,
then add glue and position, attach on head top.

52. Prepare to attach the paw feet by first chalk
(or other temp pencil) marking the approx. center
of the bottom paw box flat panel.

Position the corresponding outward-leaning paw box
near the side edge of body . . .

. . . using the chalk mark to align at the tummy end.
Take note or lightly mark where paw overlaps tummy.
Add quick-grab glue like Fabri-Tack within the marks
on paw backside, then reposition and hold until secure.
Repeat the process for the other paw foot.

Comical bunny figure is now assembled.
Add ribbon around neck to conceal seam,
and tie neat bow with streamers.

Oh my....he is absolutely adorable. <3
ReplyDeleteI can count on you to say nice things!
Delete