Showing posts with label Baby Jesus. Show all posts

Saturday, October 29, 2016

Nativity Vinyl Glass Ball Ornaments

Seven nativity designs in delicate silhouette style
to cut from vinyl, attach to cut acetate or vinyl 
insert shape, roll into a tube, and place inside 
a 3" glass ball, add artificial snow
if desired, add bow or other decoration,
then feature on Christmas tree or other displays.
These scale-able vector graphic (svg) downloads
are available from SnapDragon Snippets,
SVG Attic, and Silhouette America's online store,
to work with digital cutting systems such as
the Silhouette Cameo (our favorite) as well as
Cricut Design Space and others.
Here is the set of designs:

ASSEMBLE: 1.Obtain glass ball ornaments.
Designs are sized 3.1" size which work well 
with the  "Celebrate It" balls from Michael's Crafts; 
also included are the slightly reduced designs 
for the 2.6" balls.


2. Cut the selected size design from vinyl.
Since these designs are very small, several may
be set up in one or more rows when 
preparing to cut. Allow space between the
designs for trimming. Trim each with a small
margin around the component cuts, like the area
of white backing shown on the "Holy Family" design
being modeled in the image below.
NOTE that a good choice is "outdoor vinyl" 
such as Oracal 651 which has a stronger adhesive 
to help keep tiny pieces attached to backing 
during the weeding procedures.

3. The tiny details of these designs will require careful
and slow weeding to remove all excess around
and within the design components. 
Refer to the thumbnails
which appear with the downloads, 
or to the image above to preserve only the design.

4. Cut the ball insert shape from clear acetate.
5. Cut a piece of transfer "tape" paper,
remove backing, and place over the weeded
vinyl design.
6. Use a "scraper" to "burnish" the transfer paper
over the vinyl pieces to ensure they will be picked
up correctly and completely.
7. Carefully peel away the vinyl carrier sheet
leaving ALL vinyl pieces attached to the
transfer paper.
8. Position the vinyl on the front of the 
clear ball shape.
One way to do this is (without a lot of inadvertent sticking
of transfer tape) to place the clear ball shape
ON TOP of the carrier with vinyl and 
adjust the vinyl design compared to the ball shape
up/down and side-to-side.
Once desired position is determined, trim away the 
transfer paper even with the clear ball shape.
Next, move the clear shape to be in its final position
 BEHIND the vinyl/transfer paper, aligning the lower
edges of both, and visually adjusting before
allowing the transfer paper to "stick" in final position.
9. Burnish with scraper tool to attach the vinyl
shapes to the front of the clear ball shape.
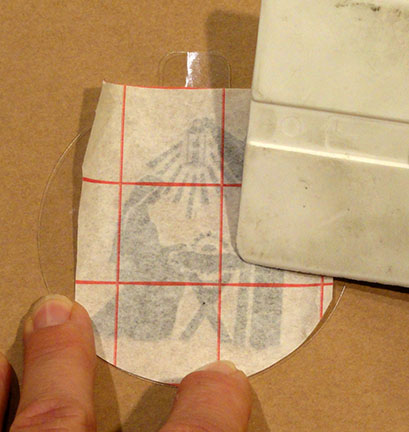
10. Carefully peel away transfer paper,
making sure that each tiny detail of vinyl
remains in position attached to the acetate.
Here is the completed acetate shape.
11. Remove the top cap and wire loop of glass ball.
12. Carefully roll the completed design side-to-side
with vinyl on the inside . . .
. . . then insert the roll through the ball stem.
When the acetate unrolls, make sure that it
self-adjusts to be in the center of the ball
with the "stem" extension in the ball's neck.
Straighten, if necessary, with tweezers.
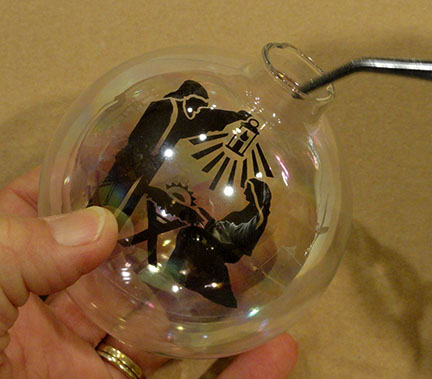
13. Replace cap and wire loop.
14. If desired, add some fake snow flakes
into the bottom of the ball prior to
re-attaching the cap and loop.
Embellish with ribbon at stem as desired.

Sunday, November 8, 2015

Swaddled Baby in Manger

Bring a special spirit to holiday decor
with this dimensional representation of
Baby Jesus in the manger.
Manger structure is a one-cut shape,
with 'X' form ends and contrast overlays
and side slats with nail hole cutouts.
Baby form has hex-based "head" with tube body,
reinforcement body tube insert
(or use a short cut of wooden 5/8" dowel)
that is fabric wrapped and glued,
with points rosette halo.
A focal point by itself, it is also
scaled to pair with "Believe 3d Letter Blocks" 
and "Star on Stick" for a nativity ensemble as seen below.
Manger measures approx. 3.75" tall x 3" long x 2.5" deep. 

(This tutorial is under construction.
Return after 11-10-15 to view completed tutorial.)
ASSEMBLY:
1. Identify and cut the shapes:
A main manger trough shape
B side "slat" overlay accents
C 'X' end supports
D contrast underlay for nail show-thru
E end contrast accents
F straw strips
G baby head bulb
H body tube
I body tube insert for reinforcement
J halo rosette strips (2)
K halo gluing circles
Not shown: swaddling wrap template

2. Prepare the main trough shape by bending center "rectangle" perf lines forward/upward, all remaining perforation lines back.

Position and attach the side slat accent shapes on the panels as shown.

3. Prepare the 'X' side support legs by bending back on the perforations. NOTE: the perforation bend edge is the bottom edge of the legs that touches the table top when the manger is completed and displayed. 
Layer and attach the middle nail hole contrast layer and top contrast layers.
NOTE: separate contrast hex bolt shapes are included in file, for even more decorative options.
4. Assemble the main trough with legs on each end, inserting the backside of plain end of 'X' leg shape behind the outer side trough end panel. (Legs shape will fold in half with the decorated front legs panel final position being in front of the same side panel. See Step 6.)
5. Fold the trough shape into a "tray", with slat-decorated front and back panels folded outward and down to bring tabs into position at edges of inner side panel. Attach tabs to inner side panel.

6. Apply glue to exposed face of tabs and inner side panel to which they are attached  . . .
. . . then bend the X legs into final position and attach to the end/side panels.
7. Bend each of the "hay" strips in crinkle fashion. OPTIONAL: Fill trough and glue as layers. This is how the finished manger should look.
8. Prepare the baby head shape by bending bottom tabs forward, all other perforation lines and tabs back.
9. Form the head by bending each of the upper segment straight edges to overlap the adjacent tab perforation line, and glue in place. NOTE: these are tiny segments and even smaller tabs, but be as accurate as possible during assembly.
10. Fold the top octagon panel down into shape on top of the head and glue in place, matching the edges to the tiny pointed tab perf marks as closely as possible (though this might not seem very precise).
NOTE that the head shape is not a completed bulb form; back remains open for ease in finger access during assembly.
11. Bend and attach each of the lower segments to the adjacent wedge tabs in similar fashion.
12. Form the body tube, by first bending back on all perforation lines, then bringing the side straight edge to overlap the opposite long tab perf line. Adjust ends to align, then glue the edge to the tab.
13. Apply glue to the top "curved tab" end of the body tube, then insert into the bottom opening of the head shape . . . 
. . . and insert until the end edges touch the head side walls (not quite to the top segment perf lines as shown by pointing finger).
14. Prepare the body inner tube, by bending back on long perf lines, end cap and cap tab marks. Form into a tube and glue the side seam.
15. Bend the cap tabs perpendicular, then apply glue and insert them into the end of the tube. Hold until securely attached.
16. Appy glue, insert the reinforcing tube into the bottom of the head/body assembly, and push in until tube ends align. Or, if preferred . . . 
substitute a cut-to-size section of 5/8" wooden dowel in place of the reinforcing tube.
17. Prepare the swaddle wrap by using template shape to cut wrap from fabric. For this sample, printed burlap is used. Other, less bulky fabrics will also work, but the shape may require trimming slightly smaller, determined during wrapping and assembly.
18. Protect the fabric edges from excessive fraying by applying FrayCheck to raw edges.
19. Fold fabric shape as indicated by template perf line. Place babe body at center, in a position where the fabric fold when bent into place will reach the front top of head.
20. Wrap fold edges down to the sides of the body tube and glue dab in place. (Recommended quick grab glue such as Fabri-Tack or hot glue.)
21. Fold bottom corner up, trim point if necessary, and glue dab in place.
22. Wrap one side over body . . . 
. . . trim excess "point" away, and glue in place.
23. Wrap second side across and glue in place.
24. If desired, tiny glue dab top fold in place to top of head.
25. Prepare the halo rosette strips by accordion folding. Join strips by overlapping straight end of one strip to perf line of tab on second strip.
26. Form the strips into a ring, overlap and attach end and tab.
27. Condense the folds and force the straight (non-pointed) edge into the center and flatten ring into a rosette. Without allowing to spring free . . . 
. . . attach a center circle using quick grab glue such as hot glue. Press folds toward center before the glue hardens, to make sure folds are even all around.
28. Position and attach halo at top of head (recommended slightly back and angled).
Place (and attach) Babe into manger.