Showing posts with label Easter decor. Show all posts

Friday, March 16, 2018

Bunny Carrot Box with Fence Stand

Whimsical combination of carrot shape box 
that represents a bunny with loppy ears 
stands upright in a specially designed stand. 
(Our adorable bunny is named "Helle" after
the imaginative originator of this design.)
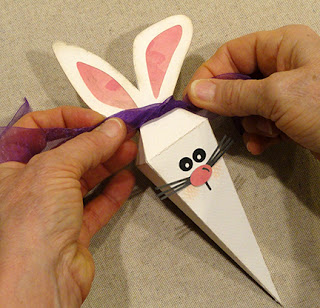
Box doubles as treat container or as Easter display, 
with top front layered ears "flap", side and back flaps 
that fold together as closure, temp taped or glue dot closed, 
tied with decorative ribbon. 
Nose, whiskers, layered eyes give character. 
Stand with insert includes cut openings 
to hold bunny upright. 
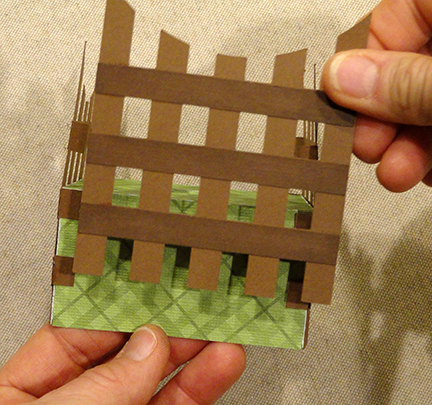
Shaped picket sections attach around box sides. 
Ensemble measures approx. 3.5" x 3.5" x 7.5" tall. 

ASSEMBLY: 1. Identify and cut the shapes:
A body front and side
B body back and side
C inner contrast ear shape
D front ear shape (with cutouts)
E facial accents: nose/whiskers, nose, eyes
F box platform main shape
G front and back fence accents
H side fence accents (2)
I optional cross beam overlays (12)
J box bottom insert
2. Prepare the face shapes:
layer nose onto whiskers/nose base shape
layer eyes (if body shapes will not show thru
as "white" or other desired color)
3. Prepare the two body shapes by bending
back on the "vertical" panel and side flange tab
lines, horizontal lines above main pointed panel,
forward at ears and top back panel tab,
back on other tab lines.
4. Position and join the body side seam by
overlapping the straight edge of the back/side
body edge over opposite flange tab,
adjusting to make sure points line up, and
top horizontal perf lines, etc.
5. Layer and attach the ears front shape over
the contrast inner ear layer, taking care
to align all outer edges.
6. Attach ears overlay unit over corresponding
portion of body front ears taking care
to line up edges that match.
7. Determine positioning for face, then position
and attach nose/whiskers unit, centered,
then eye units above.
8. Prepare to close the box top by bending
side panels and tabs inward . . . 
. . . back panel and tabs forward . . . 
. . . then bend front panel back to meet up.
If the bunny will be used for decor only,
the tabs can be carefully lined up and glued
in position. To be used as a container,
fill first, then use temp adhesive dots
or similar method to keep panels in
closed position.
9. If desired, tie a length of soft ribbon
around the ears/tabs at narrowest width
into knot and bow.
10. Prepare the platform by bending back
on all side panel and tab perforation lines.
Also push the center triangle tabs back
at opening.
11. Form the shape into its tray finished form
by bending back adjacent sides to
overlap straight edge over corresponding
side tab, and glue in place.
Repeat for remaining 3 corner seams.
12. Prepare the front and back fence overlay
shapes by bending back side tabs.
13. If desired, position cross beam overlays
over corresponding areas of front, back and 
side fence units, and glue in place.
14. Position the front fence unit over
the front panel of platform, align side edges,
bottom edges, and glue touching surfaces 
together. Repeat for back unit.
15. Position the two side units onto platform side panels
in similar manner, also attaching side tabs of
front/back units to backsides as side units
are positioned and attached.
16. Prepare the bottom insert by bending
side flanges forward, apply glue to
outer flange surfaces, then . . . 
. . . position under platform and fit into
the bottom opening (this is a tight fit) . . . 
. . . and ease upward into position where
flange bottom edges are even with
platform bottom edges.
17. To complete the display, insert bunny tip
through platform top opening and
straight down so that tip also inserts
into the cutout in the insert underneath.
Here is the completed bunny carrot box.

Wednesday, March 4, 2015

Lamby Box Pull Toy Assembly Guide


Evoke the fun of vintage Easter toys 
with this lamb box on wheeled flat bed. 
A unique addition to your Easter decor, 
this box measures approx. (overall) 5.75" tall x 4.5" long x 2.5" wide. 
Adorn the front with layered lamb with dimensional ear, layered neck ribbon.
(Reverse the shapes to create a matching back-side lamb decoration.)
Build the platform as base (includes wheel boxes with brad hole punches)
and lid (includes slots to accept tabs from lamb box bottom as attachment).
Hole punches in both lid and base line up to provide 
attachment point for ribbon or lacing.
Wheels made sturdy with double spokes bases and rims plus hub
are attached with decorative mini (or reg.) brads.


ASSEMBLY:
1. Identify and cut the shapes:
A box front
B front/top boxing strip
C back/bottom boxing strip
D box back hollow shape
E box back
F lamb base layer, mid layer, front, ear, hoof accent shapes
G bow base, overlays, knot, neck sash
H platform top
I platform bottom
J wheel boxes front (notched) and back
K inner platform support strips
L wheel assemblies: spokes, rims, hubs

(NOTE: it is suggested to cut double spokes and rims shapes, then layer for strength.)


2. Prepare the boxing strips by bending tabs inward, also folding horizontal perf lines inward or outward to match the silhouette angles on the box front.

3. Beginning at lower front, overlap the edge of the front, lowest segment over the corresponding tab of the front/top strip to line up with perforation line. Adjust so that bottom edges of both pieces line up, then glue.


4. Continue bending strip to line up each segment of the strip with the corresponding edge of the box front shape. As each tab or set of tabs are adjusted and attached, it may be helpful ... 


. . . to turn the assembly over on a flat surface and apply pressure from the backside.


5. When all of the segments of the front/top strip are attached, line up and attach the end of the second (back/bottom) strip to the end of the first. Overlap the straight end edge of the shorter strip over the end tab to line up at the tab's perforation line. NOTE that the tiny circle cut out in the end tab and top tab of the respective strips help to identify that these two ends should be joined.


6. Continue to join strip segments to edge sections. When the final segment is ready to be attached, also bend the final end tab into position and apply glue so that both the final side segment and the final end are pushed into position and attached in the same step.


7. Position the "hollow" box back shape over the bent-inward tabs on the back of the lamb box and attach them in similar fashion to the corresponding tab perf lines. It may be helpful to join the long bottom strip first, then the lamby back segment, then align and join the tabs in between.

Reach fingers into back hollow/opening to manipulate and apply pressure where needed.


8. Begin to layer the lamb decor shape. The bottom layer (includes the legs and feet) should be colored the darkest. Position the middle lamby layer over the bottom layer. Attach the bottom hoof shapes to the bottom layer.


9. Position and attach the front separate leg shape.


10. Bend the ear tab and insert into the slot on the front layer. Glue tab in place on the backside of the front body shape, keeping the front free and dimensional.


11. Attach the front layer over the lamb body assembly.


12. Assemble the bow unit by attaching the separate darker partial shapes of bow loops and streamers. Attach the knot on the top.


13. Attach the neck ribbon shape across the top of the lamb body in the appropriate neck area. Attach the bow unit on top of the neck ribbon. 


14. Position and attach the assembled lamb decor shape to the box front. Apply pressure to achieve the first "set",  then . . .


. . . turn the assembly over on a flat smooth surface to apply pressure from inside the box behind the box front. 


15. Attach the whole back shape over the edges of the hollow back shape already attached in place.

Make sure that the bottom two attachment tabs on the bottom boxing strip are extending downward.
16. Prepare the platform box top by folding sides and ends and associated tabs downward and inward, short end tabs in toward center.

17. Glue the end tabs to the corresponding short edges of the sides to form the platform box.


18. Fold the edge rim tabs inward and glue in place.


19. Insert the box assembly bottom tabs into the corresponding slots in the platform box top (remember that the hole punch is the front of the platform).


20. Fold the tabs toward the center and glue securely to the bottom of the platform.


21. Form the platform bottom into a box shape in similar fashion to the platform top, then glue the end tabs to the sides to form the box bottom.


22. Prepare the wheel boxes by folding the ends and sides up, upper long tabs outward. Glue the end tabs behind the end shapes with straight edges aligned exactly at the corresponding perforation lines.


23. Identify the front wheel box (with notch), then insert each box into the corresponding opening of the platform bottom. Take care that the notch to keep the front circle punch unobstructed is lined up properly.


Be sure to push the wheel boxes in thoroughly so that the brad holes are fully exposed. 

Glue the box tabs and side in place. 


24. Assemble four wheels. For appropriate strength, it is recommended that two "main" spokes layers be joined, then two rims (one front and one back) be layered onto the spokes assembly.

Take care that the cut edges and hole line up as exactly as possible.


Here, the rim is being layered onto the spokes assembly.


25. Attach a hub circle (orange in this picture) to the front of each wheel.

26. Attach each wheel to the wheel box with a mini or regular size brad. Bend the prongs back on the inside of the wheel box.


27. Prepare the support strips by bending the end tabs of each back. Insert the strips into the platform bottom and position each approx. 1/3 in from each side. Glue the end tabs to the backside of the platform ends.

Make sure that the top edge of the strip is NOT higher than the platform top edges.


28. Place the platform top onto the bottom. This is a little tricky since the side lower edges of the platform must slide between the wheels and the bottom box. It is a rather snug fit.

Slide the top completely onto the base. Glue if desired (it is snug enough not to need glue, probably).


29. Attach ribbon with end bead, twine or leather lacing length to the platform through cutout circles, if desired.


Here is the finished decoration.