
Seasonal table decoration or display can serve to direct dinner guests
and is sturdy and surprisingly quick to assemble.
Create
one for each place setting at your harvest feast,
echoing your selected color
theme.
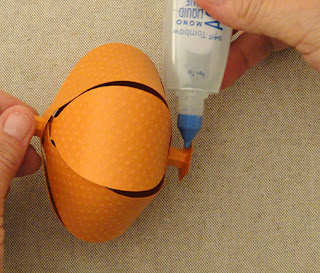
To assemble: join each of three paper-saving contour strips
to form
rings, then thread onto a hexagon stem post
(use standard no.2 pencil shaft to
help form tube) and glue in place.
Add scored vein lines to leaf, then attach stem
strip to center post.
Narrowing contrast stem strip wraps top post end.
Add place
card name tag (hand write or use Print & Cut features)
by wrapping narrow
extension around stem.
Measures approx. 3.375” tall (stem post) x 3.75” diameter.
ASSEMBLY: 1. Identify and cut the shapes:
A contour loop strips (3)
B post hexagon tube (stem)
C (optional) hex ring for post bottom as 'stop'
D post bottom 'cover'
E leaf F stem wrap (for texture)
NOT SHOWN: stem strip-matched hexagon 'cover'

To create the pumpkin place card, also cut the name tag,
either 'plain' to have name hand written onto it,
or use print and cut features of Cameo.

2. Prepare the stem post by bending back along each
of the vertical perforation lines.

3. Use a standard pencil shaft to form the post
strip into a tube, wrapping the straight side edge
over the opposite long flange to perforation line
and join seam.

4. Bend the bottom tabs away from tube.

5. Take note of the small guide marks on two panels
of the stem tube.

6. Insert the TOP of the post through the hexagon ring
through the bottom opening . . .

. . . and slide down until it is even with the bottom tab bends,
then glue the tabs to the underside of the ring.
Insert the end of 'new' pencil through tube again
to bend top semi-circle tabs inward and glue
together where they overlap.

7. Prepare each of the loop strips by adding curl
to the center portion only of each contour,
using a rod tool such as this dowel (or a pencil shaft)
and apply thumb pressure as the portion of shape
is drawn across the rod (think: curling ribbon).


end around to overlap the end tab to perforation marks
and glue the seam.
(The final strips will be looped through the other rings
prior to joining this bottom seam.)

9. Insert the second strip end through the first loop ring
and complete the seam. Then align the bottom 'rings' of each
loop, taking care to line up interior hexagon opening
as precisely as possible, and glue together.
(NOTE: the point of interlocking the loops is to match the layering
position of each ring. That is, when the FIRST loop ring,
for instance, is on TOP of the second ring at sphere's top,
is is also on TOP - inside - the rings assembly. This will help
the spheres be able to have matched 'profiles' in finished pumpkin.)
10. Repeat for the third strip, inserting end through previous
rings assembly, then joining bottom short seam.
Finally, align bottom hex 'ring' and opening and glue in place.

around the hex opening, then arrange and align
the hexagon opening as for the bottom hex 'ring'.
 To enable the layers to have pressure applied so that

the joining will be complete, it may be possible to
gently compress the loops as shown (for both top
and bottom) hex areas.
 12. From the bottom, insert the post tube through

the hexagon opening . . .
 . . . and slide it through the spherical interior

and out the opposite (TOP) hex hole . . .
 . . . pausing to apply glue to the underside of the hex ring

'stop' platform, then push all the way so that it rests
and attaches to the bottom integrated hex ends of sphere.
(NOTE: the top of loops remains loose and unattached
at this point.)
 13. Use a stylus and straight edge to add scored lines

to center of leaf, as well as lines that extend from
the center scored line outward to divide . . .

. . . the edge extensions at mid and lower mid leaf.

to the leaf shape.
 14. Take note of the 'top of pumpkin' guide mark,

then . . .
 . . . position the leaf stem bend at the guide mark

with the stem laying upward along the stem,
and glue in place.
 15. Use a very narrow rod-like tool such as this stylus tip

to add a relatively tight curl to the stem wrap strip.


14. Insert the pencil up through the tube to help
provide a "press against" surface.
Attach the wide end of strip at exposed stem base
and glue it securely to one of the faces of the tube.

Wrap and glue the strip around the tube, overlapping
each turn only slightly to cover tube completely.

Continue wrapping around stem to end of stem
and strip. Secure end.

15. Remove pencil.
Position and attach the hexagon stem-matched
cover to the top of the stem.

16. Position and attach the bottom hexagon cover
to hide the tube opening.

17. For the place card variation, cut the name tags

18. Prepare name tag by adding curl to the strip extension
using a rod-like tool as before.

Wrap the strip around the stem, then glue
in place . . .

. . . with end of strip attaching to tag backside.

Here is the completed place card pumpkin.


