Showing posts with label Triangle Santa Box. Show all posts

Sunday, November 24, 2019

Santa Gnome 3D Tall Pyramid Box

Skinny triangle sides form folksy Santa or gnome box, 
with hat pyramid lid that fits over base. 
Beard overlay with face, cheek circles, eye show-thru 
and glued-on dimensional wooden bead nose add charm. 
Hat fur strips and top punch holes to twine-tie 
on a small rustic bell add more details. 
Box can function as gift container, or as decor. 
Measures approx. 8” tall x 2.3” wide x 2” deep. 

ASSEMBLY: 1. Identify and cut the shapes:
A main body 'base' shape*
B, C & D body accent (suit) overlays
E face   F beard  G eye contrast under-lay
H cheek insert circles
I hat main shape    J fur trim
K hat interior 'buffer' build up stack shapes (6)
2. If you plan to use a wooden bead nose
*(NOTE optional main shape and fold-over circle
are included as alternatives to bead),
obtain a wooden bead that is approx. 11/32" 
(approx. 9mm) and use thick glue or hot melt
to fill in the opening, then paint to match
the flesh tone paper color of face shape.
Or make your own bead/nose shape from
polymer clay, etc.
3. Prepare the hat buffer shape stacks early in
assembly so they can thoroughly dry before attaching.
Layer and attach pairs of the shapes, taking care
to align all cut edges as precisely as possible.
Place under a flat heavy object until glue is dry.
NOTE: each of these stacks will eventually be
positioned behind the walls of the hat along
the bottom edge as shown here; wait until hat cone
has side seam completed to attach (see step 8).
4. Prepare the hat shape by bending back on
all panel, flange . . .
. . . and end tiny tab and 'lid' perforation lines.
5. Form the shape into a pyramid to overlap
straight edge over flange to perf line to
complete side seam. NOTE it may be helpful
to insert a rod-like tool behind the seam to help
provide a "press-against" stiffness to enable
pressure to be applied to join seam.
6.  Prepare the fur strip by bending back on
each of the two perforation lines.
Position and attach along the hat lower edges,
aligning the bends of hat and fur.
7. Use a loop of fine wire inserted through the lid
and side panel holes to fish through a length of
twine or string, then attach decorative bell.
8. Insert and attach each of the buffer stacks 
behind the hat walls at lower edge.
8. Prepare the main box shape by bending back
on all wall panel and bottom edges and flanges.
9. Form the shape into a pyramid to align,
adjust and glue the side seam.
10. Tuck the bottom panel edge flanges
inward, apply glue, then insert into position
and glue bottom seams.
11. Bend the face shape at center perf line to match
the body bend, then position, align top edges,
eye and nose openings, and attach in place.
12. Position and attach each cheek contrast circle
into cheek recess.
13. Bend the eye 'liner' shape back at perf line,
apply glue to the perimeter only, then position
behind the body wall, aligning bends of each
so that the contrast shows thru eye openings
and glue in place.
14. Position and attach the left and right suit shapes
onto body, with offset margins at angled side edges,
bottom edges even.
Also position and attach the body back accent
overlay in same manner, offset front side edges,
even with bottom.
15. Bend, position and attach the beard shape,
aligning bends and top edges.
16. To attach nose bead, apply quick-grab glue
such as this Fabri-Tac behind the nose opening
as thickly as possible, then . . .
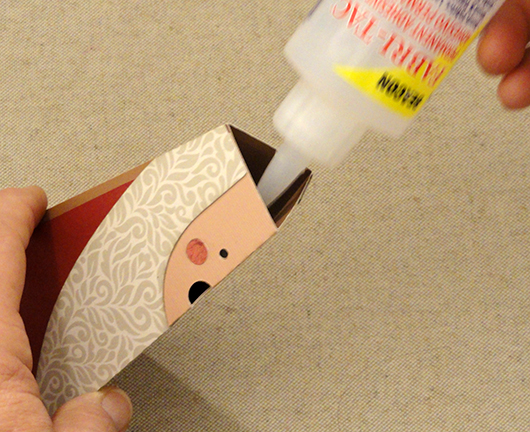
. . . position the bead into the cutout and hold
in place until fully secure.
ALTERNATIVE TO BEAD: use the flat nose
card stock shape, bent back at center perforation,
to cover the positioning guide nose cut out.
17. Fit the hat 'lid' over the body 'base' . . .
. . . and push down into position fully.
(This is a snug fit.)
Here is the completed box.

Sunday, December 11, 2016

Triangle Santa 3D Box

Festive holiday decoration or gift box 
composed of lid and snugly fit base 
that slides into the lid backside. 
Beard, hat brim and tassel are made thick 
with built-up layers. 
Interior of base has a cross piece for
strength and stability. 
Add cross-hook strips to pull in lid sides.
Measures approx. 5.25" wide (base) x 8.5" tall. 

ASSEMBLY: 1. Identify and cut the shapes:
A LID main shape
B BASE main shape  C base cross strut
D Lid main accent triangle
E main beard (top layer)
F main beard under layer
G beard build up (6-7 duplicates)
H face shape        I hat brim (top layer)
J hat brim second layer, build up (6-7)
K tassel scalloped circle with top smaller tassel (2)
L tassel build up layers (6)
M & N back latch strips
2. Prepare the LID main shape by bending back
on all perforations, including side tabs
and side rim flanges.
3. Prepare the BASE main shape by folding
back on all perforation lines in similar manner.
4. Complete the side seams by bending side walls
up at adjacent positions, bending tab back,
then bringing straight edge to overlap tab
and with wall straight edge even with perforation
line. Glue in place.
Repeat for the other two side seams of BASE.
Complete the side seams of the LID shape
in similar manner.
5. Prepare the BASE cross strut by bending tabs back,
side wall tabs back, as shown.
6. Insert the bottom tabs into the corresponding
slots in the back wall.
On the backside, bend the tabs downward.
Apply glue to the underside of tabs,
then attach to the outside face of the BASE.
On the inside, bring the side walls into perpendicular
position, then attach strut side tabs in place
to inside walls of the BASE.
NOTE: The strut is intended to help the BASE
triangle retain its "squared up" triangle shape.
So as the sides are attached, aim for a uniform
triangle with perpendicular walls.
NOTE: If the box will be used as decor display
only, you will need to install some weight in the
bottom of the base to offset the extra weight
of the layered beard and hat trim
(otherwise, it will tip forward).
Clean new metal washers quick glued onto
the bottom wall of the base is one way
to accomplish this.
7. Prepare the "thick" beard shape by layering and
gluing the 6 or 7 bottom layers together,
one by one, aligning all cut edges as accurately
as possible.
HINT: press this assembly - and all build-up
layers - under flat weights during the glue drying
process to help prevent curling or warping.
8. Layer and glue the top two beard shapes together.
In the sample project, the top beard layer
is glitter card.
9. Position and attach the beard top layer
onto the bottom build up beard layers.
(This image shows brad heads positioned
at the punch holes - these were omitted
in the final version.)
10. Layer and attach the hat brim bottom layer
shapes in same manner as beard.
11. Layer and attach the top two brim shapes
(top layer here is glitter card) in the same manner.
12. Add brad heads or studs to the brim holes,
then layer the brim upper layers onto the
build up bottom layer assembly and attach.
13. Layer the tassel circles to build up in
a similar manner . . .
. . . and add the smaller top circle to the assembly.
14. Identify the beard position guide marks
on the triangle accent shape . . .
. . . then position and attach the face shape
above the guide marks, with the bottom
of face exactly even with cut marks.
15. Position and attach the beard assembly
butting up against the bottom of the face shape
and centered side to side.
Position and attach the hat brim shape.
Add cut circle or stud eyes on the face shape.
16. Complete the assembly of the
LID shape as was done with the BASE
shape in step 4.
17. Bend the rim flange tabs to the inside
of the LID and glue in place.
18. Position and attach the tassel
circle assembly over the LID tip.
19. Prepare the back latch assembly
by sliding the tip slots together as shown,
and push together until the strip long edges
are parallel.
20. Bend the side tabs back.
Slide the BASE inside the LID,
then center over the latch assembly over the
back, tuck the side tabs between the LID 
and BASE, and slide up or down until
the latch is in its "best fit" position.
21. Without un-adjusting the latch position,
spread the LID sides slightly and apply glue
to the outer surface of the latch tab(s) . . .
. . . then apply pressure to the sides of the
box to attach the latch side tabs to
the inside of LID, and hold in place
until secure.