
Large size decoration for holiday accents
or as
a gift box or serving vessel for tall treats
such as candy bar bouquet and
candy canes.
Measures approx. 7.25" long x 7.5" tall x 4.25"
wide.
Add dimensional pine sprigs and 3d jingle bell
available as additional cut file designs.
Add dimensional pine sprigs and 3d jingle bell
available as additional cut file designs.

ASSEMBLY:
1. Identify and cut the shapes:
A boot back (section 1)
B back right combo (sections R2 & R3)
C right side (section R4)
D front (section F5) with bracket strips
E left side (section L4)
F back left combo (sections (L2 & L3)
G toe section
H under sole
I main sole
*J sole accent strips (13) *keep in order
K cuff front with fur tufts
L cuff back with fur tufts
fur tufts (30 total)

2. Prepare the boot body sections by folding as shown:
Here is the back section 1. Fold bottom tab under, first perforation back (mountain) next perforation forward (valley).

Here is the back right combo shape for sections R2 and R3. Fold bottom and side tabs (including the one separating the two sections at the center) back, then vertical center perf line (at the two-sections join line). Bend bottom horizontal perf lines as "mountain", next perf lines as "valley".
Prepare the L2 & L3 section in similar (but mirrored) fashion.
NOT SHOWN: Sections R4 and L4 will have similar bending prep with tabs back, bottom perf line bent as "mountain" and the two angled perf lines as "valley". (You can see this in step 7 image.)

Here is the toe section. Bend all perforation lines as "mountain" folds, including the wedge tabs between the upper panels.
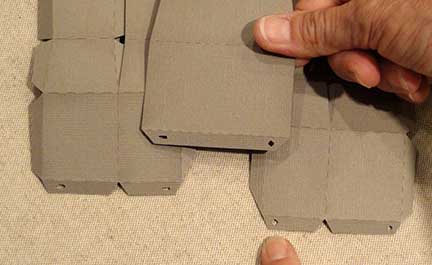
3. Identify the order of assembly of all the body panels by noting the tiny cut symbols in the bottom tabs. The edges that contain the matched symbols will be joined in upcoming steps.
 4. Prepare the combination back side units by bending to align the center straight edge to overlap the adjacent tab to the perforation line.
Apply adhesive to the sections, one at a time, beginning at lowest/shortest. Line up the straight edge at the perf line and join.
Repeat for the upper section. Complete both left and right units in this way.

5. The connection(s) completed in step 4 above will place the connection tab underneath to cover the end of the section 2 slot slightly.
Use sharp but small scissors (too large being shown here) to trim away the tab showing through the slot to make sure it is completely open to accept the fur tab later.

6. Align the appropriate L2/3 or R2/3 sections at the side of the back section 1. Overlap the straight edge of back bottom segment at the bottom tab of adjacent side section, adjust to make sure top perf lines and bottom tab perf lines match up, then join.
Continue to complete the seam moving up to the next segment to align and join, then to the top segment. Make sure horizontal perf lines and top edges match up as each segment is completed.
Join both side 2/3 sections to the back section.

7. Identify the L4 and R4 sections that should join to the assembly by locating and matching up the tiny cut out symbols in the bottom margins.

8. Line up, overlap straight edge to adjacent tab perforation line, one segment at a time, to join as has been done previously.
NOTE that the angled transition shaping of this piece is a little more involved. It will help to make sure the segment seam is secure before moving up to the next.
NOTE that the angled transition shaping of this piece is a little more involved. It will help to make sure the segment seam is secure before moving up to the next.

9. Join the four seams in the toe section by bending to overlap the straight edge of one section over the tab to the perforation line of the next and glue in place.

10. Prepare to attach the toe section to the under sole shape by centering the front toe tab at the narrower front sole end, placing the tab's perforation line exactly at the sole straight edge, then wrapping the tab to the sole's underside and attaching in place.
NOTE: the under sole will have tabs from all boot body sections wrap over the side edges and attach on the bottom this way.

11. Form the toe section around the next sole edge segments, adjust so that the sole's straight edges are snug at the tab perforation lines, then glue tabs in place to the underside of the sole.

The under sole (not seen in this image) will need to swing slightly up into the boot cavity in order to allow the boot body tabs to wrap around it's edge.
Adjust and attach the side bottom straight edge of L4 (shown) or R4 at toe section bottom segment tab perf line, and join. Bend top segment to align, then attach.
Complete both left and right side seams.

13. Prepare the front section 5 by bending cross perforations as shown (bottom up: "mtn", "mtn", valley, valley).
14. Position and glue bracket strips in place (longest goes on top). If using the shapes with hole punches, line up the holes of brackets and front section, then attach eyelet details if desired. Add twine or ribbon, etc. at this point.
(If you choose to use non-punched shapes, position them evening in the spaces as shown.)

14. Position the front section center straight edge overlapping the middle toe tab and attach in place.
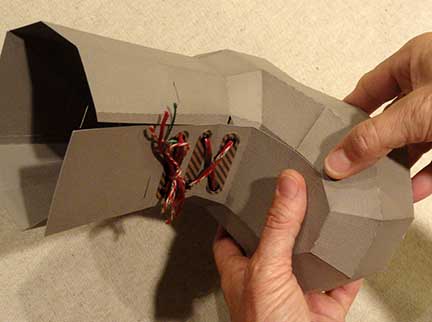
NOTE: in order to access each edge, adjust, hold in place and apply pressure, it may be good practice to connect one segment on right side then the same segment on the left before moving up the boot. Use the finger openings in the under sole and the inside upper opening of the boot as well.

16. Position and attach the main sole shape.

17. Position and attach each sole accent strip on the corresponding segment along the bottom of each segment all around.
NOTE that the longer strips that include a mid perforation will span the edges of the left and right sections 2 & 3.

18. Prepare the cuff sections as shown, bending on the vertical and tab perforations as "mountain" folds.

19. Attach the front (longer) section to the back section at one long side seam - right seam is shown here), taking care to adjust so that the top and bottom perf lines match up, and that the echo punch hole of the tab lines up as exactly as possible with the front edge punch hole.
NOTE that bottom shorter edges remain unattached (here and throughout).

20. Prepare the fur tufting squares by bending (valley) on each of the diagonal perforation lines.
First bend and fold one diagonal, then the other, then . . .

. . . push the edges between the corners inward toward the hole slightly to form a sort of "cup" shape. Pinch the corners to complete the fold, then flatten out slightly.

NOTE: This image implies attaching one tuft square then attaching brad. It may be better procedure to attach the tufts on one panel, then while glue is still pliable, adjust the tufts squares for best non-touching, non-overlapping arrangement. Then add tufts of adjacent panel, make adjustments as necessary.
Add brads when all but final* tuft are in place.

22. Form the cuff unit into a tube to bring the final straight edge and tab into alignment, adjust and attach to complete the seam.
*NOTE that the final tuft square is shown in place here. It may be easier to complete this seam by leaving the tuft off, joining seam, then positioning and attaching it, and adding final brad.

23. Insert the top edges of the boot body inside the cuff tube, taking care . . .

. . . that the triangle "arrow" symbol in the front top tab is aligned at the center front of the boot.

24. Insert front tabs into boot body slots, bend tabs downward, apply glue to the face of the tab while it is in position . . .

. . . then apply pressure from inside and outside of boot to attach in place.

25. Continue to work around the lower bevel edge of the cuff to insert tab(s) into slot(s), bend tab downward, and glue tab to inside of boot body.
NOTE that the miter "seam" between the bevel sections are not glued to each other, but remain free to adjust as may be helpful as the cuff is attached and takes its final form.

Here you can see tabs inserted into the interior of the boot. The front tabs are glued in place in this image, but the others are awaiting final attachment.

26. Apply glue to the first (front) top cuff tab underside, then fold over the edge of the boot body, adjust for alignment on the segment, and apply pressure until secure.
Continue to fold and attach the top tabs - you may wish to do the center back tab next, then adjust the tabs between to fit as may be necessary.

27. Bend the tuft squares at the cuff ridges back to match the cuff form as you may deep desirable.

Here is the completed boot.

You may choose to embellish and decorate your Santa boot.
Shown here are Pine Sprigs and 3d Jingle Bell,
clustered and attached to a length of coarse, burlap-style ribbon.


