
Large candle form (approx. 10" tall x
4.5" wide)
is constructed as hexagon-shaped LID and BASE
that fit together
(base provides strength to lid).
Lid top includes three "flame"
positions
where "rolled" fringe shapes are inserted and glued
to
replicate a celebration fire cracker.
Decorate candle walls with contrast
offset rectangles,
optional band (model uses shape as template
for cutting
corrugated band).
Add the "July 4th scalloped rosette" as finishing touch.

ASSEMBLY: 1. Identify and cut the shapes:
A main shapes upper panels (2)
B upper panel accents (6)
C upper opening ring
* (extra top hex; not used in tutorial project)
D upper cylinder wick holes top cover
E main wick (3) F upper wick (3)
G base main shapes (2)
H base bottom ring I base cover
J cuff template (with corrugated strip)
 2. Prepare the main upper panels by bending back
at vertical perforation and tab lines, bending
bottom rim tabs back.
 At top of panels, bend as shown:
top flanges and side tabs bend forward;
inner two horizontal perforation lines
bend back.



 As far as possible, reach under the seam without
un-adjusting the tab/wall seam to apply pressure.
Then move around to successive seam areas
to adjust and apply pressure until all are joined.


 12. Form the main wick section into a tube,
first applying glue to the lead edge, then
wrapping snugly around a standard pencil shaft
as shown. Take care that tyhe bottom straight edge
of fringe base "stacks" up accurately, with bottom tabs
extending clear. Secure the final end with glue.
Complete three main wicks.
 13. Insert the tabs through from the front of the
top cover . . .

 14. Prepare the upper wick shapes in a similar
fashion, then apply adhesive around the bottom,
insert into the center of the main wick and
push in as slightly so that it can attach.
Complete three wicks.
 15. Position and attach the wick top cover
over the top ring.

 17. Overlap the straight side edge at the corresponding
side tab perf line of the other shape, adjust
and glue to complete side seam.


 23. Use the half template to measure and
bend the cuff at the appropriate places so
that it will match up with the hexagon corners
of the roman candle main tube.
 24. Wrap the cuff around the candle,
position as desired, then overlap at back
and glue cuff in place.
You may also wish to apply glue under the
cuff strip intermittently or all around
the strip.

 You may also consider preparing
the "scalloped rosette July 4th" element
as shown here.

A main shapes upper panels (2)
B upper panel accents (6)
C upper opening ring
* (extra top hex; not used in tutorial project)
D upper cylinder wick holes top cover
E main wick (3) F upper wick (3)
G base main shapes (2)
H base bottom ring I base cover
J cuff template (with corrugated strip)

at vertical perforation and tab lines, bending
bottom rim tabs back.

top flanges and side tabs bend forward;
inner two horizontal perforation lines
bend back.

4. Overlap straight side edge over corresponding
side tab flange to complete first side seam.

5. Bend back and glue bottom rim tabs
in place behind panel, except leave flat and unglued
the final end tab at the straight left panel edge
until final side seam is completed.

6. Position and attach each of the accent
rectangle panels in each of the panel segments
leaving approx. 1/8" offset margin around
accents.

7. Form the body into a tube to bring
edge and tab together to complete the
final side seam.
(NOTE: because of the symmetry of
the candle tube, it is possible to fold the
body tube flat to apply pressure along
the seam while in conveniently-flat position.)

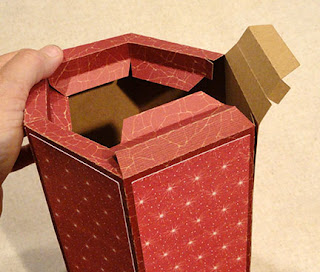
8. At top opening, bend the rim segments to arrange
into the dimensional rim as shown.
Right "straight" edges will overlap
the top face extension and downward face tab
of the adjacent segment.
After the side seam is complete,
fold the final bottom rim tab back and glue in place.

9. Prepare to glue the rim into position by
applying dabs of glue to the top face extensions
and downward face tabs . . .

. . . then re-arrange and push downward faces
into position so that the straight edge lines up
at the tab perforation to form a perpendicular seam.

un-adjusting the tab/wall seam to apply pressure.
Then move around to successive seam areas
to adjust and apply pressure until all are joined.

10. To further strengthen the rim construction, bend
tab flanges toward center of tube (perpendicular to walls)
apply adhesive to the face surface of these tabs,
then position and attach the rim ring shape.

Reach fingers through center opening to apply
pressure to attach all tabs to underside of ring
all around until all are securely attached.

11. Prepare the main and upper "flame" wick
sections by separating each strip, then adding
forward curl to the fringe edges using a tool
such as a pencil or the handle of spatula shown.

first applying glue to the lead edge, then
wrapping snugly around a standard pencil shaft
as shown. Take care that tyhe bottom straight edge
of fringe base "stacks" up accurately, with bottom tabs
extending clear. Secure the final end with glue.
Complete three main wicks.

top cover . . .

. . . then bend back the tabs and glue to the
backside of the cover shape.

fashion, then apply adhesive around the bottom,
insert into the center of the main wick and
push in as slightly so that it can attach.
Complete three wicks.

over the top ring.

16. Prepare the base tube by bending back
on all perforation lines.
NOTE that the bottom of the base tube shapes
have angled cuts at the ends of the tabs,
whereas the top of the tube shapes are
less wedge-cut.

side tab perf line of the other shape, adjust
and glue to complete side seam.

18. Bend back the upper rim flanges and glue in place
to the back of the tube wall, except leave the tab
next to the straight wall side edge unglued.

19. Form the walls into a tube to overlap
straight edge to opposite tab perf line,
adjust and complete second side seam.

NOTE that it is possible to fold the base tube
flat to apply finger pressure along the seam.

19. Bend the bottom flanges inward to
perpendicular, apply glue to face surface of flanges,
then position base hexagon, adjust so that all perf edges
and hex edges line up, and glue in place.

Reach fingers through circle opening to
assist with the attachment of each segment
of the seam.

20. Apply glue to the base hexagon, then
position and attach the base bottom cover.

21. Insert the base inside the main candle tube
and push into place so that bottom edges align.
This will provide structural strength near the
middle of the candle shaft.
NOTE: if using this as a decor piece, glue the
tubes together. Otherwise, the base tube
will slide to far inside the main tube.

22. Prepare the corrugated (or other) cuff by
using the cut half template shape to cut
decorative strip that is two-times the template length.
(NOTE: corrugated media may be longer than
standard 12x12 paper craft sheets and therefore
would not require a seam; if using 12x12 stock,
you may need to cut and join the strips with
a seam that is as invisible as possible, then
cut to size.

bend the cuff at the appropriate places so
that it will match up with the hexagon corners
of the roman candle main tube.

position as desired, then overlap at back
and glue cuff in place.
You may also wish to apply glue under the
cuff strip intermittently or all around
the strip.

Complete the candle with a decorative
touch such as wrapping raffia, ribbon
or twine around the cuff.

the "scalloped rosette July 4th" element
as shown here.


