
Pull the fob -- or manipulate strings
individually --
to make the pumpkin man dance!
Reminiscent of vintage string puppets,
this little man works, but is mostly-for-decoration.
He has multiple layers built up for front,
back, arms and legs
to provide strength and to imitate thin wood.
Strings thread through small holes in limbs,
thru body
interior and down thru layered fob's
channel to hang below. Posts separate body layers
to allow limbs to pivot and move.
to allow limbs to pivot and move.
Loop a ribbon through hanger hole to dangle
him from a peg, temp hook, door knob, etc.
Measures approx.
10.5" tall x 6.5" wide x .5" thick
(without fob) when assembled.
ASSEMBLY: 1. Identify and cut the shapes:
Coloration & Weight NOTES: to simulate painted wood,
I have used kraft colored card stock for the
"build up" layers, with colored accent front
or back layers, including darker kraft in some places.
Textured or regular card stock is recommended
to layer for the "build up" to make thick, wood-like
components. (I used 100# kraft card stock from
Michael's Crafts.)
A main body build up shapes (6 front, 6 back)
B body with post holes (1 front, 1 back)
C head base crescents D head top layer crescents
E eyes, nose accent components F mouth & cheeks
G contrast head base H ruff base and top accent
I body contrast and top accent
J star buttons (4-6 layers for two buttons)
K hand, cuff, trim accents
L arm (L & R) front, back & 6 build up layers
M upper leg (L & R) front, back & 6 build up layers
N lower leg (L & R) front, back & 6 build up layers
O (L & R) shoe and trim accents
P hanger front, back, 6 build up layers
Q top (larger) post R arm, leg, stop posts (8)
S fob back portion (4), front portion (4)
T fob (bottom and small top) interior portions (3)


 6. Position and attach eyes, nose, eye accents
and mouth unit onto head assembly, then
complete head by fitting the bottom "chin"
shape below mouth.


 Layer the ruff base and accent shapes,
then position and add centered, at lower head edge.
 Attach star buttons to the center section of body.
(NOTE: for many of the images through the
remainder of the tutorial, these stars were
inadvertently left off.)


 . . . flattening tabs on the backside
and attaching securely.

 . . . as viewed from the back.


 . . . layer and attach the interior bottom and top
onto the backside of back fob, taking care to align
outer edges of each.


 . . . then return string up through body center
to thread through hole of second arm
and prepare totie off in similar manner,
except . . .


 25. Position inner body front over the assembly,
face side down, and insert each post's tab end
through corresponding opening.
NOTE: this may take some time and require
patience and gentle manipulation,
including using a dull blade tool such as
a spatula to coax all tabs into and through
holes.
 Once tabs and through holes, bend back
and glue in place.
NOTE it will be helpful to use a flat press
against tool inserted under body front
and between posts to assist in the
tab attachment.

 NOTE: it will be helpful to use a press
against inserted under ALL areas of the
body layers being joined that can be
reached, such as the spatula shown here,
or . . .


 . . . here the fob is pulled downward.
You can also manipulate the strings
separately by inserting fingers
between the pairs on each side of fob,
or by rotating fob clockwise/counter
to produce different actions.
Loop a hanging ribbon through hanger
hole to display on peg, hook, door knob, etc.


Coloration & Weight NOTES: to simulate painted wood,
I have used kraft colored card stock for the
"build up" layers, with colored accent front
or back layers, including darker kraft in some places.
Textured or regular card stock is recommended
to layer for the "build up" to make thick, wood-like
components. (I used 100# kraft card stock from
Michael's Crafts.)
A main body build up shapes (6 front, 6 back)
B body with post holes (1 front, 1 back)
C head base crescents D head top layer crescents
E eyes, nose accent components F mouth & cheeks
G contrast head base H ruff base and top accent
I body contrast and top accent
J star buttons (4-6 layers for two buttons)
K hand, cuff, trim accents
L arm (L & R) front, back & 6 build up layers
M upper leg (L & R) front, back & 6 build up layers
N lower leg (L & R) front, back & 6 build up layers
O (L & R) shoe and trim accents
P hanger front, back, 6 build up layers
Q top (larger) post R arm, leg, stop posts (8)
S fob back portion (4), front portion (4)
T fob (bottom and small top) interior portions (3)

2. Layer and glue together the 6 body fronts
and 6 body backs into separate units,
adding one at a time, aligning edges
as accurately as possible, using smoothing tools
if available, and weights to flatten the assembly
during the drying process to minimize warping.

3. Assemble the head unit, beginning with
the base, then the base crescents, then
adding the sides, center top, matching
edges as accurately as possible.
NOTE the top crescent layer has feature
cut outs that will provide positioning guidance
and also allow features to be "counter sunk"
and appear more like they are painted.

4. Assemble the eyes, with the eye
"white" behind the pupil front, then
placing this unit onto the base with the
attached "smile" arch.

5. Assemble the smile unit by positioning
the cheeks onto the base, then placing
the separate "smile" over the matching
part on the base with ends fitting into
the cheek cutouts.

and mouth unit onto head assembly, then
complete head by fitting the bottom "chin"
shape below mouth.

7. Assemble the arm left and right fronts by
layering and fitting hand, cuff, trim and sleeve
onto the top "build up" arm shape.
8. Assemble the leg left and right fronts by
layering and fitting shoe, trim and stocking
onto the top "build up" leg shape.
Also layer the upper leg left and right fronts
onto the top "build up" upper leg shape.
9. Assemble the thickened limb shapes for
left and right leg componentss and arms by
gluing together all build up layers including backs,
accurately matching all edges. Use flattening
weights if possible to help minimize warping.

10. Assemble the puppet front by layering the body
base (show thru) and front, then positioning and
attaching to body build up front. Add head above,
taking care to "snug" the head at the body neck edge.

then position and add centered, at lower head edge.

(NOTE: for many of the images through the
remainder of the tutorial, these stars were
inadvertently left off.)

11. Prepare the large top post and 8 lower post
shapes by bending back slightly at each of the
vertical perforation lines. Also make sure
that all end tabs are separated.

12. Form the large post shape into a tube to
bring the straight edge to overlap the opposite
tab to perf line, and join.
NOTE it will prove helpful to wrap the post shape
NOTE it will prove helpful to wrap the post shape
around a 3/8" wooden dowel while forming post.

13. Form the narrower posts in the same manner,
using a wooden skewer to assist.

14. Insert one end of the large post front to back
through the hex opening at the top of the
inner body back . . .

. . . then bend the tabs outward on the back
and glue in place.

NOTE that it will assist to place the assembly
on a flat surface and apply finger pressure
all around the tube to assist the tabs to
securely attach.

15. Repeat the process for the narrower posts . . .

and attaching securely.

Here is the inner body back with all 9 posts
in position as viewed from the front, and . . .


(NOTE the following image shows the inner back
being positioned behind the front assembly,
which is incorrect.)
16. Position and attach to the back build up
assembly, applying thorough finger pressure . . .

. . . for an extended period all over the surface
between posts to ensure a flat and complete
joining.

17. Measure and cut a short 3/8" dowel stub
to provide strength to the hanging post,
then insert into the post opening . . .

. . . and push into place completely.
The dowel insert must NOT extend above
the tab perforations.

18. Complete the hanger by layering all
hanger shapes.

19. Layer the fob front, back, interior bottom
and interior top, then . . .

onto the backside of back fob, taking care to align
outer edges of each.

Finally, position and attach the built-up front
assembly onto the previous fob assembly,
taking care to match shapes.
The final result will include a string channel.

20. Position the hanger unit over the top post
and glue in place.
21. Position the arms and legs over their
respective lower posts.
(Upper posts are stop posts to help
prevent limbs from swinging too high
during the dancing action.)

22. Begin the stringing process by cutting
a pair of 20" lengths of perle cotton or twine.
Thread one end of first string through hole
of one arm and tie off with square knot.
Trim tail to scant 1/4".
23. Bring string downward through center
portion of assembly, then . . .

. . .thread end
through fob channel . . .

to thread through hole of second arm
and prepare totie off in similar manner,
except . . .

. . . before tying off, extend fob downward
to a length approx. 3.5" to 4" below bottom of
body, as is demonstrated here.

24. Repeat the stringing process with the
second length of string, attaching to one leg,
bringing it downward at body center,
through fob, then upward to thread through
second leg.
Before tying off, pull the fob downward
to even out both arm and leg strings.
Tie off, taking care not to pull strings
out of the "even" adjustment.

face side down, and insert each post's tab end
through corresponding opening.
NOTE: this may take some time and require
patience and gentle manipulation,
including using a dull blade tool such as
a spatula to coax all tabs into and through
holes.
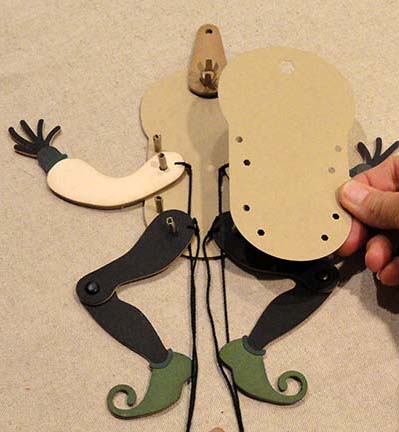
and glue in place.
NOTE it will be helpful to use a flat press
against tool inserted under body front
and between posts to assist in the
tab attachment.

26. Position body front assembly over
the inner body front, align and join.

against inserted under ALL areas of the
body layers being joined that can be
reached, such as the spatula shown here,
or . . .

. . . a narrow, thick ruler shown here.

Here is the pumpkin with fob in the
high position, and . . .

You can also manipulate the strings
separately by inserting fingers
between the pairs on each side of fob,
or by rotating fob clockwise/counter
to produce different actions.
Loop a hanging ribbon through hanger
hole to display on peg, hook, door knob, etc.

Here is the completed project
(with his buttons in place.)


