Showing posts with label star box. Show all posts

Tuesday, July 18, 2023

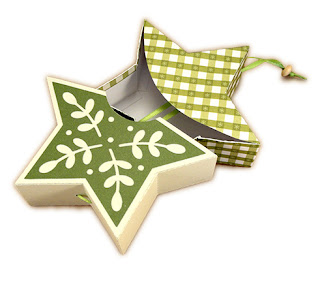
Star Box 3D Slide Together Orn


For use as treat of gift box, this modified five-point star 
shaped box is composed of half-shell lower star “hull” 
and inner star “compartment” with partial front face wall. 
Fill with contents as desired, slide compartment 
into lower hull, tighten hanging loop (with optional bead cincher), 
and the star appears as a “solid”. S
tar box measures approx. 4.4” wide x 4.2” tall when closed. 

ASSEMBLY: 1. Identify and cut the shapes:
A insert star back panel
B insert star front partial panel
C container star front & back overlays
D insert star boxing top portion
E insert star boxing bottom boxing
F container star front & back panels
G container star boxing (lower)
INSERT ASSEMBLY
2. Become familiar with the star box modified shape,
which includes "leg" side edges that are vertical
instead of being angled outward as is the case for
a more regularly-designed star. The insert star can
be rotated and will look like a star in many positions.
Take care that the TOP POINT remains at 12 o'clock,
opposite the vertical lower leg sides.
Also be aware that since the insert box has an OPEN
lower front where the boxing front edges DO NOT
attach to a front panel, but instead are folded back
as a sort of "hem" at opening edge. In the image below,
the pointing fingers indicate the straight edges at
both ends of top boxing strip, as well as ALL ACROSS
the lower strip front edge.

3. Prepare insert boxing strips by bending back on all 
perforation lines for boxing segments and edge tabs. 
4. To help keep the front "hem" edges oriented
correctly, the ends of upper and lower boxing strips
are each marked with a half-circle notch.
5. Bring the notched tab end straight edge of upper boxing
strip together with opposite notched tab, overlapping
to the tab perforation line, adjust for top and bottom
alignment, then join the seam.
6. Form the boxing into a ring to align and join
the second seam in the same manner.
7. Identify once again the "hem" tabs of lower front
edge then . . .
. . . apply glue to backside of hem tabs (these have
straight in-cut edged), then bend back to attach to
backside of boxing strip. Apply fingertip pressure
along glued areas.
8. Bend the boxing edge tabs inward.
Identify the front of boxing, if necessary, as the edges
that include the attachment tabs for partial front panel.
Invert the assembly to position the whole back panel
over the boxing framework. 
Make sure top of panel
is oriented to top of boxing - where hang holes are.
Position the first of top star panel edges next to
the corresponding boxing back top flange tab,
overlap straight boxing edge tab perforation line,
adjust to align ends of edge and ends of boxing tab 
accurately, then join the edges.
9. Move down one front panel edge and one boxing
segment, bend boxing to align tab perforation to
align with panel straight edge, adjust, then attach.
As seaming continues, NOTE that it may be helpful
to turn the assembly face down on flat work surface
to apply fingertip pressure along the tab seams
being joined, until completely and thoroughly secured.
10. Continue to work around the star until ALL edges
and boxing tabs are joined for back.
11. Follow similar process for the star's front panel,
beginning at center top, joining one side pair of
edges, then the final pair. Again, take care that
TOP of front partial panel is oriented at top
of star boxing.
CONTAINER ASSEMBLY
12. Position and attach the decorative overlays
onto the container front panels, with narrow
offset margin at star point edges, and with
curved edges of each layer lined up flush.
If possible, place a heavy flat weight over the layered
shapes and allow to dry thoroughly, for several
hours or overnight, to minimize warping or curling
of paper when using liquid adhesive.
13. Bend the container boxing shape in similar
manner to insert boxing, at cross perforations
(back at deeply angled notch edges, forward at
straight cut notch edges), and at edge tabs.
NOTE that it may be helpful to apply an extra,
directed PINCH at the narrow notch areas that
will fall at star points, to ensure that the folds extend
absolutely to end of wall segments.
14. Beginning at boxing center bottom where the holes
are located, position the first under-star edge along
the boxing tab, adjust, align and join edge.
15. Work in the same direction along one star side
to position and attach the remaining two edge seams.
Then, return to center to position and attach
the other half.
16. Turn the container assembly over to repeat
the process . . .
. . . for the second star panel.
FINISHING
17. To close the box, slide the insert into the top
opening of the container, then . . .
. . . carefully slide down until fully inside.
NOTE that the boxing seams may at first interfere with 
insertion, but this can be eased with a flat tool to help 
the legs not catch tabs inside.
18. To make hanger, thread an 18-20" length of twine
or narrow ribbon onto a fine gauge doll needle, 
then pass the needle through the insert from 
top to bottom on the aligned side pair of holes.
Pull through, leaving tail end outside top of insert
(make be helpful to secure there with piece of
temp tape to keep from pulling through).
Next, continue the needle pass through inside of
container hull and out corresponding hole at bottom.
Pull through enough twine or thread to continue.
19. Pass needle and ribbon/twine through container,
up through empty insert bottom hole . . .
. . . and finally out through top hole.
20. Pass ribbon/twine ends through a "stop" bead,
if desired (with or without needle assist), then . . .
. . . slide bead flush with top point. Adjust and knot
off ribbon/twine, with enough length of loop . . .
. . . to allow insert to be slid upward on ribbon to 
access contents.

Wednesday, October 28, 2020

Star 3D Box Joy Gift Card Holder

 
Gift card-giving container that can double as 
a hanging ornament, composed of base and lid 
which fit together as a box. 
Lid accent layers create the contrast chaser dots and sprigs, 
with “JOY” decorative letters and hearts pair attached in place. 
Inside base, a pentagon support structure has fold down 
flanges that create a recessed platform to attach and hold 
a standard plastic gift card, in plain or attached tabs variations. 
In Scandinavian-styled red and white like the model, 
this makes a special Christmas gift box. 
Change the contrast color scheme to greet a newborn, 
or express “JOY” for other occasions.  
Box measures approx. 7.14” wide x 6.79” tall x 
.75” deep when finished and closed. 

ASSEMBLY: 1. Identify and cut the shapes:
A front star LID layer 1   B chaser dots contrast layer 2
C sprigs contrast layer 3       D JOY letters and hearts
E LID boxing top, side, bottom strips
F back star BASE     G BASE boxing strips
H interior card five-sided platform
I interior platform shape (tab version also included)
2. Assemble the box front decoration layers by
centering and attaching the sprigs layer on top of
the chaser circles star.
3. Position and attach the separate 'O' onto
the corresponding portion of the welded 'JOY' shape.
4. Position the JOY assembly on front of sprigs shape,
taking care to space it as evenly as possible between
star edges and other cutout shapes.
Also position and attach the two tiny hearts in front of
the 'J'.  If using liquid adhesive, press the assembly under 
a heavy flat weight such as a wood plank or large book 
until completely dry to avoid warping of curling.
5. Identify the solid LID front star which has 'F' cut
into the center.
6. Prepare the LID boxing strips by bending back
at the center top perforation line (where hanging loop
punch holes are located), and at other perforation
locations where the deep angled flange tabs are
(for star points).
Bend forward at other perforation lines where 
a straight cut separates the flanges (for inside star angles).
7. Locate the top boxing strip where the loop hang holes
are, then . . . 
. . . position the first segment of the strip under the left
side of the LID star main shape's center point,
with straight star edge overlapping the flange to
perforation line, adjusting top to bottom to align 
as precisely as possible at inner angle and point tip,
and glue in place.
8. Continue along the strip to position the next two
segments in one motion along the next two edges
of the star, taking care to adjust and align as precisely
as possible.
As strip flanges are attached, flip the assembly
face down on flat surface and apply fingertip pressure
from the inside of the LID shape.
9. Position and attach the final segment of strip 1.
10. Bend the end tab of first strip forward, then position
and attach the plain end of second strip. Then . . .
. . . continue to position and attach the strip segments
along the LID star edge.
11. Position and attach the final (short) strip as was
done with previous end seam, then . . . 
. . . position and prepare to attach the final segments
to star edges, AND complete the end to tab seam
in the same action.
12. Position and attach the LID front decoration
assembly with slight inset at edges. If using liquid adhesive,
find a way to press flat while drying to avoid warping
and curling.
13. Repeat the BASE and boxing strips assembly
in similar manner to the LID.
14. Prepare the interior gift card platform strips by
bending back at vertical (short) perforation lines
between segments. 
Also bend the bottom rounded tabs inward,
and the platform flanges inward, and the enclosed
attachment tabs (at perforations) outward.
Also bend the bottom rounded tabs inward,
and the platform flanges inward, and the enclosed
attachment tabs (at perforations) outward.
15. It may be helpful to lay out the upper three-section
strip and the lower two-section strip, as shown here.
(NOTE that the upper end care platform segments
shown in this image are bent outward but should be
bent inward.
16. At strip ends, a strip end tab is bend inward
so that . . .
. . . the end tab can be positioned and attached at the adjacent
strip end while keeping the rounded connector tab
separate and out of the way . . .
and directed outward as shown here.
Complete both strip end seams.
17. Here is the prepared five-sided support structure,
with inward-bent platform flanges indicated by fingers,
bottom rounded tabs inward, and outer angle
connector tabs extended away.
To get a better visual, this image shows where
the gift card will sit . . .
. . . when all assembly is completed.
18. To get the orientation correct, locate the BASE's
top point where hanger loop holes are, and
the platform's top straight-across segment is, then . . .
. . . apply glue to the underside of the bottom tabs . . .
. . . to outer surface of connector tabs, and . . . 
. . . position within the BASE with platform angles
at the inward star angles as shown.
Center and adjust, then apply pressure
 to connector tabs, which will extend into
the adjacent point space to attach to inside surface
of boxing wall, and . . . 
. . . to bottom tabs.
19. Prepare to attach either version (plain shown) of
the platform 'roof' shape by applying adhesive to
platform flanges, then position (centered) roof shape
over flanges and apply pressure in any way possible
to secure in place.
Position the gift card on top of the plain platform shape
and use sticky dots or double-sided tape
to affix it in place. (NOTE: the alternate platform shape
includes tabs to help hold the card in place.)
20. Close the star box by sliding LID over BASE . . . 

. . . making sure the tops of both are aligned so that
loop holes align.
21. Thread cord, twine or narrow ribbon through
holes of both LID and BASE, and tie ends
for hang loop. Here is the completed gift card box.
NOTE: it may be helpful to use sticky dots or tape
between the LID and BASE walls at inward angles
to help the two conform to best star shape.
22. When recipient wants to open the box,
the loop through both layers may interfere,
but a scissor snip along the LID's edge perforation
cut will allow the LID hang holes to slip loose
to remove LID.
Here is the completed ornament box.