
This
unique and thoughtful hostess thank you card
is great for a Thanksgiving or
harvest celebration,
or simply an autumn greeting. Two offset front panels
are
centered on side-fold front card base.
Employ “print & cut” features of
Cameo system
to prepare the apron front, cut a second plain apron tag,
then
layer and glue together for sturdiness.
Complete basic cross stitch pumpkin on
apron-shaped tag.
Add narrow ribbon through side and upper corners
to replicate
apron strings.
(If preferred, omit the cross stitching holes and
printed words
and use plain apron shape cut from
fun autumn print, or add other sticker,
embellishment to apron front.)
Position and attach apron tag slightly askew
to
front of card. Stitching chart included in file download.

A dimensional (with side gussets) envelope is available
as a separate file to tuck this embellished A7 card
for enclosed giving (may not be acceptable for mailing).

ASSEMBLY: 1. Identify and cut the shapes:
A card base B accent (narrow border) C card front
D apron stitching tags (1 with print & cut phrase; 1 plain)
E printed copy of stitching chart
F embroidery floss

floss colors (DMC selections shown here for the sample project):
938 dark brown for stem
3011 olive green for leaf
3854 yellow for center contour
976 yellow orange for outer contour
3853 goldenrod orange for center contour
720 orange for contour outlines


4. Prepare the stitching apron tags by poking through all holes
using some suited tool such as this un-bent standard size
paper clip, to make sure that all the "crumbs" are moved
out of the way and brushed off the shapes.

Layer the two cut stitching discs on top of each other
and glue together, taking care . . .

. . . that ALL the holes and cut edges align as
precisely as possible. One way to check for alignment
is to use the paper clip tool to push through corner
and other random holes, and make adjustments as needed.

Once adjustments are made, press the layers on
a flat surface with a heavy flat object such as this large
book volume - possibly with something else heavy
placed on top of it - and leave in place until completely
dry, several hours or over night. This will reduce or
prevent warping or curling of the glued-up shapes.

5. Fold the card base backsides-together at perforation line.
6. Position and attach the front card accent panel,
centered, on front of middle accent panel with even
narrow margin showing all around as border. Then . . .

to the card front, centered with even margin all around.


7. Study this diagram to understand how to form
cross stitches for uniform appearance and tension.
NOTE that the RIGHT SLANT stitches are generally
placed across the row first, followed by the LEFT SLANT
stitches placed coming back across the row.
8. Prepare to stitch cross stiches by cutting a 30-32 inch
length of 6-ply floss for PUMPKIN CONTOURS OUTLINE color.
Following substeps describe how to separate single strands
from the 6-ply group to minimize knotting:
A) separate plies by holding the grouped floss length
somewhat firmly between fingers of offhand, isolating one
ply to pull away, then pulling it gently away from others
while the twists of the group begin to bunch up behind it.

B) Continue to pull even as the bunching expands
until . . .

. . . the single strand can be removed completely.
C) Repeat to remove a second strand.

9. Place the two plies side by side and . . .

. . . line up the ends. Holding the ends together,
smooth together to create a loop at the half-way point.

Thread the loop (or the four ends if preferred) through
the needle eye. Pull the loop through so that it is . . .
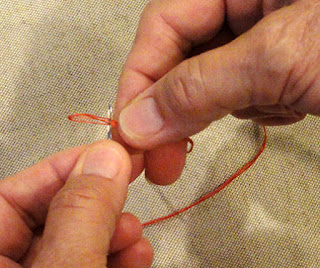

10. For this project, begin at the bottom of the left edge
of pumpkin design at the top left hole where
the first cross stitch will be created.
Each square on the pattern chart represents 4 holes that
would be needed to create both the right and left slants.
It may be helpful when counting where to begin to think
about the spaces between four holes as the STITCH.
NOTE that each stitch will SHARE holes with the side-by-side
stitches - this is why counting the spaces may be wise.

A) Count along the left edge row the 4 SQUARES that
represent the 8 cross stitch units that will be left blank,
then move right to skip the left edge row that will be
left blank, then insert the needle with thread UP from backside
in the TOP LEFT HOLE where the first X will be made.

of the loop end remains, then insert the needle
diagonally to complete the first right slant stitch.
On the backside of work, insert the needle
through the loop and . . .

. . . pull the loop tight to remove all slack.
This is the "tying on" process.

C) Insert the needle through to front of work, in
the bottom right hole of the next stitch above first stitch.

Continue along the left contour row to complete
the 12 (total) RIGHT slant stitches of outlines color. Then . . .

. . . return back down the row to add the LEFT
slant stitches to complete the cross stitches.
(NOTE that the TOP contour stitching will be completed
later in the contour color stitching.)
11. Move down to next row to complete right slant
and then complete that "row" by adding the left slant
for this single stitch row.

12. Continue to follow the chart down to the bottom
rows of this unit of the design to complete the next
2-X stitch row of right then left slant stitches, and
the bottom row of 4 stitches, and then move up to
middle portion of bottom contour to complete
the 5 stitch row that represents the pumpkin's indent.

13. As stitching proceeds, thread length will eventually
be used up. Before length is unmanageably short,
pause when the needle is on the backside of work
as a slant stitch is completed. Slip the needle under
3-4 stitches on the backside, then . . .

. . . slide the needle off, and trim the tails close
to the surface of the work.
This is the "tying off" procedure.

14. Prepare another needle-load of floss, then continue
to follow the chart to move UP the next contour
(but you can leave the top contour stitch until later) . . .


. . . then move back down that row to complete
the cross stitches.
15. Follow the chart to complete remaining contours
in similar manner, moving up to complete right slants
then back down to complete left slants. As the right-most
outer contour row is completed, tie off current floss load.
Then tie on with new floss to work left or right across
the pumpkin top contour, as desired.

16. With contour rows completed, the fill-in stitches
can be completed within. For the sample project,
the center contour with lightest shade of yellow was
completed first, then the next flanks of second color,
then finally the outer flanks.
17. Switch floss colors to add the brown stem stitches
and the green leaf stitches.

18. To complete the apron tag, cut a 16-18 inch length
of narrow ribbon (sample uses a slightly stiff 3/8" width).
Thread as shown here, down through one lower side
punch hole, behind apron to emerge from nearest
top side hole, down then up again, etc.
19. "Audition" the positioning of the apron tag
on card front, with right apron string hanging down
parallel to side of card, left string arched to tuck
behind apron edge. (You can trim excess now
or more preferably later once tag is secured in place.)

20. To keep ribbon behind tag and not seen from
front of work, glue-tack lightly along
the tag curve edge, then . . .

. . . on front of tag a tiny bit of adhesive to help
the neck loop stay flat.

21. Place and finalize apron tag positioning on
front of card, with strings positioned as desired.
Glue tag in place, and lightly tack ribbon streamer
ends to secure them.
Here is the completed card.

As noted, a dimensional envelope suited to
packaging this embellished A7 card (and others
of same size as well) is available as a separate design
download: Env 3D 5x7 for Apron Stitched Card


