
Set this mini oasis
above each place setting at your next tropical event
to serve as special treat and placecard holder all in one.
Custom-sized openings in the platform top fit the very common
2 oz. "to go" condiment or sauce cup available from many restaurants.
Custom-sized openings in the platform top fit the very common
2 oz. "to go" condiment or sauce cup available from many restaurants.
Can you feel that island breeze?

Not shown: name card inner oval & boxing decorative strips front and back

2.Identify the difference between the main platform layer (it has the smallest circle cutout and is the bottom shape in this image) and the added onto the top layer (it has the largest circle cutout - top layer in this image).
The main platform layer is the one that the boxing strips will be attached to.

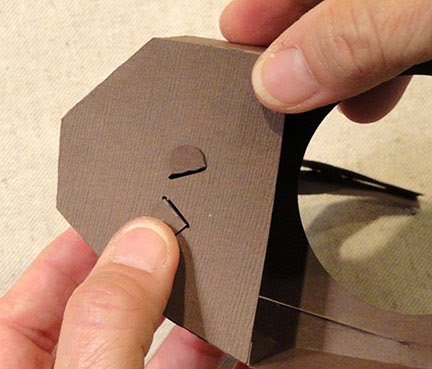
3. Identify the edge that the first segment of the boxing strip will be added to. The shape shown here has the front edge at the bottom of the image, with the name card slot at the back. The edge to begin with is being indicated by my finger - straight over from the tree slots.

CONSTRUCTION:
1. Identify and cut the shapes:
A platform first layer
B platform top added layer
C boxing front section
D boxing back section
E platform bottom layer
F palm tree base pieces (left and right)
G palm tree face shapes
H single leaves (2)
I leaf trio
J name card oval
Not shown: name card inner oval & boxing decorative strips front and back
2.Identify the difference between the main platform layer (it has the smallest circle cutout and is the bottom shape in this image) and the added onto the top layer (it has the largest circle cutout - top layer in this image).
The main platform layer is the one that the boxing strips will be attached to.
3. Identify the edge that the first segment of the boxing strip will be added to. The shape shown here has the front edge at the bottom of the image, with the name card slot at the back. The edge to begin with is being indicated by my finger - straight over from the tree slots.
4. Prepare the front (longest boxing strip by folding tab flanges back. Also fold back at side edge vertical perf lines, except the line beyond the third segment is folded outward ("valley") fold.
5. Align and join the target platform edge at the tab perf line of the first segment of the boxing strip. NOTE that the top edge of the boxing strip has tabs at each segment.

6. Fold the boxing and swing the second segment into place to align with the platform second edge, then adjust and attach.
Continue folding to align, adjust, then attach each segment and platform edge in similar fashion until the entire front boxing strip is in place.

7. Prepare the back boxing strip as for the front (see step 4 description), then overlap the left end edge at the front strip's end tab, adjust and join.
8. Continue with the remaining four segments of the strip and platform edges.

9. As the final segment assembly commences, fold the end tab under, then align, adjust and attach as part of the process of the final segment attachment. The boxing strips are now completely attached to the main platform shape.

10. Turn the platform assembly backside up and make sure all the boxing lower tabs are folded inward. Position the platform bottom layer over the corresponding edge tabs, adjust then glue in place.

11. Position and attach the top layer platform shape over the attached platform so that edges and slots match exactly.

12. Fold the tabs on the left tree base back. Align the straight edge of the right tree with the tab perf line of the left piece. Adjust to make sure that bottom angle edges align accurately, then glue the tab in place behind the right trunk straight edge.

13. Align and glue the other left trunk upper tabs to corresponding edges of right trunk.
 14. Insert the trunk long tabs through each of the top surface slots, then push the truck into place so that the slots continue through the interior space and exit out the corresponding slots in the platform bottom.
15. Fold the tab ends back and glue in place.

16. Fold the bark scale shapes of each face shape up slightly and curl outward.

17. Position and attach the face shape to its corresponding tree base shape, taking care NOT to glue the bark scale shapes down.

18. Assemble the leaf units with the contrast "veining" shape on top of its corresponding single or trio leaf base.
Fold end tab downward. Curl the tip areas of all five leaf shapes slightly.

19. Glue the tab of one single eaf to the side of one trunk just below the top end prong shape.. Glue the other single leaf to opposite trunk side in similar fashion.

20. Position and slide the trunk top tab through the center slot of leaf trio unit. Apply a little glue to leaf unit underside to attach.
11. Position and attach the top layer platform shape over the attached platform so that edges and slots match exactly.
12. Fold the tabs on the left tree base back. Align the straight edge of the right tree with the tab perf line of the left piece. Adjust to make sure that bottom angle edges align accurately, then glue the tab in place behind the right trunk straight edge.
13. Align and glue the other left trunk upper tabs to corresponding edges of right trunk.
15. Fold the tab ends back and glue in place.
16. Fold the bark scale shapes of each face shape up slightly and curl outward.
17. Position and attach the face shape to its corresponding tree base shape, taking care NOT to glue the bark scale shapes down.
18. Assemble the leaf units with the contrast "veining" shape on top of its corresponding single or trio leaf base.
Fold end tab downward. Curl the tip areas of all five leaf shapes slightly.
19. Glue the tab of one single eaf to the side of one trunk just below the top end prong shape.. Glue the other single leaf to opposite trunk side in similar fashion.
20. Position and slide the trunk top tab through the center slot of leaf trio unit. Apply a little glue to leaf unit underside to attach.

21. At this point you can slide the 2 oz. plastic serve sauce cup into the circle cutout, for a test, if you like. Note that the cup's rum should slide into the recess circle.

22. Fold the platform decor strips (front and back) at vertical perforations, then attach with upper and lower offset to the front segments of boxing strip. Begin at the same first segment as was done for the boxing strips (see step 3).
23. Prepare the "guest name" inner oval with names as desired (use Silhouette's print & cut process), and its offset outer contrast oval then attach smaller to center of larger. Bottom of oval fits into back platform slot.
(In this image, you can see the bottom of the name tag oval inserted through the slot.)

Here is the finished project, without the cup in place.


