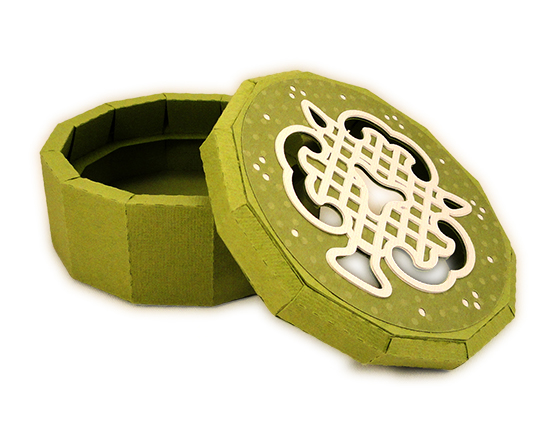
Facetted heart front and
back domes are edge-joined
to form dimensional “puffy” heart which is mounted
on a dowel-reinforced square post.
Fancy tiered stand with angled checkerboard
accents
anchors the post, and can be invisibly weighted for stability.

Use
this decoration "plain" or with offset multi-patch overlays,
in many settings, as Valentine or other holiday decor,
wedding
centerpiece or serving table accents,
baby shower decoration, and more.
Heart
measures approx. 9.5” wide x 7.625” tall
x 2.5” deep at center;
heart on post
and stand measures approx. 14.75”.
Stand base measures approx. 4.25” x 4.25”.
(1.5”
shorter post shape also included to make
an ensemble pair of hearts which are
two different heights.)
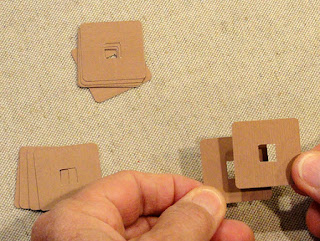
ASSEMBLY: 1. Identify and cut the shapes:
A front heart facetted dome
B back heart facetted dome with finger access windows
C window covers
D interior vertical center support heart
E interior horizontal shelf supports (2)
F post collar support stacks (2 sets of 4-5 each)

H stand top layer with post anchor hole & slots
I stand base post support collar squares (4-5)
J stand tier 1 K stand tier 2
tier 2 accents: L contrast trapezoid base (4)
M checker overlay (4)
N stand center column
O column post support collar squares (4-5)
P post (wrap for 1/4" dowel)


 As part of the bending and creasing of some of

2. Prepare the shapes that need to be glued up into stacks
to be drying as other assembly progresses:
A) layer and glue together the heart post top collar shapes
into 2 sets of 4-5 each, taking special care - here and
throughout - to align ALL cut edges as precisely as possible.

Place the glued-up stack on a flat surface and place
a heavy flat object on top, such as a wooden plank or
the thick book shown here, until fully dried. This will
help minimize curling or warping when using liquid adhesive.

B) layer and glue together square bases; press
under heavy weight until completely dry.

C) layer and glue together each set of post collar shapes,
then press under a flat weight until dried.
NOTE that the collars can also be attached in place
to their corresponding shapes - base and column
(shown in Step 36) - at this time as described in Step 34
to have them dried and ready in regular progression
without need to wait, if desired.
3. Prepare the front dome shape by bending back
on all perforations for facet panels, edge tabs.

the facets which are flanked by narrow tapering end
of wedge tabs, "pinch" the ends of perforation lines
to ensure that the perforation line continues as
crease all the way to the point.
 4. Begin to form the shape into a dome by applying

glue to the wedge tab at lower left, then overlapping
the straight edge of adjacent facet across wedge tab
to align as precisely as possible at perforation line.
 NOTE that it may assist with the completion of these

seams to invert the shape on a flat work surface,
adjust so that the seam area is flat, then apply
fingertip pressure across the entire seam, paying
particular attention to the wedge tip area of seam.
 5. Next, bend the facet segments to allow the middle

vertical seam to be formed by overlapping the straight
edge of inward facet across the wedge tab to
perforation, and complete the seam. Also complete
the mirror image seam on opposite side of front dome.
 6. Adjust/allow to bend dome halves to bring top center

seam edges to align, overlapping the left side plain edge
to overlap across the tab to perforation line. Adjust
the edges for proper top to bottom alignment,
then glue the seam.
 7. Adjust the dome to push the upper seamed area

"down" to allow horizontal two-part straight edge
to overlap the left & right tabs near center top seam
(completed in step 6 above), and join seam.
 8. Complete the back dome assembly in similar manner.

9. Prepare the heart interior support by bending back
the edge tabs, as well as . . .
 . . . bending the center "post" attachment tabs,

bending in alternating order, bottom pair forward,
second pair back, etc.
 10. Glue the edge tabs in their folded positions,

thus creating a thickened edge for increased support.
 11. Prepare the two interior "shelf" supports by bending

back on all perforation lines, except bending forward
at bottom edge tabs, and at "box" side tabs.
NOTE that as viewed in image below - where bottom tabs
are bending FORWARD - the face side of "shelf" panel
visible is the underside.
 12. Position and attach one collar stack at the center

U-shaped notch, on the underside of the shelf portion
of the shape. Repeat for second shelf.
 13. Form the extension into a "box", bending the bottom

flange under to align and attach to upper side of shelf.
 14. Apply glue to the underside of the side end

flanges, then bend and push toward center
to form box's side wall - push until perpendicular;
attach flange to shelf. Repeat for second side.
 15. Position one shelf on front or back face of heart

support, with collar/underside downward, and insert
bottom tabs into slots - filling upper half of slot space.
 On opposite face of heart support, bend the tabs upward

and attach in place.
 Apply glue to the narrow bottom of the box, then

reposition the "box" to attach to support, forming a
perpendicular support shelf.

 . . . tabs are bent downward and glued in place.


 19. insert the dowel inside and sliding into place so ends

16. Repeat for the second support shelf, positioning
it on the opposite side of heart support to where
the first shelf was inserted and attached.
For this second shelf, the tabs are inserted into
the bottom half of the slots, then . . .


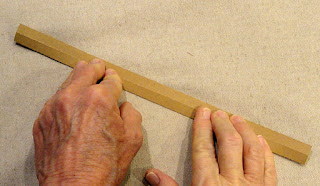
17. Prepare the post shape by bending back on each
of the long perforation lines for skinny facet panels
and side flange.

18. Form the shape into a tube to overlap the straight
side edge across the opposite flange to perforation line.

Flatten the tube on work surface to apply fingertip
pressure all along the seam until completely attached.

Re-form the shape into its tube form.
Align ends of 1/4" diam. wooden dowel and post tube and
mark on dowel the cut-to-size length. Cut to size
and lightly sand ends.

are even.

 . . . also into the "well" created by the collar stacks

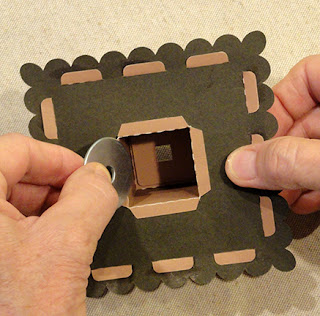
20. Apply glue to the inward surfaces of the center
post opening tabs, and . . .

(on each side of heart support) where dowel end
will be inserted. Then . . .
 . . . insert the dowel into the space between the post

opening tabs, and push firmly into the collar well.


Once post top end is in place, adjust tabs so that
the crease lines of ALL run at the vertical diameter
of post, with the bottom "point" aligned at center
of post face also.

Apply pressure to all post attachment tabs until secure.

21. When post and heart support with shelves unit
is firmly dry, position the assembly into the open back
of the front heart dome and adjust so that ALL edge
flange tabs are extending around the heart shape.

on each side of center top, then bend down around
support edges and glue in place. (Leave the attached
triangle-shaped tabs at center top and center bottom
unconnected til later in process.)
NOTE the heart support is sized to allow a very slight
amount of wiggle room within heart dome edges,
so do a "dry fit" to see where bottom fits best, then
adjust if necessary to "split the difference" of any
gapping that may occur.
 22. Bend triangle-shaped "tabs" at center top and bottom

out of the way, then place the back dome over
the assembly to center and line up the top two adjacent
angled edges with tab perforations.

then bend down into position to align outer free edges
as closely as possible to back dome facet edges.
Hold each in place until firmly attached.

nozzle of quick-grab adhesive (Fabri-Tack suggested)
to apply adhesive at rim edge of one half of
front assembly. Then . . .
 . . . align and "pinch" the edges together and hold

together until joined. HINT: move fingers from one facet
edge to another to help all on one side align and join.
 24. Bend the bottom triangle tabs over into

position as with top triangle tabs and join in place.
 25. Identify, position and attach the triangle "covers"

overlaid onto the corresponding facets with windows.

STAND

STAND
26. Prepare tier 1 platform by bending back on all
perforations for center panel, walls, corner tabs;
also bend forward at bottom edge tabs.

27. Bend the walls back at corners to align straight
edge over inward-bent corner tabs, and join
each corner seam.

28. Prepare the tier 2 platform shape by bending similarly
to tier 1.

29. Prepare the checker panel accents by centering
the checker cutouts on the contrast base trapezoids,
and attaching.

30. Position each checker panel assembly onto
corresponding trapezoid area, centering with narrow
offset margin all around.

31. Bend the platform walls into position to join
each angled side seam.

32. Prepare the column shape by bending back on
perforation lines for side wall panels, forward on
bottom tabs . . .

. . . bending back on "lid" edge perforation, then
forward on the four lines around the lid square.

33. Form the column shape into a tube to align
and join the side seam. NOTE that . . .

. . . it is possible to press the column shape flat
to apply finger tip pressure along the seam edge.

34. Position and attach the two post collar stacks:
one is placed on the backside of the column "lid",
and the other on the top of the base scalloped square.
taking special care that the post square openings are
as precisely aligned as possible.
Press under a flat weight until thoroughly attached.
35. Prepare to bend the column "lid" into place by
applying glue to the wall between column and lid,
and to underside of three other edge flanges.

. . . bend the lid into position to attach connected
wall onto inside of tube, also . . .

. . . tucking edge flanges into tube.

Push lid into position until flange edges are even
with top column edges.

36. Position the column shape (with bottom flanges
bent outward as shown) onto the base shape
with bottom bend edges surrounding the post support
collar stack. Make sure it is centered, then . . .

firmly attach in place.

 At underside of tier 1, bend the "corner-ish" tabs

37. Join tiers assembly by inserting tier 2 tabs
through slots on top of tier 1.

outward and glue to underside.


 . . . tabs inserted into base slots.


 44. It may be helpful to hand number the shapes
 . . . position over corresponding heart dome facet

38. NOTE that the next couple of images are from
identical assembly steps from a different project
design which has scalloped base edge.
Apply quick-grab glue to lower 1/3 of column sides
(where tier 1 flanges will have a chance to
adhere), then . . .
. . . slide the tier 1 & 2 assembly over top of column . . .

. . . and down into position with column emerging
through tier 2 top window, and . . .
Bend tabs inward and glue in place to underside.
NOTE it will be helpful to place platform base-down
on flat work surface and apply finger pressure in
tab positions to help with attachment.

39. To help prevent stand with heart from tipping over,
consider hot melt-gluing a few large metal washers
as weights onto the interior walls of the column at
this point in assembly.

40. Apply adhesive to the underside of the platform
top accent layer. Then position it over the layered base,
and glue the platform together, taking care that outer
edges align as precisely as possible all around.

Apply pressure along all four edges to firmly attach.
If possible, place weights or "pinch" with folio clips
along ALL edge margins to help minimize warping or
curling of these edges during the drying process.

42. Apply quick-grab glue to bottom of post, then
insert heart/post assembly into the post hole of
column, through tiers assembly, then "fish" around
until post end "seats" into the reinforcement collar
at the bottom. Apply pressure and hold in place
until thoroughly dried.

43. If desired, cut various paper "patch" overlays
for the heart dome facets. To simplify the process of
choosing varied paper patterns that won't inadvertently
line up next to same pattern, and to "balance" the color
values and pattern visual weight, use the shapes as
TRACING TEMPLATES then hand cut with rotary cutter
& ruler or scissors.
44. Below is a diagram for numbering the pieces to help
minimize confusion about which triangle shape fits over which
facet. The cutting shapes provided are for one-half of heart only.
Reverse the shapes to trace & cut the overlays for
the opposite half. If adding patch overlays to back dome
as well, trace & cut 2 sets.

to correspond with the diagram above prior to removing
them from the cutting mat after cutting is complete.


45. Position the template shape, trace with .05 or .07
mechanical pencil, trim to traced size, then . . .

with narrow offset margin all around, then glue
in place.
 Here is the patchwork overlay variation.