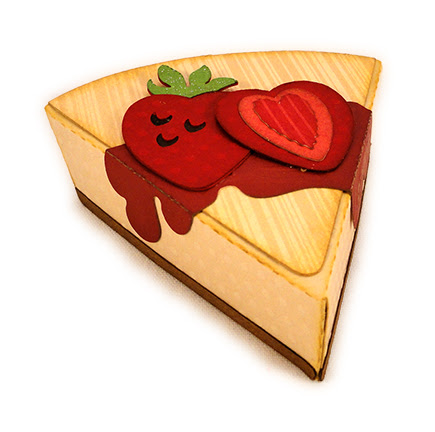
Box
composed of imitation pie slice LID which fits
snugly over triangular BASE. Pie
details include
top wedge with side and back wall “crust” rim,
topping “puddle”, strawberry slice pair.
topping “puddle”, strawberry slice pair.

“Pie Tin 3D Tray”.

Consider adding the “Say Cheese”, “Spice It Up” or
“Sweetie Pie” companion print & cut tag designs.

“Sweetie Pie” companion print & cut tag designs.

Pie wedge measures approx.
2.875 center length
and height .875” tall hull.
and height .875” tall hull.
ASSEMBLY 1. Identify and cut the shapes:
A main box LID hull
B crust trim for lower edge of LID hull
(NOTE the back angle portion shown has been removed
in final cut file update)
C LID rear wall D crust lower edge trim for back wall
E BASE box
F wedge top accent layer
G topping "puddle"
H strawberry shapes: base with hole cut out,
main overlay with seed cut outs, leaf unit,
seeds contrast circle insert
I strawberry slice shapes: base, middle, inner

2. The cheesecake pie wedge box basic assembly for LID and
for BASE are virtually identical to the fruit pie slice box,
in the event that you have already assembled that design.
Prepare the hull by bending back on all perforations for
wedge, side walls, tabs.
3. Position and attach accent shapes: top wedge within the perforation
angled lines and flush with back curved edge, crust trim strips
along lower edges and even with side cut edges of perf lines.

completely dried), add back curl to the rear wall unit
in an amount that helps it match the hull back curve.
 5. Bend back rear wall top edge tabs.
 6. Position the rear wall tabs edge centered along


the hull curved edge, align ends precisely
and begin to attach in place.
NOTE it may be helpful to first attach ends and
secure, then . . .
 . . . push middle of seam into place to match

perforations of tabs with hull curve edge and
ease the edges together to secure the full length.
 Reverse the assembly onto a flat surface to apply

fingertip pressure along the tabs from the backside
to fully secure seam.
 7. Bend the walls into position with tabs bent

inward to align, adjust and attach at back corner
and front center point seams.
 9. Begin the finishing details for LID by bending

the (optional) topping "puddle" shape back at
side angled perforations.
 Position and attach to the LID at position where

the angled perf lines match the wedge edges snugly,
with side drips hanging down and attaching to
side walls.
 10. Prepare the strawberry unit by assembling shapes:
 A) position the whole strawberry on top of


the base layer, then . . .
 . . . turn the assembly over to insert and attach

the contrast disc into the circle cut out.
 B) position and attach the leaf unit where it

matches the base edges, tucked snugly into
the angle above the whole berry front layer.
 11. Prepare the strawberry slice by assembling shapes,

middle and smallest centered onto base
as shown . . .
 . . . slightly higher than centered.
 12. Arrange and attach the whole berry and


slice onto LID front, slightly angled as shown.


13. Prepare the BASE shape (sample shown here
is from the fruit pie box project) by bending back
on all perforations for main wedge shape, walls, tabs.
NOTE that the back panel of box base can be
identified by the notch.

14. Bend the walls into position, with tabs bend inward,
align and join all three corner seams.

NOTE that the narrowness of the wall angles at
tips may be more easily joined by slipping
a spatula tool blade behind the seam to provide
a press-against surface.

To close the box, insert the BASE into the bottom
opening of the LID - flexing slightly if necessary to fit
back angles inside LID walls, then push BASE into place
until bottom is flush with hull wall lower edge.

15. If desired, prepare and attach the print & cut
pie label (Say Cheese version shown here).
To attach with twine, determine desired position,
then create small holes through LID top layers
and nearby through rear wall using an ultra-sharp
pointed tool such as this awl.

Thread twine through the two holes, slip tag
on to twine, then tiw knot and bow.

Consider preparing up to six slice boxes to fit into
companion Pie Tin design.


