
Creative adventure awaits if you "punch your ticket"
to build and decorate this large box that takes the form
of a Victorian round hat box travel case.

These three views show the decorations that are included
in the cut file for this box design
that measures approx.10" wide x 8" tall x 3" deep.
that measures approx.10" wide x 8" tall x 3" deep.
Details include lid that hinges to box base at bottom edge,
dimensional handle with end
brackets,
accent shapes for front and side panels,
faux strapping for box back,
strip with latch bracket closure, and more.
Punch holes included for inserting
approx. 34 mini brads
plus several small nail heads (or substitute nail head
studs for all).
Decorate the front with included accent shapes (leaf flourish,
fleur de lis,
sizes of single and layered flowers, “Bienvenue” word cutout,
circle ID hang tag) plus purchased decorations including feathers,
stud
flourishes, paper leaves, chipboard letter, or anything you wish.
 ASSEMBLY:
1. Identify and cut the shapes:
A box lid main shape (front)
B front edge rim
C double strap closures shapes
D front decoration shapes
E latch bracket strip
(not shown: end build-up shapes - see Step 24)
F handle strip and end brackets
G box base main shape (back)
H base edge rim
I back straps
J back bottom brackets
K lid boxing strips ( sides & ctr)
L top boxing strip with accents
M right boxing strip with accents
N left boxing strip with accents
O bottom boxing strip
P "feet" box shapes

2. Prepare the base boxing strips by folding on cross perforations (all mountain folds), and folding shorter connect tabs back, wider rim flanges back.
This is the top center boxing strip that includes the punch holes that will attach the handle brackets on each side of the center top panel.

3. Prepare to glue the back main shape center top edge to the top center boxing shape by lining up edge exactly at boxing perforation line. Adjust side to side so that cross perforation lines at ends of panel section line up with edge ends, then attach.

4. Bend the boxing strip so that the next section's tab perf line matches up to the next edge section of the main box back and glue in place.
Continue to bend strip, line up and attach the remaining edges of main box back and top boxing tabs until all edges of this boxing strip are attached.

5. Join the side boxing strips to the ends of the attached center top boxing strip by overlapping straight edge at added strip's end tab perf line, adjusting for top/bottom alignment, then attaching.
NOTE that small cutout symbols in the edge and end tabs of the boxing strips will identify which ends join up. Here, the tiny square cutout in the tab being joined would match to the same symbol in the connector tab already joined to the back main shape (but still visibly on the inside of the assembly).

6. Join the corresponding box main shape edges to the added side boxing shapes as was done before for the top center boxing strip. Attach all edges and tabs of BOTH side strips.

7. Attach the bottom boxing strip (has cutout "windows" for the feet boxes) to the bottom straight edge of the main box shape.
8. Bend the bottom boxing strip into position so that it's end tabs can be joined to the end straight edges of the left and right side boxing strips.

9. Fold back (inward) the rim flange tabs of the boxing strips and glue to the inside of the box.

10. Position and attach box base backside decoration accent shapes: H edge rim ring;
I faux strapping strips with punch holes lines up; J bottom brackets with fold perforation at box edge, top points centered over strips.
 11. Position and attach each of the boxing strip accent rectangles.
Here, the center top panel accent is in place, centered so that there is a small (less than 1/8") offset margin all around. (See next frame for gluing instructions!)
The left top panel accent is being added, which includes three hold punches for the handle bracket brads. NOTE that the left accent and right accent are not interchangeable, so determine which fits on each side as you prepare to attach.
 GLUING TIP FOR TOP CENTER ACCENT:
since the latch strap will need to insert into the slot and be pushed in an inch or more, make sure that there is NO adhesive attaching the accent to the boxing strip in this area - only at edges, front and sides beyond slot.
12. Layer and attach the two latch straps (reinforces the strap). Apply adhesive to the end top and bottom of the strap, then insert into the strap and push back (in) as far as it will go.
5. Join the side boxing strips to the ends of the attached center top boxing strip by overlapping straight edge at added strip's end tab perf line, adjusting for top/bottom alignment, then attaching.
NOTE that small cutout symbols in the edge and end tabs of the boxing strips will identify which ends join up. Here, the tiny square cutout in the tab being joined would match to the same symbol in the connector tab already joined to the back main shape (but still visibly on the inside of the assembly).
6. Join the corresponding box main shape edges to the added side boxing shapes as was done before for the top center boxing strip. Attach all edges and tabs of BOTH side strips.
7. Attach the bottom boxing strip (has cutout "windows" for the feet boxes) to the bottom straight edge of the main box shape.
8. Bend the bottom boxing strip into position so that it's end tabs can be joined to the end straight edges of the left and right side boxing strips.
9. Fold back (inward) the rim flange tabs of the boxing strips and glue to the inside of the box.
10. Position and attach box base backside decoration accent shapes: H edge rim ring;
I faux strapping strips with punch holes lines up; J bottom brackets with fold perforation at box edge, top points centered over strips.
Here, the center top panel accent is in place, centered so that there is a small (less than 1/8") offset margin all around. (See next frame for gluing instructions!)
The left top panel accent is being added, which includes three hold punches for the handle bracket brads. NOTE that the left accent and right accent are not interchangeable, so determine which fits on each side as you prepare to attach.
since the latch strap will need to insert into the slot and be pushed in an inch or more, make sure that there is NO adhesive attaching the accent to the boxing strip in this area - only at edges, front and sides beyond slot.
12. Layer and attach the two latch straps (reinforces the strap). Apply adhesive to the end top and bottom of the strap, then insert into the strap and push back (in) as far as it will go.

13. Prepare the handle strip by folding the end tabs back.
Insert each end through the loop of the handle bracket . . .

. . . then fold the handle end back and glue in place, taking care to line up the handle and tab punch holes exactly.
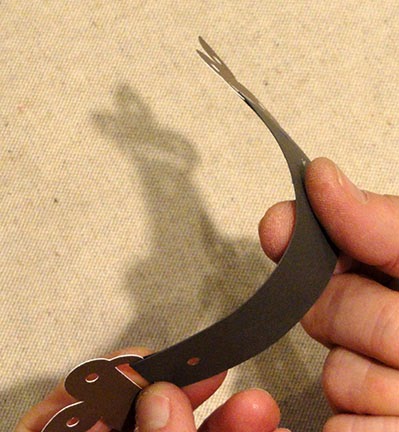
14. Add some curl to the handle strip between the end brackets by sliding the strip between finger tips and over the round of lower finger (think: curling ribbon).

15. Position the handle assembly on top of the box base assembly so that the bracket holes line up with the panel holes. Glue brackets in place.

16. Prepare the feet boxes by folding as shown, with long side and end perforations as "mountain" folds, top edge long and short end flange tabs outward as "valley" folds.

17. Create the "box" shape by overlapping the short vertical end straight edges over the wedge tab perforation lines at ends of the long side panels, and gluing in place.
Complete this short seam on all four corners of each of the two "foot" boxes.

Here is how the completed foot box should appear.

18. Apply glue to the face surface of each of the flange tabs . . .

. . . then slot the box into the rectangle window from the inside of the box base. Apply pressure to attach each flange to the inside of the bottom boxing strip.
Repeat for the second foot box.

This image shows the first of the foot boxes in place as viewed from the underside of the box base.

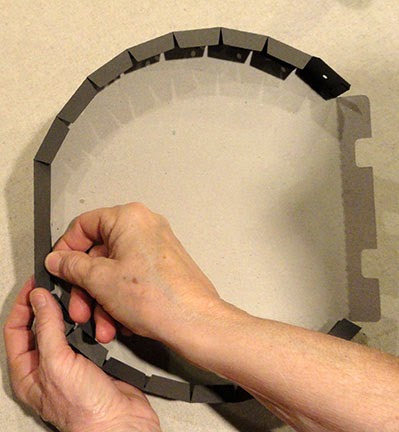
19. Prepare the LID boxing by joining the longer top center strip between the left and right side strips. Small "1" and "2" cut symbols in the end or connector tabs will identify how to join then up.
(Here the "1" of the center and side strips are circled to help locate them in the photo.)

20. Attach the LID boxing to the main front shape in the same fashion as was done for the box base and boxing strips.
That is, line up the center top straight edge of the base front shape with the long top center section of the boxing, adjust end to end for proper alignment, then glue in place with the front straight edge lined up exactly at the rim tab perforation line.
21. Fold the rim edge flange tabs back and glue in place, including . . .

. . . the end flange tabs at the bottom of each side boxing strip.
(You can see here that the front main shape does not have rim boxing extended across the bottom edge. Rather, as seen here, there is a long shaped "hinge" strip that is part of the cut shape.)

22. Apply glue and attach the front open ring edge accent shape. Take care to line up all the outer straight edges with the constructed edges of the front main shape.

23. Apply adhesive to the underside of the hinge strip at the bottom of the front assembly, then position and attach to the bottom of the box base.
Take care to adjust end to end, and to make sure that the hinge perforation line seats properly at the box base bottom straight edge (now inside and under the lid assembly).

24. Prepare the front strap bracket by adding at least 2 left and 2 right "build up" shapes to the ends of the backside of bracket shape. This will allow the strap to be inserted under the bracket more easily.
Take care to line up edges and punch holes accurately.

25. Attach the large front panel to the lid (see next frame for more information about the decorations of the front panel).
26. Position the bracket over the lid, with punch holes aligned, and glue sides ONLY in place.

27. This image shows the approximate placement of the decorative shapes that are included with the design for the model Travel Case. Arrange and attach your front decorations at this time.
As can be seen in the vignette (staged) photo at the top of this post, other decorations were added. Use your imagination, check your collection of "findings" or go shopping.
DECORATION IS THE FUN PART!
As can be seen in the vignette (staged) photo at the top of this post, other decorations were added. Use your imagination, check your collection of "findings" or go shopping.
DECORATION IS THE FUN PART!

28. Insert all the brads in the punch holes. Shown here are the two attached through the front strap latch bracket.
Pairs of small nail heads can also be attached at the tiny punch holes on the box back strap brackets (brad holes are not included at these positions in the cut file).

NOTE that when closing the lid, the bottom edges of the LID rim should be carefully directed to the outside of the base boxing.

To close the box, slide the latch strap under the bracket.
Here, again, is the finished model Travel Case.

This is so gorgeously vintage! I didn't realize that it was a travelling case when I saw the picture on Facebook and I LOVE that idea of it! You always come up with the most wonderful file ideas!
ReplyDeleteThanks, Beth. Glad to have you as my audience as I envision and create!
ReplyDeleteI LOVE this! I knew it had to be yours when I saw it. I just bought it and can't wait to put it together!
ReplyDeleteTracy, fun to have a friend watching and commenting so favorably. I appreciate it.
Deletebonjour,
ReplyDeletela France est à l'honneur, c'est magnifique bravo merci !
cordialement
martine
Mercia vouz oussi. Votres mots si gentiles me rendres heureuse!
Deletecoucou,
ReplyDeleteje ne suis jamais déçue de vos superbes créations ! vous méritez tellement
pour moi personne ne vous égale sur le site silhouette , vos créations sont bien faites des tutos excellents , j'ai toujours hâte de découvrir vos magnifiques créations , je pense pratiquement avoir tout acheté , enfin depuis que j'ai ma cameo
bravo bravo et merci
Martine
Vous etes trop genereux. Nous vison la lune, mais ne nous attendons pas à frapper la cible à chaque fois. Merci encore.
Deletebonjour,
ReplyDeletenon je suis réaliste et sincère, croyez moi vous atteignez largement votre objectif!
agréable jjournée à vous,.... alors ! à votre prochaine création!
bien cordialement
martine
bonjour,
ReplyDeleteest ce que la tour Eiffel sera sur le site silhouette svp ?
merci
cordialement Martine
Patine, nous allon vendre la tour Eiffel sur notre propre site qui s'apelle SnapDragonSnippets.com, mais je pense qu'il sera quelque jour de plus jusque ce design serais dedans. Je vais dire à ma fille
Delete(la patronne de SnapDragon) que vouz voulez le voire dans le site. On vera. Merci encore.
Patine, Kenzie Daley (la patronne de SnapDragon Snippets) m'a dit qu'ils vont mettre le tour Eiffel design sur le site SnapDragon demain. Bonne chance avec votre prochain projet!
DeleteI made it. so much fun!!! Thank you very much for this patern. My daughter is so happy with her case.
ReplyDeletehttp://scraplijn.blogspot.nl/2015/04/these-are-few-of-my-favorite-things.html
merci tout plein
ReplyDeletecordialement
Hi Jodi , thank you for your comment on my blog. You asked me if you may show the suitcase I made on your blog. Of course, I consider that even as a compliment . Thank You very much.
ReplyDeleteJust brought these and am doing it right now going to put a mini album inside for my mothers day gift from the kids to their grandmother
ReplyDeleteWill the Silhouette Portrait work with this design?
ReplyDeleteI'm new to using silhouette cameo and when I opened the file, the whole area is larger than 12 x 12. Should I move the images around and save them as different 12 x 12 pages?
ReplyDelete