
Friendly fowl for decor and display is
constructed
of body halves composed of lid and base boxes
which join at the
center wall.
Tube legs (reinforce with 5/16" wooden) connect
through body
to the feet box.
Body accents plus wings, feet accent, eye/beak
"mask"
and two-layer eyes give him character.
Finished size: approx.
10.5" tall x 3.125" deep
(feet) x 11.125 wide.
ASSEMBLY: 1. Identify and cut the shapes:
A body LID and BASE right side shapes
B right accent body LID shape
C body LID and BASE left side shapes
D left accent body LID shape
E wing front and stack shapes (4 for left & right)
F eye assembly (2 sets)
G mask stack (4-5)
I right LID boxing strips
J right BASE boxing strips
K left BASE boxing strips
L left LID boxing strips
M feet LID and BASE main shapes
N feet accent LID shape
O leg posts
P feet bottom cover (hides post openings)
Q feet "struts" to support box depth
 R post "collar" shapes (16)
to support body height
S body "struts" to support box depth (2 sets)
T body LID top covers left & right
to hide dowel post insertion openings
NOTE SHOWN: wings positioning guide


 Left boxing strips which are mirrored from
right boxing strips also include the 'L' cut.

 6. Continue to bend the strip's segments
into position to align with body edge segments,
one at a time, and glue in place.
 NOTE that it will be helpful to invert the assembly
on a flat surface to apply finger pressure along
the tabs being joined to ensure a strong bond.

 . . . until only 1 or 2 segments remain.
Bend the final end tab back (includes the tiny
triangle symbol on the lead boxing edge from
step 5), apply glue to final segment AND end
tab, then position and attach both in the same step.
Complete both left and right LIDS and BASE
assemblies in similar manner.


 11. Position collar at inside top boxing of BASE,
with open side of collar circle facing the body's
long center side, and with circle edges of each
lined up exactly. NOTE: leg dowel post extension
will eventually need to fit snugly through
this collar/body hole.
Repeat for both left and right body BASES.


 16. Prepare the feet boxing strips by bending
back top edge and end tabs, also bending back on all
vertical perforation lines, then re-bending
to match the edge configuration of feet shape.
Note that the tiny square symbols will fall at
the center back, and tiny circles will fall at front.
 17. Position and join the feet boxing strips
to feet main LID and BASE shapes in
the same manner as for the body . . .


21. Position and attach in the BASE assemble
in position as shown near center, to support
the box depth near leg post openings.
 22. Prepare the leg post shapes by carefully
bending back on the series of long perforation
lines.
23. Form the post into a tube to bring the long
straight edge to overlap the opposite flange tab
perforation line, and glue in place.
NOTE this will be easier to do by wrapping
the post shape around the 5/16" diameter dowel
that will later be cut to length for leg supports . . .
 . . . using the dowel inside tube as a "press-against"
surface to securely join the seam.

 . . . then begin to fit the LID over the BASE
so that the leg posts . . .
 . . . can be inserted through BASE openings
also. Then close the feet LID and BASE
completely . . .


 31. Position the eye units over the alignment
dash circles on mask and glue in place.


A body LID and BASE right side shapes
B right accent body LID shape
C body LID and BASE left side shapes
D left accent body LID shape
E wing front and stack shapes (4 for left & right)
F eye assembly (2 sets)
G mask stack (4-5)
I right LID boxing strips
J right BASE boxing strips
K left BASE boxing strips
L left LID boxing strips
M feet LID and BASE main shapes
N feet accent LID shape
O leg posts
P feet bottom cover (hides post openings)
Q feet "struts" to support box depth

to support body height
S body "struts" to support box depth (2 sets)
T body LID top covers left & right
to hide dowel post insertion openings
NOTE SHOWN: wings positioning guide

2. Identify the body left and right
LID and BASE shapes that correspond.
NOTE: though not obvious here, LID shapes on top
are shown face side up, BASE shapes on
bottom are shown face side down.

Also note that the BASE shapes include a cut-in
'B' shape to identify them more easily.
(Since the 'B' can be read equally from face side
and wrong side, you may want to mark an 'X'
or other notation on the wrong sides of BASE
shapes as they are pulled from cutting mat
to also help identify them.)

3. Identify the boxing strips for LEFT & RIGHT
body, both BASE and LID.
LID shapes will have single symbols cut
into tabs; BASE shapes will have double
symbols. NOTE: strips pictured here
were further modified after prototype
was constructed to include body
post openings for top and bottom
for both LID and BASE.

right boxing strips also include the 'L' cut.

4. Prepare the boxing strips (beginning with LEFT
side for assembly shown) by bending back all
top edge tabs and end tabs, also bend back
on vertical perforation lines - then re-bend
in appropriate direction to correspond
to the body shape. NOTE: this bending to match
process is shown for feet shape in step 16.
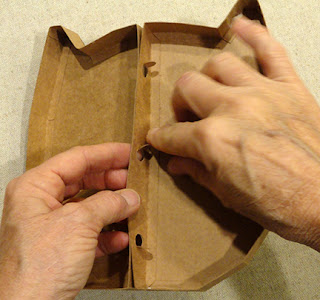
5. Begin by positioning the long inner edge of strip
at the corresponding edge of body,
overlapping straight edge to strip's perforation
line, and glue in place.
NOTE that the tiny triangle symbol in flange tab
is visible at bottom of image.
Symbols will help identify which ends of strips
should be joined.

into position to align with body edge segments,
one at a time, and glue in place.

on a flat surface to apply finger pressure along
the tabs being joined to ensure a strong bond.

7. Prepare to join the second body boxing strip
to the first strip's end by identifying the symbols
near each end - a single 'X'. Overlap the straight
end of the strip attached to the body at the
second strip's end tab, and glue in place.
8. Continue to position and attach the remaining
tab segments to corresponding body edges . . .

Bend the final end tab back (includes the tiny
triangle symbol on the lead boxing edge from
step 5), apply glue to final segment AND end
tab, then position and attach both in the same step.
Complete both left and right LIDS and BASE
assemblies in similar manner.

9. Position and attach the LID front accent
shape onto the completed LID assembly . . .

. . . noting that the center long straight
edge of accent will be placed at LID center
edge, with equal offset margins at top and bottom.
(Offset of accent edge does not echo LID edges.)

10. Prepare the post collar shapes by stacking
and gluing together 8 shapes into two stacks each,
taking care to accurately line up edges,
especially the circular edges.
NOTE: it will be helpful to use a flat weight laid
on top of the glued-up stacks to help press them
flat during the drying process.
(Use of weights to press will also be helpful
when gluing up WING and MASK stacks in
later steps.)

with open side of collar circle facing the body's
long center side, and with circle edges of each
lined up exactly. NOTE: leg dowel post extension
will eventually need to fit snugly through
this collar/body hole.
Repeat for both left and right body BASES.

12. Position body LID assemblies together
at center edges, then push circle tabs of left
through the corresponding openings of right,
and glue tabs in place to join.

13. Prepare the body strut supports by bending
back tabs, then sliding the set together at
"center" slots.

14. Position the strut into the BASE tray
at the side, away from the location where
dowel will eventually be inserted, and
glue tabs to inside of BASE.
NOTE that dowel is temporarily inserted
through top and bottom openings
to help gauge where struts should be placed.

15. Prepare to assembly the feet box by
identifying the base with the 'B' cut symbol.

Also prepare the LID main shape by pushing
the post opening wedge tabs through to backside
using a pencil eraser end or similar tool.

back top edge and end tabs, also bending back on all
vertical perforation lines, then re-bending
to match the edge configuration of feet shape.
Note that the tiny square symbols will fall at
the center back, and tiny circles will fall at front.

to feet main LID and BASE shapes in
the same manner as for the body . . .

. . . adding the second boxing strip
to first at ends, then continuing to join in place . . .

. . . until the final segment and strip end tabs
are joined in place in same step.

18. Complete the feet BASE in same manner.
19. Position and attach the feet accent shape
to the LID, matching leg post openings exactly.
Accent edges will be irregularly offset
within feet LID edges.

20. Prepare the feet strut strip by bending at
center perforation, bending tabs back.

21. Position and attach in the BASE assemble
in position as shown near center, to support
the box depth near leg post openings.

bending back on the series of long perforation
lines.
23. Form the post into a tube to bring the long
straight edge to overlap the opposite flange tab
perforation line, and glue in place.
NOTE this will be easier to do by wrapping
the post shape around the 5/16" diameter dowel
that will later be cut to length for leg supports . . .

surface to securely join the seam.

24. Insert the leg tubes (long tabs end) through
feet LID shape . . .

so that the leg posts . . .

also. Then close the feet LID and BASE
completely . . .

. . . adjust the posts so that bottom tab perforations
align at BASE edge. Bend tabs back and glue
in place securely.

25. Squeeze adhesive between the LID and BASE
layers intermittently around to help secure.

26. Position and attach the bottom cover
to hide the post holes.

27. Insert the top post end (short tabs) through
corresponding openings in bottom of body LID,
then bend tabs back and glue in place.
NOTE: make sure that the feet assembly is
correctly oriented toward the front of body.

28. Insert the dowel through body top openings
and into leg posts, pushing completely down
so end rests behind feet BASE surface.
Without compressing the top of body,
mark the length of the dowel. Repeat for
each body/leg.
Carefully cut to size, "keeping" the marked
line so that posts will be long enough to be
secured by collar stack build up inside BASEs.
Sand ends as needed so they are smooth.

29. Prepare the mask stack by carefully positioning
and joining each of the 4-5 shapes
into a built-up stack. Use a flat weight to press
until dry, to help avoid warping or curling
during drying process.

30. Prepare the eye units by layering
and centering the three shapes as shown.

dash circles on mask and glue in place.

32. Position the mask/eyes assembly onto
the front LID joined assembly, center and adjust,
then securely glue in place.

33. Insert each body BASE into backside
of each LID. Apply glue between LID
and BASE layers as was done for feet assembly.

34. Insert cut dowel lengths into each
post opening at body top, sliding through
to insert into leg posts and completely down,
adding some quick-grab adhesive to
inserted end (if desired and can be done neatly)
and also at top to secure top end within collar stack.
35. Prepare top body covers by bending back
slightly at perforation, then position and attach
at top boxing to hide the post openings.

36. Prepare the wing stacks by layering
the wing face with remaining 3 build up layers,
one by one, taking care to precisely align cut edges.
Use a flat weight to help flatten during glue-up process.

37. Use the wing positioning template shape
aligned over the body's backside to help
determine wing position . . .

. . . by lightly marking overlapped edge position.
Reverse guide template to mark opposite side,
then remove guide, position and attach wings in place.

Here is the completed standing owl figure.

No comments:
Post a Comment