
Create
a unique “ornament” gift container,
or fashion a flock to decorate tree or
wreath.
Bird-shaped “lid” hull with ”base” insert that
slides up from bottom composes
this seasonal ornament
that can double as a gift box.

Cord loop threads upward
through boxing holes,
with knot, bead or button “stop” on bottom
(optional bead
on top).
Cardinal decoration (cardinal body, face, wing) can also
be used as 2D
decoration for card, pick, garland, etc.
Ornament at longest dimensions measures
approx. 5” long x 3” tall x 1” deep when closed.
ASSEMBLY: 1. Identify and cut the shapes:
A front and back "lid" body shapes
B body boxing strip
C & D front interior interlocking support strips
E front and back insert (container) shapes
F insert boxing strip
G front & back accent body overlays
H front & back contrast tail underlays
I front & back front wing (wing face)
J front & back contrast wing underlay
K wing build up layers: 3-4 for front; 3-4 for back

2. Prepare the layered wings so they can be drying
(prepare front & back wing units):
A) layer contrast wing shape behind main front wing
and glue in place;

B) layer and glue together the build-up layers;

C) Position and attach front/contrast unit on top of
build up wing stack;

Press the stack under a flat heavy weight until
completely dry. This helps avoid warping or curling,
and may require a few hours or overnight.

3. Prepare the body overlays so they can be
drying.
A) Position and attach contrast shape behind
the tail area, centered so that edges are
concealed;

B) layer the face shape on top of the face/beak shape
with common edges aligned, then glue in place.

C) Position and attach the eye in eye "socket" cut out.
Place under heavy flat weight until adhesive is dry.

INSERT CONTAINER
4. Identify the FRONT end of boxing strip where
the arrow head is in the end fold-under tab.

5. Add moderate back curl to the center portion of
boxing strip where multiple small notches will fit
along the curved edge of insert. Then . . .

. . . bend back the small tabs and longer end edge tabs.

6. Align front edge of front wall (with arrow symbol)
to the first wall segment - skip down past the top edge
"wall" and fold-under end tab - which will match
the wall edge length. Apply glue to the tab, then place
wall front edge along perforation line/edge; adjust
to make sure top and bottom of segment and edge
align properly, then attach in place.
Hold until seam is secure.

7. Curl the boxing shape around to align the back
boxing segment with the back wall edge, adjust
and glue in place. When attachment is secure . . .

. . . then ease the boxing down into position along
the curved edge, adjusting and shaping as necessary
until the fit is good. Hold in place until tabs are secure.

NOTE that it may be helpful to invert the assembly
face down on work surface to apply fingertip
pressure along the tabs and seam until secure.

8. Reverse the assembly to position and attach
the back wall shape, following the same steps
as for the front . . .

. . . reaching fingers inside to apply pressure along
the seam edge.

9. Bend the end fold-back tabs on each boxing strip
end, and glue in place.

10. Bend top wall segment back, tucking side tabs
behind the container wall, and glue each in place.
Repeat for back top segment.

BIRD BODY HULL ASSEMBLY
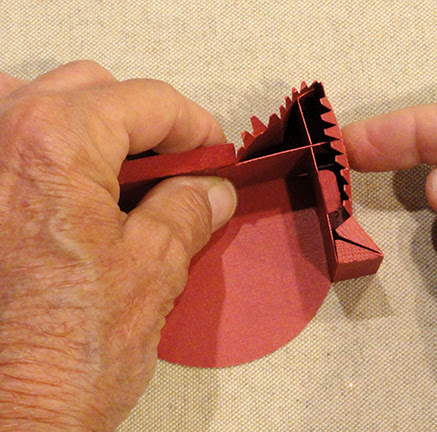
11. Prepare the body boxing shape by bending back
on ALL cross perforation lines, EXCEPT the two
short segments that will box out the top and bottom
of the beak (shown at far right of image below).
Identify the multi-tab areas that will box out the curved
edges of the body front and back walls.
At the rear is the tail segment, which the finger
is identifying. At the front, above beak, are
back head and front head segments.

to add back curl to the tail section, which will assist
the boxing strip to conform to the curves of body shape.
 Also add slightly tighter back curl to the head back

section, and . . .
 . . . very tight back curl to the 2 head back sections.

This can be done by rolling the strip along the rod
while applying fingertip pressure.
 13. Bend all regular tabs and multi-tabs back

on perforation lines. (NOTE it is safer to add curl
BEFORE bending tabs back.)
 14. Identify the tail end of boxing strip, which includes

the final boxing segment and tail tab end.

These are support structures that assist to define
the cavity where the compartment will be inserted,
and eventually will be in position shown here.

that will fall along the top of body (includes hanger hole)
and top of tail. Then position the TAIL segment along
the tail top edge of body shape.

Apply adhesive to the strip's tail tab, then align,
overlap edge to perforation bend, adjust for top
and bottom length alignment, and glue in place.

16. Continue along top of body to position
and attach edge to flange tab.

17. To complete the tail curved edge and bottom
seams, first move to straight undertail segment,
align and join to body edge.

NOTE that it may be helpful for each seam being
completed to invert the assembly on flat surface
and apply fingertip pressure along tab(s)-to-body seam.

18. Apply glue to multiple tabs at curved tail end,
then ease into position so that tab perforations align
along straight tail end. Apply pressure to attach.

19. Bend the end tab and boxing segments back, so that
they will be inside the body cavity, then . . .

. . . add glue to the end tab, and push into position
so that its perforation line aligns with the backside
of tail-to-body bend/perf line. Make sure that
straight top edge is below the top body flange
perforation bend, then hold in place to attach.

20. Move to the curved sequence of edges at
head back, to form, align and attach to
corresponding body curved edges for
lower head back . . .

. . . upper head back . . .

. . . then head front.

21. Position the beak segments and attach.

22. Identify the long (vertical) and shorter (horizontal)
interior support strips with interlocking slots,
then locate the top and front ends respectively
which include arrowhead symbols.

Bend at end and edge tabs, then interlock by aligning and
pushing slots together - taking care that arrow end tabs
are oriented as shown here.

23. First, bend tabs back so they will be
out of the way of interior supports.
Position and attach the bottom tab of vertical (long) strip
at bottom beak boxing end . . .

. . . so that tab is behind
boxing of beak. Attach in place.

24. Swing the support assembly upward to be
behind head area, with the horizontal back end tab
aligning with body's upper body boxing. Adjust and
attach end tab to underside of back boxing,
making sure that the tab and boxing perforation lines
are lined up, and support strip is within body cavity
below unattached long flange tab of boxing.

25. Adjust/re-bend top and front support tabs,
add glue to these, then attach to boxing backsides
to maintain right angle intersection.
NOTE that it may be helpful to use the end of
a tool such as this spatula handle inserted
behind tabs being attached to provide
a press-against surface to assist in tabs attachment.
Also NOTE that the small tabs on side edges
of vertical support strip should also be bent forward
and attached to the first body wall backside
(and later to front wall backside).

26. Bend the edge tabs inward all around, then . . .

. . . apply adhesive to the tabs.

Position and attach the second body shape to
tabs all around, repeating the process . . .

. . . for the first body shape. Reach inside body cavity
to assist with attachment when possible or needed.

27. To finish the box, insert container into the bottom
of body, taking care that arrow symbol is at front.

Since the insert container is a tight fit, push it inward
carefully without tipping backward or forward.

28. Position and attach body assemblies on
front and back, with narrow offset margin all around.
Hold in place or place an appropriate flat weight
balanced on top to assist body accents to attach well.

29. Position and attach front and back wing as shown,
taking care to apply adhesive ONLY on wing backside
where it will overlap the body. Hold or press in place
until thoroughly dried.

30. Add hanging loop. Following is one way to do that.
A) cut a piece of twine approx. 18-20" long;
B) thread one end of twine through hole
of small bead to act as "stop", and pull
to be centered on twine;

C) bring twin ends together to thread both through
larger bead; if needed, create a threading "loop"
of heavy weight thread and insert through loop hole;
insert twine ends into loop for 1/4" or so, then
gently pull thread loop back out to carry twine through;

D) thread both twine ends through long doll needle,
then insert needle from bottom through insert's hole . . .

. . . through cavity and out the top-body hole;
pull through completely;

E) if desired, thread a "control" duplicate bead
onto twine ends using thread loop method;

F) to allow insert compartment to be pulled away
from body into "open" position, enough twine length
above body must be allowed for;

measure approx. 4.5" above body when in closed
and with twine pulled up flush, then tie knot above
that position. Trim excess twine ends approx. .5".

Here is completed ornament in closed position.

No comments:
Post a Comment