
This festive container is styled as crown front
& back
connected with boxing that arches to curved tip
and “tassel” (octagonal
tube).
Brim has classic “upturned” points built out from
crown in low relief rim.

At
underside, base insert fits snugly up into
the slightly curved bottom edge of
“lid”.

x 2” deep when fully
closed.
(Requires 12x12 stock and cutting capacity
for longest boxing shape.)
ASSEMBLY: 1. Identify and cut the shapes:
A crown boxing strip
B & C back and front crown panels
D & E back and front crown accent overlays
F tassel octagon tube
G tassel end overlay scallop (2)
H tassel end contrast overlay (2)
I brim main hull
J brim "upturned" points boxing strips (2)
K front and back brim panels
L brim panel accent overlays (2)
M brim end accent overlays (2)
N compartment insert boxing
O compartment insert front & back
P interior bottom "liner" for compartment

COMPARTMENT INSERT
2. Use a rod-like tool such as this narrow dowel toadd slight forward curl to the center portion of
the boxing shape where multiple narrow tab cuts are.
 Then, bend back on all perforation lines for boxing
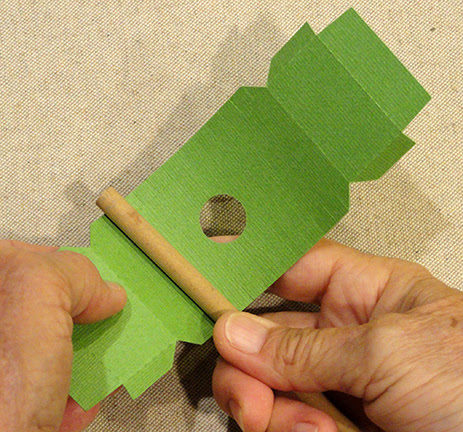
body, end panels, top fold-in panels, side tabs, etc.
Take extra care to make sure that the multiple side
tab cuts are fully separated.
 3. Position first front or back panel, centered, along

the middle portion of the boxing, between end panels,
overlap plain slightly-curved straight edge to perforation line,
align, adjust, then . . .
 . . . glue in place. Apply fingertip pressure until secure.

Repeat this step for the second, back wall panel.
 4. Bend first end panel up into position to align and

attach along side edge of front panel and glue in place.
Repeat for the opposite side edge.
Also repeat for opposite (front or back) wall panel.
 5. Bend the upper "inward" bending stabilizing tab

back to attach to inside of boxing wall.
Repeat for opposite side.
 6. Prepare the compartment liner by adding slight

back curl to liner rectangle, then . . .
 . . . slip inside to bottom of compartment. If desired,

lightly glue the ends in place. (NOTE that finger hole
will need to be accessible to pull compartment out.)
 7. If desired, with liner in place, position and attach

retained hole circle cut shape at cutout position,
gluing to backside of the liner. This will give the box bottom
a more finished appearance.


CROWN ASSEMBLY
(NOTE that the card stock used in the sample project
has solid red for the FACE and polka dot for REVERSE.)
8. Use rod-like tool to add some back curl to the longmulti-tabs section of brim boxing strip which will be
attached at at outer arching end, and . . .

which will be attached around underside curve
of crown panels.
 Make sure that all narrow "attached" tabs are separated

fully at outer boxing edge.
 9. Bend back all narrow tabs along curved, and also

bend back at all other side and end tabs, and at
cross perforation lines.
 10. At this point in assembly, it may be helpful

to position the crown boxing around the front face
panel to visualize how wall segments and multi-tab
curved segments correspond to edge shaping.
The multiple narrow tabs as shown here will allow
the edge to curve while still providing best surface
for attaching.
 Beginning at left end of FRONT, locate the bottom

corner point, then . . .
 . . . position this segment's side tab to align with

first segment of boxing strip as defined by tab slots
and perforation lines. Overlap front edge across
tab to perf line, adjust for fit at bottom edges,
and where segment and edge "angle" mark
terminus of this portion of seam, and glue in place.
 11. Move across shapes to end of multi-tabs sequence

where the top curve edge of front ends in hat tip,
and "tack" corner and end tab together as a "place holder".
 12. Apply glue to multi tabs, then ease the edge in

to evenly fit under the front panel edge, aligning as
closely as possible.
 Apply pressure to the seam, which may most easily

be accomplished by inverting onto flat work surface
and pressing along backside.
 13. Continue to work along edge to position and join

front panel segment edge to boxing sections.
First, bend the narrow section to align and match up
with the "tip" edge, then hold in place and apply
pressure until secure.
 14. Next, work forward to position and attach

the next straight edge to straight front panel edge . . .

. . . then ease curved boxing tabs to panel edges as
was previously done for curved edge.
Apply pressure to secure seam.
15. Align and attach final tab and panel edge
to complete joining of front panel to boxing edge.

16. Repeat the attachment process to position,
align, adjust and attach . . .

. . . remaining side boxing edge
to back crown panel.

Extra care may be required to align and attach
the narrow section at hat tip.

BRIM ASSEMBLY
17. Prepare the brim main shape by bending back
on cross perforations, including the inset mini tabs
that will help attach brim to crown.

18. Use a rod tool to add a slight amount of forward curl
to the center area of main hull shape where multiple
tabs indicate the curved edge.

Carefully fold back the mini tabs on outer edges
and inner edges, as well as side tabs along both
side edges.

NOTE it will be helpful to pinch the folds at deeply angled
tab ends where brim points will fall.

18. Prepare the brim points boxing strips by bending
in mountain or valley folds to simulate the points shape.

Also fold back the tabs on both long sides.

19. Position and join the first strip at tab end, to
short edge at end of main hull strip.
(NOTE that the point strips are interchangeable.)

Then form the hull/strip into a loop to position and
join second end of points strip in opposite position
at opposite end of hull strip.

20. Position first brim front panel along center curved
section, adjust for end alignment. Attach (tack) ends
then ease curved, multi-tab portion in to fit
along front panel bottom edge until aligned
as accurately as possible.

21. Bend hull strip to align and join side segment
at brim side edge. Repeat for second side segment.

22. Bend hull strip to align tabs across the sawtooth
shaped upper edge . . .

. . . conforming and attaching at each point.
Repeat for opposite side.

FINISHING
23. Bend brim end connection mini tabs upward,
then slide the bottom edge of crown into
the upper opening of brim . . .

. . . then carefully ease downward into the bottom
opening, taking care that all tabs remain tucked up
behind crown wall. When the next step is complete,
glue lower edge of crown to tabs.

24. At ends, use a tool to gently push the mini tabs
down into crown slots. Then . . .

. . . bend tabs upward and glue in place.
(NOTE that a dab of quick-grab glue may work best.)

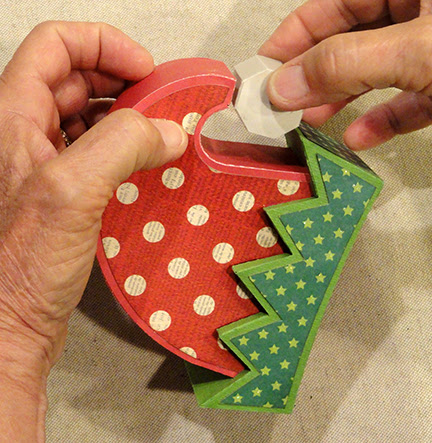
25. Position and attach the crown accent shapes in place,
with narrow margin around upper curved and tip edges,
and with sawtooth edge abutting brim sawtooth edge
(or nearly abutting).

Also position and attach the brim accent shapes
on ends and sawtooth panels with offset margin
all around each of these.

TASSEL UNIT
26. Prepare the tassel tube by bending back on
all perforation lines for panels, walls, side flange tab,
end octagons and wedge tabs.

27. Form the shape into a tube to bring side straight edge
to overlap opposite flange tab to perforation line,
adjust for top to bottom alignment, then glue seam.

NOTE that the symmetry of this shape will allow
it to be flattened so that seam can have fingertip
pressure applied along surface.

28. (Pop back into tube configuration.)
Bend end tabs inward, octagon "cap" down,
adjust so that segment end edges align as
precisely as possible with cap edges . . .

. . . and glue in place.

It may be helpful to insert a flat-ended tool such as
this dowel or a new pencil end into the open tube
to press around seam (at least for first end).

29. Repeat for second tube end.

Use quick grab glue such as Fabri-Tack to attach
tassel tube to crown tip, aligning one face of tube
to the tip face, with front and back edges matched.
30. Position and attach contrast octagon onto face
of each end of tube, then . . .

31. With finger nail or spatula tip, bend out the
"fluff" circle partial cut outs on each tassel
scalloped circle. Position one, centered, on
each end of tassel tube.

32. To close box, insert compartment into bottom
of brim and . . .

. . . carefully push upward into place.
NOTE that this is a snug fit, and it will must be
pushed straight up without tipping one end
in more quickly than the opposite end.

When insert is fully flush at bottom,
the eld hat box is complete.


Hi, I love you design for "Star Box 3D Slide Together Ornament", I would like to know if you can design this with a 6 pointed start, as it would make a great Hanukkah decoration. Thank you and be well, Jay M S.
ReplyDeleteThat's a great idea. The issue has to do with having the bottom points at right angle or less than right angle, or it can't be put together. I'll think about this, for sure!
Deletebonjour, je viens d'acheter le fichier sur silhouette, je regrette la petite taille , du coup je dois modifier le fichier et ce n'est pour moi pas simple afin de faire une boite qui pourra recevoir des friandises à offrir à noël , cette boite est superbe dommage
ReplyDeleteSo sorry that the file didn't open at the specified size. This is an issue between Silhouette America and their customers who use other digital die cutting systems such as Cricut where the software processed the svg files differently upon opening. If you can deal with it, I can send you the regular svg file directly. If you would like that, please email me at hearthsewnpatterns@yahoo.com
Delete