
Celebrate the love you feel for your own Mom (or for another)
with this 3d letter box ensemble kit
available (soon) from SnapDragon Snippets
through the SVG Attic online store.
Four-inch tall lid-and-base boxes in the shapes of 'M' & 'O'
are built and embellished with floral overlay
(shown here with glittered double stick adhesive),
layered scallop-edge heart with ribbon & punch holes,
3d rose ribbon-tied upright to the final 'M'.
CONSTRUCTION:

Shown here: top row M, O, M LID fronts with associated boxing strips, accent letter fronts, overlays, double-sided adhesive cut overlay; bottom row M, O, M BASE fronts with associated boxing strips.
Boxing strips will be joined end to end for the required perimeter length, matching the tiny cutout symbols in the tabs near each end, so you will know which strips connect together at ends during the construction process.
LID STRIPS: single symbols BASE STRIPS: double symbols

M is sketched here for reference. Each place where symbols are shown will have a joint seam. Strips ends that come together will EACH have the symbol(s) in the tabs near ends.

O is sketched here for reference.
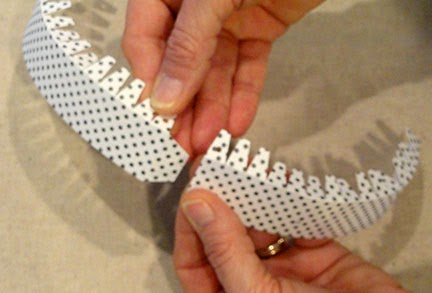
NOTE that the outer curved edge for both LID and BASE requires the pair of boxing strips to be joined. Place the seams at center top and center bottom. The inner curved edge for LID and BASE uses a single strip. Place that seam at the center bottom.

With the boxing strips folded, you can begin to see how the "M" edge lengths match up, and it will start to be obvious how the pieces attach to create the LID. Follow the same procedure for the M BASE, then for the O (if necessary).

NOTE that tabs are wide, so glue one complete edge, then make sure the next tab lies neatly on top of the first glued-in-place tab. It may be helpful to glue and attach one, adjust, then glue and attach the next one to line up the corners and edges before the first edge is completely set, so repositioning can still happen, if necessary.

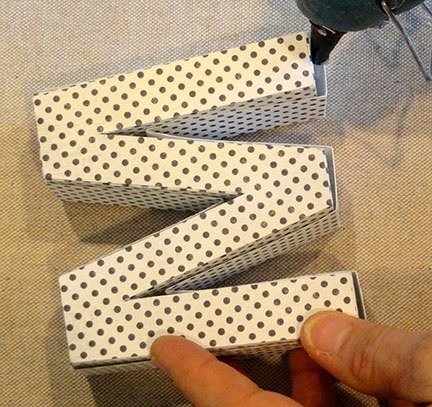
4. Glue all tab segments to the corresponding 'M' edge.
Shown here is the last segment of the first strip being positioned and glued into place.


Now repeat the steps to position and glue the segments of the newly-attached boxing strip section in place to their corresponding 'M' edges, one at a time, until the entire strip is in place.
Continue to watch and take care that perforation "ridge" of strip aligns exactly with the straight edge of the letter. Add next strip, etc., until all boxing is in place. Complete BASE 'M' in the same manner.

7. Prepare the accent front for the first 'M' of "MOM". Here I have the 'M' face shape that is an exact duplicate of the box LID 'M' shape (pale, underneath shape) and the overlay (green) shape. Glue the overlay on top of the accent shape, taking care that edges align exactly.

8. If you wish, prepare a double-sided adhesive duplicate shape of the overlay to hold the glitter. I have used Silhouette America's premium double-stick sheet, cutting as directed with the white side UP in my cutting tool.
Peel off the backing (yellow in this case) . . .

. . . then carefully position EXACTLY on top of the accent shape. Then peel away the top (white) layer to expose the sticky clear layer.


10. Use a clean paint brush to completely "dust" off the excess glitter, then recapture the glitter into its container for use later.

11. Apply adhesive and attach accent 'M' to the LID front of the letter box.

12. Complete a second 'M' letter box LID and BASE, this time using the LID 'M' shape that includes the two pairs of punch holes that will be threaded with ribbon in the final steps of embellishment.
Use an awl or other piercing tool to make sure that the holes are clear all the way through the boxing tabs on the backside.

13. Attach the accent 'M' shape that also includes the punch holes.
14. Refer to the 3d Rose tutorial to complete one rose with single leaf and stem. Position and glue it in place with stem between the punch holes, bottom of stem even with base edge of 'M', leaf turned toward the front as shown. For this king of quick gluing, I like to use clear Fabri-Tac adhesive.

15.Use a darning-style needle with large enough eye to accept your 18" of sheer ribbon, then with ribbon "loaded", thread ribbon through holes as shown, so that it wraps and holds bottom of stem. Bring ends out of the upper holes as shown.
Tie the ends into a neat knot and bow, then trim the ends attractively.

16. Prepare the 'O' letter box LID and BASE in a fashion similar to the 'M'. Begin with the center circle opening of the 'O'. It uses a single boxing strip section, with the same symbol on each end. Give the strip some curl by running it between thumb and finger (think curling ribbon), with the face side of the card stock on the inside of the curl.

17. Fold the tabs outward, join end tab to end straight edge so strip forms a ring. Squash the ring into an oval to roughly match the 'O' opening shape, apply glue to tabs, then position seam at center bottom of opening. Work around the strip and opening to match the perforation "ridge" of the strip to the curved edge of the opening, making repeated adjustments until the best result is obtained. Hold or press the tabs in final position until secure.

During the gluing-up process, work BOTH from the inside where the tabs are, as well as from the outside where you can see the 'O' edge and the perforations ridge, making adjustments and re-alignments until the best possible positioning is achieved before the adhesive is cured.

19. Construct the 'O' BASE in similar order and fashion. When complete, and before glue is completely cured, fit the base inside the lid. Having them finish drying together may help unify the shaping.

20. Position and attach the accent 'O' shape on the front of the LID. NOTE that the punch hole of the LID and of the accent shape are at the TOP of the 'O'

21. Layer and glue the heart embellishment. Thread an 18" length of sheer-style ribbon through the holes front-to-back. Tie the ribbon ends in a loose overhand knot, then attach the heart to the 'O' LID, keeping the ribbon streamers free at the top of the heart.

22. Use an awl or other piercing tool or narrow dowel, etc., as a "place keeper", then complete the tying of the ribbon ends into a square knot.

23. Insert and affix the decorative brad into the hold that the awl had been in.
24. When embellishments are done, join the LID and BASE of each of the letter shapes by carefully applying a dab of hot glue between the boxing strips, especially at the base edges, also at sides and tops.
 25. Prepare a mounting base for the letter boxes to stand upon. I use white foam core for this model, cut 2" wide x 12" long. Cover it with decorative paper. I am using a light gray corrugated sheet. Glue the foam core top surface thoroughly to the backside of the paper, with one long and short edges aligned. When glue is cured, use a dull butter knife, stylus, or hera tool to SCORE the paper edge along the front edge of the foam core.
27. When glue is cured, score the paper at the new lead edge, fold and glue. Repeat for the final (bottom) foam core surface. Trim excess paper even with foam core edge.

28. Complete a "dry run" arrangement of the letters onto the prepared mounting base. The 12" length designated can align with the M lead and back edges, with the O centered beetween. Once positioning is finalized, use hot glue dabs applied NEATLY to bottom edges of letter boxes, then position onto the base and hold in place until glue cools and cures.
NOTE that the middle "legs" of the 'M' shape DO NOT actually touch the base, so DON'T apply glue to these.
HERE, ONCE AGAIN, IS THE FINISHED DISPLAY!

CONGRATULATIONS! IT'S READY TO GIVE.
This is absolutely beautiful!
ReplyDelete