
This tutorial will separately present
the assembly for the terracotta style pot with post
that transforms the Flower Ball into the blossoming
top of the Topiary Tree.
ASSEMBLY: 1. Identify and cut the shapes:
A rim/outer top panel unit
B side wall panels (6)
C bottom hexagon bases (2, both with pentagon cutouts)
D interior platform hexagon
E interior wall (covers) (6)
F outer wall accent shapes (6)
G outer upper panel accent shapes (6)
H rim accent strips (6)
I post wrap J upper sleeve K lower sleeve
NOT SHOWN: post end cap cover (see step 21)

 3. Prepare the main pole shape to glue seam
by wrapping it around a 7/16" diam. wooden dowel.
Bring the straight side edge to overlap
the long flange tab opposite to line up with
the tab perforation line, and glue in place.
Apply pressure continuously up and down
the seam forcing the edge into accurate
position until the entire seam edge is secure.
4. Push the dowel to align one end with post end,
mark the dowel with post length, remove and
cut dowel to size, then re-insert into post.
 5. Prepare the upper sleeve by wrapping it
around the main post shape (still wrapped
around the dowel) to align and complete
the seam in similar manner to the main post.
 6. Bend tabs inward, top hex "lid" down
and glue into position.


 10. Position and attach the side "wall" panels as follows:
apply glue to the underside of the rim inner tab,
then position the backside top edge of side panel
to that rim inner tab.
 Here is another view of the side panel attaching
position, this time showing the panel backside
sliding under the rim flange tab, where it is attached.


 15. Bend the rim walls downward into position
to insert the tabs into the side wall slots . . .

 16. Bend the second rim wall section into position
with the left straight edge overlapping the adjacent
tab, and glue in place. Insert tabs, and glue in place
on the inside of pot.
Repeat this step until all panels are positioned
and attached.


 18. Prepare to attach the bottom hexagon base by
looking at the post pentagon opening.
NOTE that only one of the pentagon edges
is parallel to the hex side - this is the FRONT,
and is marked with a tiny 'F' cut.
While it may not matter, if you eventually choose
a flower side that is "best" to be the front,
this is the side it should face.
 Push the sleeve all the way in until the tab perfs
stop at the opening edge, bend outward,
and glue in place.


 . . . use the bottom of a new pencil eraser to
apply some pressure to tabs from the inside.
Placing fingers under the pot along hex base
edges while pressing with pencil tool is helpful.


 . . . then position the center of the cap over
the corresponding pentagon end of the post.


 . . . and slide downward into position . . .
 . . . until it fits snugly against the interior
side wall surfaces all around, and is
parallel to the pot's base.
Apply pressure to all tabs until each
is securely attached.
 NOTE that the post can - if you choose -
remain removable for easy storage.
(Or glue it in place inside bottom sleeve,
and/or flower ball top sleeve.)


A rim/outer top panel unit
B side wall panels (6)
C bottom hexagon bases (2, both with pentagon cutouts)
D interior platform hexagon
E interior wall (covers) (6)
F outer wall accent shapes (6)
G outer upper panel accent shapes (6)
H rim accent strips (6)
I post wrap J upper sleeve K lower sleeve
NOT SHOWN: post end cap cover (see step 21)

2. Prepare the post and sleeve shapes by
bending back on all panel and tab or flange
perforation lines.
Bend bottom tabs of lower sleeve outward.

by wrapping it around a 7/16" diam. wooden dowel.
Bring the straight side edge to overlap
the long flange tab opposite to line up with
the tab perforation line, and glue in place.
Apply pressure continuously up and down
the seam forcing the edge into accurate
position until the entire seam edge is secure.
4. Push the dowel to align one end with post end,
mark the dowel with post length, remove and
cut dowel to size, then re-insert into post.

around the main post shape (still wrapped
around the dowel) to align and complete
the seam in similar manner to the main post.

and glue into position.

7. Wrap, align and glue the lower sleeve
side seam in similar manner.

8. Prepare the main rim shape by bending
inner tabs back, outer panels back,
panel lower edge back, bottom tabs forward.

9. Prepare the 6 side panels by bending
the side flange back, bending the bottom rim edge . . .

. . . back, and the bottom tab forward.

apply glue to the underside of the rim inner tab,
then position the backside top edge of side panel
to that rim inner tab.

position, this time showing the panel backside
sliding under the rim flange tab, where it is attached.

11. Attach all 6 side panels as shown in step 10.
12. Bend the rim shape upward out of the way.
Bend first two adjacent side panels into position
to bring the left straight edge of right panel
to overlap flange of the left panel to perforation line,
and glue in place.
13. Repeat step 12 until all 6 seams are completed.

14. Position and attach upper accent panels.

to insert the tabs into the side wall slots . . .

. . . then on the inside of pot, push tabs downward
and attach in place.

with the left straight edge overlapping the adjacent
tab, and glue in place. Insert tabs, and glue in place
on the inside of pot.
Repeat this step until all panels are positioned
and attached.

17. Prepare the pot bottom rim by bending the bottom
flange and tab inward for each side panel.
Apply pressure on the underside of the tab "margin"
then reposition to attach it to the backside
of the side panel.

Pinch along this edge to secure the seam.
NOTE that the flanges should bend away from
side panels at perpendicular angle, and
ends will overlap at the "miter" position
all around the hex opening.

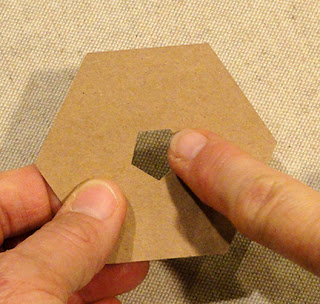
looking at the post pentagon opening.
NOTE that only one of the pentagon edges
is parallel to the hex side - this is the FRONT,
and is marked with a tiny 'F' cut.
While it may not matter, if you eventually choose
a flower side that is "best" to be the front,
this is the side it should face.

Position the bottom sleeve to be inserted
through the pentagon opening, aligning a
non-seam toward front, all other sleeve edges to
also be parallel with opening edges.

stop at the opening edge, bend outward,
and glue in place.

NOTE that it will help to place the hex base
on a flat surface to apply fingertip pressure
all around.

19. Make sure the pot's bottom tabs are
pointed inward, perpendicular to walls,
then apply glue to the "ledge" created by tabs.
Position base (orient to line up FRONTs if necessary)
and insert into the bottom of the pot . . .

. . . to sit snugly onto the ledge, with edges
snugly inside the rim.
Apply light pressure to make sure it is seated,
then . . .

apply some pressure to tabs from the inside.
Placing fingers under the pot along hex base
edges while pressing with pencil tool is helpful.

20. Position and attach the outer side wall
accent shapes.
Also attach studs over the punch hole
of the rim accent shapes
21. To cover the sleeve construction tabs,
apply glue, position and attach a second hex base,
making sure to rotate the base so that
pentagon opening edges line up exactly (post
will need to fit through opening).

22. Prepare the post end cap by bending back on
the center pentagon outline perforation lines
and forward on the trapezoid end tab perf lines.

23. Insert the post through the base opening . . .

. . . and push in until the end is even with
the pot bottom (rim) edge.
Hold pot and post carefully in this position . . .

. . . until they can be secured temporarily together
with masking tape or equivalent.

24. Apply glue to the trapezoid tabs ONLY . . .

the corresponding pentagon end of the post.

Push the tabs and "short wall panels" inward
so that the gabs all close completely.
Short wall panels should be perpendicular
to the hex base and snug around the post
(but NOT attached - if you intend to keep the post
in "detachable" condition for easy storage),
and pentagon tabs lined up . . .

. . . to create
one larger pentagon footprint as shown.

25. To help stabilize the pot, place weighted
stuffing material (pellets) or equivalent divided
between a couple of small, sealed baggies
into the bottom of the pot around the sleeve stem.

26. Prepare the interior platform hexagon
by bending the edge tab flanges upward.

Apply glue to the underside of flanges, then
insert the top of the post through the center
pentagon opening . . .


side wall surfaces all around, and is
parallel to the pot's base.
Apply pressure to all tabs until each
is securely attached.

remain removable for easy storage.
(Or glue it in place inside bottom sleeve,
and/or flower ball top sleeve.)

27. To complete the topiary flower tree,
complete the flower ball as shown in tutorial HERE.
Insert the top of post into the sleeve
enclosed in the bottom blossom
(be sure to follow the special instructions A thru E
shown at the end of the post).

Here is the completed topiary flower ball project.

No comments:
Post a Comment