
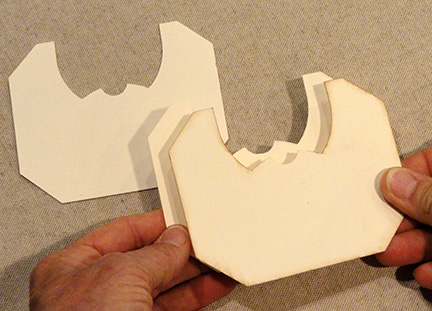
Block-y shaped box (lid and base) are joined
to present Sam's
bearded face and hat,
with build-up layers that compose brim,
beard and mustache.
Insert a painted
wooden "button"
(3/8" mushroom plug) for nose.
(Alternate shapes without button nose also
included.)
Layered star button embellishes hat.
Measures approx. 5" wide x
7.5" tall x 1.75" deep.
ASSEMBLY: 1. Identify and cut the shapes:
A LID main shape
B boxing strips for lid (4)
C BASE main shape
D boxing strips for base (4)
E interior support for base
Accent shapes:
F hat upper
G brim face plus build up layers(3)
H face I beard plus build up layers (3)
J mustache face plus build up layers (3)
K eye fronts and contrast backs
L star 3 layers plus extra build up layer each

2. Prepare the "boxing" strips by bending upper
edge tabs and lower edge rim tabs back,
also bending back on vertical perforation lines
(some of these bends may be reversed as needed
later to match the LID shaping).

3. Identify the special symbol marking that will help
identify the position and connection of the strips.
For instance, the "top & upper left" strip
(as viewed from project front) has an arrow triangle
cutout in the center top connecting tab . . .


upper tab (nearest the right end).

assembly symbols. The two ends of strips
that will be seams together will share the same
symbol (circle, square, diamond or X)
which are cut in the end tabs, or
in the top (not rim) connection tabs closest
to the end to be joined.
NOTE: if it is helpful, arrange the boxing strips
around the LID main shape as shown,
main shape face down with strips bottom up.
Re-bend the vertical seams to follow
the ins and outs of the main shape edge.

4. Position the top left (longest) strip with top tabs
along the underside of main shape edge,
lining up the arrow point center tab at the center
segment edge, adjust to make sure segment ends
line up exactly at middle section perf lines.
Glue tab in place.

5. Bend the adjacent strip section into position
to line it up with the corresponding next edge
segment, and glue in place.
Repeat to complete the short end of the top,
then . . .

the sections and segments to complete
the top box edge.

position, then position and attach each strip
section to corresponding LID edge.

NOTE that it will be helpful to apply fingertip
pressure from the inside of the LID as
the tab seams are completed.

7. Identify the adjacent strip to be added to
the first (top) strip already attached to LID
(square symbols in the case of this model which
is being construction in counter-clockwise direction
as viewed from FRONT).
Bend end tab forward to create a valley fold
where the previously-attach strip's end edge will
fit, position and join ends.

aligning and attaching each edge tab along
each corresponding LID edge segment
to complete the attachment of the second strip.

9. Identify and attach the third strip end.
Position and attach edges following
the same process.
Attach the final strip end, and attach edges,
except . . .

. . . before the final strip segment is attached,
also position the end tab ready to attach,
and complete these two seams at the same time.

10. Bend the lower edge rim tabs back
and glue in place to the back inside
of the LID.

11. BASE strips have similar symbol array
for identifying strip positioning,
but with double symbols for BASE strips.

the BASE, positioning and attaching the
top center segment, then completing
the first strip edge attachment.
Follow steps 4 thru 9 to complete BASE.

12. Prepare the interior support "strut" by
bending back narrower panel
(shown on left in image below)
along horizontal perforation line,
also bending center bottom tab away,
side tabs toward the narrower panel.

13. Position and attach the folded-back
panel in place.


14. Apply glue ONLY to the end margins that will
correspond to the LID's brim wall
interior surfaces, and to the undersides
of the bottom tabs, then . . .

. . . insert into the BASE in the position shown
which bridges across the width of interior space,
next to the wall indent of lower brim shaping.

Apply side to side pressure to ensure that
LID shape is NOT spreading wider than it should
by making sure strut ends are snugly next to
brim side end walls . . .

. . . apply pressure to glued-up ends, and
to bottom tabs also, until strut is securely in place.

assembly by inserting the two together, adjusting
the forms so that the various edges
conform (this is a snug fit in some places)
and slide the two together completely.
Then remove the LID to attach front accents.

by layering and attaching the multiple shapes
for beard . . .


should match as precisely as possible.
NOTE it is recommended when using liquid glue
to place a heavy flat weight on top of the joined
layers during the glue-drying process to keep them
flattened and to avoid warping or curling
until the shapes are completely dry.

layers to form one "button" accent.

18. Position the beard unit over the lower portion
of the face shape (model face has had some cheek
distressing done before this step)
with corresponding edges aligned precisely,
and glue in place.
(Pressing with weights is recommended here.)

(Use weight to flatten during drying if available.)

LID front, then position and attach the brim unit
next to and above face.
NOTE it may prove helpful to place the assembly
face down on flat surface to apply finger tip
or small weight pressure to the backside of LID
while the adhesive dries.

hat crown, layered eye fronts/contrast backs.

mushroom plug by painting if desired
to use for nose.
(If not using this plug, NO nose shape is required.
Alternative face, beard and mustache shapes
should be selected and cut.)

23. Position and glue the nose button in place.

24. Re-insert BASE into LID, and slide
together completely.

(if not leaving as a BOX that can be separated)
to apply a quick-grab
adhesive such as hot-melt glue or
Fabri-Tack between the walls, in strategically
needy positions, or all around
to secure the block shape in its best form.
Apply inward pressure as needed.

25. Tie star button accent with twine.
Position and attach securely to brim.
Here is the completed project.

No comments:
Post a Comment