
Create this large rooster as a decor
accent
with its many detail: dimensional beak, layer-thick comb & feet,
face mask, body and tail accent overlays,
hex tube legs with 1/4" wooden
dowel inserts for strength and durability.
Assembly is accomplished through
body/head hull box,
legs box insert, attached thigh forms and added on tail.
Measures
approx. 14.5" tall x 9.5" wide x 4" across.
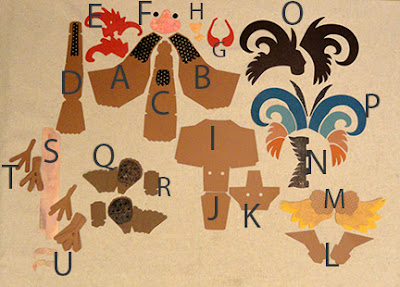
ASSEMBLY: 1. Identify and cut the shapes:
A & B body "hull" side panels with head accents
C front body boxing strip with front neck accent
D top body boxing strip with head top accent strip
E comb build up shapes (6-7) with outer tab shapes
(NOTE: check depth of cut shapes when stacked
to see if 6 or 7, or more, are needed to match
the space between the pair of slots on F;
see step 20)
F face wrap accent with eye contrast under-lay circles
G wattle outer and inner shapes
H beak upper and lower
I body box & leg support main shape J body box back panel
K body box upper shelf
L wing wedge lift platforms left & right
M wing assembly: main wing, upper accent, 4 build up shapes
N inner tail inverted "V" feathers
O tail main and add-on base shapes
P tail feather accent shapes left & right
Q thigh wrap base with outer accents left & right
R thigh wrap add-on panel strip left & right
S leg post "tube" strips (2)
T feet: 2 bottom plus 8 build up for each left & right
U leg spur left & right to join (2 pair)
NOT SHOWN: tail joining tabs (4-6) - see step 29

 For stacked or built-up shape components,
consider using a flat weight such as this fabric covered
re-purposed free weight bar, or equivalent,
placed on top of the stack and left there for
long enough (sometimes hours) until liquid adhesive
has dried completely. This will help avoid
warping and curling.
 Feet: stack left 8 and right 8 and glue together,
taking care to align all outer edges,
and taking particular CARE with the hex opening.

 Wings: Stack and attach the 4 main build up shapes
for both left and right wings.
(Model has a special top "face" layer - gold print.)
 Also attach the upper wind accent to each stack.


 6. Bend the next up segment and edge together
and glue together.

 8. Continue to bend the boxing front strip into
position to align and attach the top front head
segment and the next segment as well.


 . . . and end tail section.
 11. Alternate back to the left body side boxing
attachment to complete upper back and tail seams.


 18. Insert the tabs of upper beak into the slots
on the face mask, then . . .
 . . . bend the tabs outward on the backside
and glue in place.


 . . . bend the tabs outward on the backside
and glue in place.

 22. Position the face/beak/comb assembly in position
at the head as shown, then glue the face mask
surfaces and the back accent onto the body hull
where they touch.
 23. Bend top tab on main wattle shape back.
Layer the main wattle shape with top wrap extension
with the shorter backside shape and glue together.

 Also give the wattle a slight bend near the lower beak
to help it stay in position in front of head.


 27. Invert the tail so that the bottom pop-out tab
is visible, then insert it into the back slot on the body hull.
On hull inside, bend the inserted tab toward hull back
and glue in place. (This may require use of a rod tool
to reach inside to apply required pressure.)
 On the hull outside surface, glue the platform tab
in position onto boxing.

 . . . "swing" the tail downward into position to
overlap tail only a scant 1/4" at that lower corner,
and glue all of tail curved edge to body hull
where the two touch.
Repeat for opposite side.
 29. Bend the tail connector tabs in half at perforation.
Position and attach the tabs between the broad arc
of top tail as shown, tabs downward and perf fold even
with tail cut edge, and glue in place,
spacing the 6 tabs along the arc evenly
as deemed best to hold the tail edges together.


 NOTE that it will be helpful to use a thin blade tool
such as this spatula tip inserted behind the tab seam
to help apply pressure for the joining.


 . . . position the wing as shown with the curved edges
of wing at top and mid lower corresponding
to guide marks, and glue in place.
Repeat for both wings.

 38. Bend the bottom back into position
with side tabs tucked under the side walls
and glue in place.
 Continue to shape the box by bending side walls
up into position to align and glue the front side seams.

 40. Prepare the leg post shapes by carefully
bending back along the series of long perforation lines.

 42. Identify the TOP of the leg post which has
the longer end tabs.


 Bend top tabs back and attach to inside base
surface of platform.
NOTE it will be necessary to trim off the corners
of one or more tab tips so they don't interfere
with the platform walls bending into position.

 . . . tops of walls match up. Glue platform
walls to inside of body box walls.
 45. Insert the un-cut dowel into one leg tube
and push in until . . .


 50. Bend the shape so that straight edges overlap
adjacent wedge tabs to join bottom seams . . .

 . . . each wedge seam is joined, and . . .


 52. Determine which side each thigh structure
should be attached to (Left or Right), then
insert leg post through center, and . . .
 . . . slide up fully into position with outer curved top
extending over the hull surface,
front tab extending over the hull front,
inner bottom flange tab seating at body box surface.


 Insert leg post bottom end through hex opening of
appropriate foot stack, then bend tabs back
and glue in place.


A & B body "hull" side panels with head accents
C front body boxing strip with front neck accent
D top body boxing strip with head top accent strip
E comb build up shapes (6-7) with outer tab shapes
(NOTE: check depth of cut shapes when stacked
to see if 6 or 7, or more, are needed to match
the space between the pair of slots on F;
see step 20)
F face wrap accent with eye contrast under-lay circles
G wattle outer and inner shapes
H beak upper and lower
I body box & leg support main shape J body box back panel
K body box upper shelf
L wing wedge lift platforms left & right
M wing assembly: main wing, upper accent, 4 build up shapes
N inner tail inverted "V" feathers
O tail main and add-on base shapes
P tail feather accent shapes left & right
Q thigh wrap base with outer accents left & right
R thigh wrap add-on panel strip left & right
S leg post "tube" strips (2)
T feet: 2 bottom plus 8 build up for each left & right
U leg spur left & right to join (2 pair)
NOT SHOWN: tail joining tabs (4-6) - see step 29

2. Assemble the built-up shapes (comb, feet, wings) so the stacks
can be drying thoroughly before they are needed:
layer comb shapes with all cut edges aligned as
precisely as possible, and glue together.

Add the tabbed outer left and right shapes
on top of the stack, matching edges that should align,
and glue together.

consider using a flat weight such as this fabric covered
re-purposed free weight bar, or equivalent,
placed on top of the stack and left there for
long enough (sometimes hours) until liquid adhesive
has dried completely. This will help avoid
warping and curling.

taking care to align all outer edges,
and taking particular CARE with the hex opening.

Also glue together the pair of left and right shapes
without the hex opening (bottom foot layer)
Eventually, attach the bottom 2-shape stacks onto
bottom of stacked left or right foot shapes.

for both left and right wings.
(Model has a special top "face" layer - gold print.)


3. Position and attach the head accent shapes
onto corresponding left or right body side panel shapes,
with offset margin on sides and upper edge as shown.

4. Prepare the front and upper body boxing strips
by bending back side flange tabs, also bending
on cross perforations as MOUNTAIN or VALLEY
folds to match the contour of the body shapes
(shown here with M for mountain or
V for valley folds).

5. Begin to attach the upper boxing strip to the right
side body shape by lining up the longest edge
of back neck area with the second from top boxing flange.
Overlap side body straight edge over boxing segment
to perforation line, adjust top to bottom
for more perfect alignment, then glue in place.

and glue together.

7. Position top tab flange of other boxing strip
under the top straight edge of upper boxing strip,
adjust for side to side alignment, then glue together.

position to align and attach the top front head
segment and the next segment as well.

9. In order to reach into the head area
to make adjustments and to apply pressure to
seam area, pause the attachment of right side body
panel flanges to boxing strips.
Position and attach the opposite (left) side body
panel by repeating the positioning and attachment
as shown in steps 5, 6 and 8.

10. Return to the right body side to position and
attach the boxing segments across the rooster
back body . . .


attachment to complete upper back and tail seams.

12. Return to the right front to position and attach
the remaining boxing segments, then
complete the same seams for the left body.
All of boxing to side body panels should be completed.

13. Prepare the inner tail shape by bending back
at mid center short perf line, and bend tabs outward.
Position and insert tabs into body tail end slots.
On inside of body cavity, bend the tabs outward
and glue in place.

14. Bend the front neck accent forward slightly
at the middle perforation, then position, centered,
at second-down front "neck" bend and glue in place.

15. Prepare the face "mask" shape by bending
back on all perforation lines.
Position and glue the contrast eye circles
behind the shape so that the contrast circles
show thru the cut openings.

16. Prepare the upper and lower beak shapes
by bending back on main perf lines,
bending the tabs on upper beak forward.

17. Prepare the lower beak by bending it into
a dimensional triangle shape to overlap the straight
inside side edge to overlap the tab opposite
and glue seam.

on the face mask, then . . .

and glue in place.

19. Position the lower beak centered beneath
the upper beak, tucked up to be snug next to
upper beak lower corners, but NOT inside it.
Glue in place.

20. Insert the forward tabs of comb build up
into the top panel slots, then . . .

and glue in place.

21. Complete similar step with the top head
accent shape, inserting tabs into slots,
bending tabs outward and gluing in place.

at the head as shown, then glue the face mask
surfaces and the back accent onto the body hull
where they touch.

Layer the main wattle shape with top wrap extension
with the shorter backside shape and glue together.

24. Position the bend of the wattle assembly
at the top of the beak, with wattle hanging
down the rooster's right side, and glue
touching surfaces (wattle to upper beak) together.

to help it stay in position in front of head.

25. Prepare the two tail sections by bending back
on all perforation lines of each.
Position the two together at an angle as shown
to overlap straight edge of add-on (shown right)
section over angled edge tab, and glue together.

26. Position and attach the various accent shapes
to the tail on one side (also add slight bend to the two
accents that include perforation lines) with the top
plume necessarily overlapping the other plume,
then adjust for opposite top overlap to enable
opposite side accents to be attached.

is visible, then insert it into the back slot on the body hull.
On hull inside, bend the inserted tab toward hull back
and glue in place. (This may require use of a rod tool
to reach inside to apply required pressure.)

in position onto boxing.

28. Locate the back bottom corner of the body hull
as the key place in positioning bottom of tail, then . . .

overlap tail only a scant 1/4" at that lower corner,
and glue all of tail curved edge to body hull
where the two touch.
Repeat for opposite side.

Position and attach the tabs between the broad arc
of top tail as shown, tabs downward and perf fold even
with tail cut edge, and glue in place,
spacing the 6 tabs along the arc evenly
as deemed best to hold the tail edges together.

30. Prepare the wing wedge platform shapes
by bending back on all perforation lines
and tabs.

31. Bend side walls back so that the ends come
together in narrow angle. Tuck tab inward
and glue in place to opposite wall.

such as this spatula tip inserted behind the tab seam
to help apply pressure for the joining.

32. Bend the point tabs inward,
bend the back panel to close the wedge box
and glue the back underside to the tabs.
(Complete left and right wedge platforms.)

34. Identify the perf mark guide lines on
wing stack underside, then . . .

. . . position the matching platform box to match
guide marks, and glue in place.
NOTE that the platform wedge should be
completely behind the wing stack.

35. Locate the curved wing perforation guide marks
on the side body, then . . .

of wing at top and mid lower corresponding
to guide marks, and glue in place.
Repeat for both wings.

36. Prepare the body box by bending back
on all perforation lines for main shape and
for added back wall.
37. Position the back wall lower tab under
the bottom wall edge as shown, adjust,
then glue edge and tab together.

with side tabs tucked under the side walls
and glue in place.

up into position to align and glue the front side seams.

39. Prepare the platform insert by bending
back and side walls forward.

bending back along the series of long perforation lines.

41. Form the leg posts each into a tube.
Wrap around the 1/4" wooden dowel that will be
cut to size later in assembly, but now will act
as a glue-up form.
Overlap the long side straight edge over
the opposite long flange tab, force the tube tightly
around dowel until edge matches up with opposite
tab perf, and glue the seam, working finger pressure
continually along the length of the seam to ensure
the tight wrap is maintained, and the seam is secure.

the longer end tabs.

Insert the post top into the hex leg opening on
bottom of body box above top edges.
Repeat for second post.

43. Position the platform structure above
body box (orient the fronts marked with 'F'
in same direction), then . . .

. . . insert posts through hex holes in same manner.

surface of platform.
NOTE it will be necessary to trim off the corners
of one or more tab tips so they don't interfere
with the platform walls bending into position.

44. Push the leg posts down with platform
attached so that it inserts into the top of
body box, and continue sliding platform into
position until . . .

walls to inside of body box walls.

and push in until . . .

. . . top of dowel reaches but DOES NOT extend
above the platform/side wall edge.
Hold dowel securely in this position until . . .

. . . the length can be marked as shown
with this mechanical pencil, at leg post length
WITH TABS BENT BACK OUT OF THE WAY.
Remove the dowel and cut to size for first leg,
then repeat the inserting, measuring/marking,
and cutting of dowel for second leg.

46. Apply glue strategically to inside of post tube,
then insert dowel for final time and
push fully into position as it was measured.

Apply glue to exposed dowel edges
to attach each to the body box side wall.

47. Insert the box (orient F toward rooster front)
inside the rooster hull, and push in fully -
this may take a little maneuvering to get the upper
edges to align correctly and seat together fully.

Bottom body box edges should be fully inside
of hull bottom tabs. Glue body box in place.
Bend hull tabs inward and glue in place
to bottom of body box.

48. Identify the thigh main and add-on strip shapes
for left and right thigh box structure.
NOTE that a tiny 'L' will identify the shapes
that will create the left structure.
Since these symbols will be hidden when the need
to identify left and right arises, transfer the 'L'
by hand with pen or pencil onto
the upper backside of shape.

Prepare the main and add-on strips by bending
back on all perforation lines, except the upper edge
tabs which are bent forward.

49. Position the side flange tab of add-on strip
next to the corresponding side straight edge
of main shape, overlap and join the seam.

adjacent wedge tabs to join bottom seams . . .

. . . around bottom of structure until . . .


. . . box is formed into a tube to complete
the final back inner side seam and lower segment.

51. Prepare the thigh left and right accent overlay
shapes by bending back slightly on the middle
perforation line, also bending the "feather" tab
cutouts outward sightly.
Position and attach the appropriate accent over
the main face of the thigh box with
perforation lines lined up.

should be attached to (Left or Right), then
insert leg post through center, and . . .

extending over the hull surface,
front tab extending over the hull front,
inner bottom flange tab seating at body box surface.

Glue all touching surfaces together.
NOTE if may be helpful to use a tool to help
apply pressure to front tab and inner flanges.
Repeat for second thigh and leg.

53. Prepare to attach the feet to legs by
orienting the feet stacks at leg ends so that
"toes" angle away from center as shown.

appropriate foot stack, then bend tabs back
and glue in place.

54. Position the matching bottom (2-layer) short stack
to align with attached foot, and join.
Consider using flat weights placed over front
and back toes of feet to help them attach securely
and avoid warping and curling.
Repeat for second foot.

56. Prepare the spur paired shapes by bending
inner perf line as "valley" fold, outer perf line
as "mountain" fold as shown for each of paired set.

Position the pairs back to back to align and attach
the hooked portions ONLY; tabs should remain free.

This is how the completed spur structure appears.

57. Position the spur at the back of the leg
approx. 3/4" or so above foot, with tabs
placed to wrap around leg post, and glue in place.
Repeat for both legs and spurs.

Rooster assembly is complete.


I really love this rooster! Will purchase all your chicken designs as soon as the tutorials are up and running!
ReplyDeleteThank you so much for this clear tutorial. Your work is great!!! BIG compliments!
ReplyDeleteWorking to get the text together with the images. Sorry this is taking so long. Crazy week.
ReplyDeleteIt's a really lovely roster! Thank you for the tutorial.roberta
ReplyDelete