
(Requires
12x12 cutting capacity.)
Six dimensional skeleton frame wedges are built
then
wavy mesh overlays attached (and cross members
clipped out). These are attached
to layered top and
bottom hex ends supported through the center with
a hexagon
tube which encases a 3/4” diam. wooden dowel.
(Interior interlocking strut strips can
replace
the dowel if preferred.) A pair of layered leaves are
jute-twine tied
to the dimensional, curved stem
(1/2” diam. dowel supports the lower portion).
Add optional “found” berries stem or other
seasonal decorations to complete
the ensemble.
Pumpkin measures approx. 6.75” wide x 7.5” deep
x 10.75” tall including the stem.
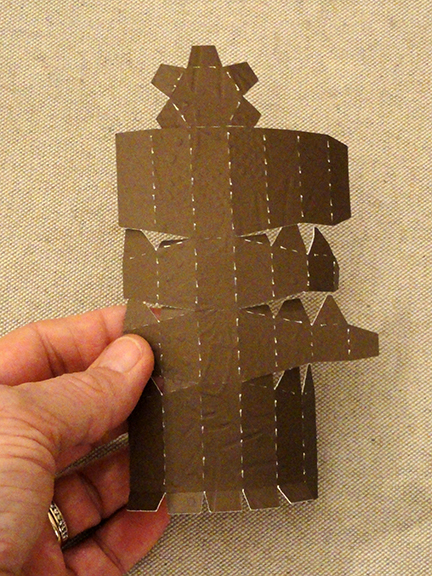
ASSEMBLY: 1. Identify and cut the shapes:
A wedge "skeleton" (6) B wedge bottom section (6)
C & D wedge side flanges (6 right; 6 left)
E wedge grille overlay (6) F bottom post anchor hex (6-7)
G bottom power anchor whole
H top post anchor hex (6-7) I top post anchor whole hex
J stem shape K stem collar (2) (NOTE: these shapes
were cut from darker card stock for final project)
L stem base hex shapes (1 top; 1 bottom)
M post wrap shape N opt. dowel replacement struts
O smaller leaf build up shapes (5-6), contrast top layer
& vein accent layer
P large leaf build up shapes (5-6), contrast top layer
& vein accent layer

 Use flat weight such as this fabric covered repurposed
weight machine bar to press the stack while it dries.


 Repeat for the large leaf.
This image shows both leaves layered and complete
to demonstrate thickness of the completed leaves.

 Position and attach the contrast whole hexagon
on the bottom of the stack. Press until dry.

 . . . position and attach the whole shape on top
of the stack; press until dry.
 D) Layer the stem base hexagons with the outer
edges aligned, attach and press until dry.
A wedge "skeleton" (6) B wedge bottom section (6)
C & D wedge side flanges (6 right; 6 left)
E wedge grille overlay (6) F bottom post anchor hex (6-7)
G bottom power anchor whole
H top post anchor hex (6-7) I top post anchor whole hex
J stem shape K stem collar (2) (NOTE: these shapes
were cut from darker card stock for final project)
L stem base hex shapes (1 top; 1 bottom)
M post wrap shape N opt. dowel replacement struts
O smaller leaf build up shapes (5-6), contrast top layer
& vein accent layer
P large leaf build up shapes (5-6), contrast top layer
& vein accent layer

2. Prepare the shapes that need to be layered,
glued up and pressed to dry completely so they
can be ready when needed farther along during
the construction sequence:
LEAVES: Layer small leaf main shapes, taking care to align
all cut edges, and glue together.

weight machine bar to press the stack while it dries.

Layer the contrast shape on top, then . . .

. . . the vein accent top shape, then press again
until completely dry.

This image shows both leaves layered and complete
to demonstrate thickness of the completed leaves.

B) layer the base hexagons in the same manner,
taking care that all cut edges -- especially the inner
hexagon opening -- are lined up as precisely
as possible. Press under a flat weight until dry.

on the bottom of the stack. Press until dry.

C) Repeat for the post top hexagons, stacking
and attaching the main shapes, then . . .

of the stack; press until dry.

edges aligned, attach and press until dry.

showing the recess where stem tabs will fit.

3. Before beginning the wedge construction,
get familiar with the perforations that will work
to shape it. Here, the cross beam perforations
are indicated.

Locate the side perforation cuts on cross beams
that line up with the "window" opening edges.
These are guidelines for when the beams are
eventually hand-trimmed away.

perforation lines.

Once the bend is started, it may be helpful to
finger crease to ensure crisp uniform bends.
Also bend back on the bottom and top end tabs.
Repeat for all 6 wedges.

5. Position and attach the end extension section
to the bottom of each of the six main wedges.

6. Prepare each of the left and right wedge arc flanges
by bending back each segment tab.
Also locate the single perf cut across the arc shape
and bend back slightly at each.
Identify the top of the right arc flange by finding the tiny 'T'
cut into the cross wall tab.

back at the two-cut perforation line.
Also locate the bend back the short bottom
cross flange.

alongside the corresponding large center tab of arc,
overlap wedge straight edge to tab perforation line,
make sure that ends of "seam" match up
(i.e. cross beam perf line aligns with the cross hatch
of arc bend), then glue the seam.

on table top and finger press to secure it.
(Its the only one that can be pressed flat!)

8. Bend wedge and arc slightly to align, position
and glue the next segments of the seam.
NOTE the fit will be snug, so it may be helpful
to work on 2-3 segments at once to make sure
the alignment stays right.
9. Continue to fit, align and join each segment
along the edge, moving toward top of wedge.

of the top tab, and glue in place.
(Cross flange perf line will align at end tab perf line.)

11. Move to the lower portion of the right flange arc
to continue to position, adjust and attach each
to corresponding segment of wedge.

12. Bend the bottom cross beam and attach
to the end edge of the wedge.

13. Repeat the process to position and attach
the left side arc in the same manner, beginning
at center and working up and down to complete
attachment of each tab.

and glue in place. NOTE: the tight corners may
require using a tool to be able to apply pressure
in tight space.

15. Prepare each grille overlay by locating the short
perf cut lines, then bend along the line . . .


Grille overlay will look like this when all bends are made.

16. Prepare to attach grille overlay to wedge assembly
by either applying glue to the inward half of the side
skeleton ONLY (do NOT glue the cross beams
to grille), or apply glue to the solid edge of the grille.

over the corresponding center portion of
framework, aligning the bends of grill and
cross beams. Then . . .

each grille perf bend with cross beam bends,
keeping grille overlay centered, and attach in place.

Then move to lower portion to wrap and attach
the grille overlay in place.
Allow the glue to dry thoroughly.

18. Use sharp scissors to carefully trim away
the beams along the side perf lines, first on one side . . .

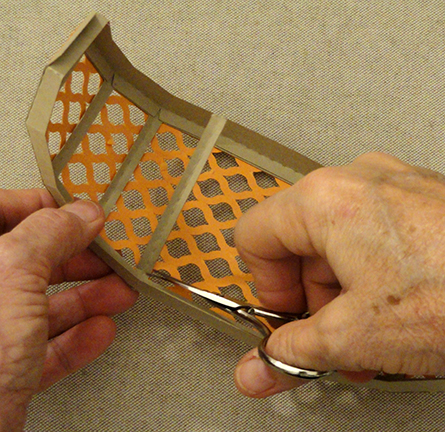
trimmed away.
(If preferred, beams can be left in place.)

19. Continue to carefully cut away each
of the remaining 4 beams (5 total per wedge).
Here is a comparison of wedge with and without beams
as ween from backside, and . . .


21. Prepare the beam wrap shape by bending back
on each long perforation line for wall sections,
side flange tab, end hex caps and tabs.

22. Form the post shape into a tube to overlap
the straight side edge over the long flange to
perforation line, and glue seam. Use the 1" wooden dowel
as a form to wrap the shape over, during gluing. OR . . .

. . . the side seam can be aligned and glued,
then pressed flat.

with the three-part strut support.
Assemble the struts by sliding together one
single-slot strut up from the bottom of the two-slot strut.


Spread the struts evenly, then insert into the end
of the post tube, and slide into place until it is
centered inside, with ends even with tube ends.

23. When using the 1" dowel, insert the dowel
into the tube, and slide . . .

. . . until end is even with opposite end,
when the end tabs are bent back.

away), then remove dowel and cut on line.
Re-insert dowel into tube.

24. Bend end tabs inward, hex cap down into place,
adjust and glue in place.
Repeat for second end.

then insert top post end in, square up and apply
pressure to secure in perpendicular position.

26. Repeat for the bottom hex anchor.

27. Prepare to to assemble the pumpkin with wedges
by applying adhesive to the bottom solid panel . . .


Then position bottom end on inward surface of
bottom hex anchor, end wall flush with post wall,
and top tab overlapping top hex anchor, adjust
to be centered, then hold in place and apply pressure
until secure.

Here is the assembly to this point.

onto the post and anchors, until the final wedge
in positioned and attached.
NOTE it may require using a tool inserted between
the wedges to apply pressure that finger tips
will not be able to reach.

29. Prepare the stem shape by bending back on
all wall perforation lines and tabs, except
the bottom end tabs should bend outward.
30. Form the stem into a tube to overlap the straight
edge of first segment over the opposite tab to
perforation line to join seam.
NOTE this may be most easily accomplished
by inserting a 3/4" dowel as a press-around form.
31. Continue in same manner to complete each of the four
segment seams.

This is how the stem unit looks as completed tube.

slightly, apply adhesive to them, then bend the upper
segment slightly to enclose them. Insert finger into
tube to apply pressure to join tabs to segment;
hold until secure.
33. Repeat for each of the next two seams to form
the stem into its hooked shape.

34. At the end, bend cap tabs inward, apply glue
then tuck the tabs into the top segment until hex
surface is flush, and hold in place until secure.

35. To reinforce the stem end so that ribbon, etc.,
can be safely tied around it, cut a short (1-1.25") long
stub from the 3/4" wooden dowel that will
eventually be glued into the bottom of the stem.

36. Insert the bottom tabs end through the stems
hex base from the face side, then . . .

. . . bend the tabs back and glue in place
within the recessed area; hold until secure.

37. Insert the dowel stub into the bottom of
the assembly and push in until flush with bottom,
and glue in place.

38. Prepare the two collar reinforcement shapes
by bending back on vertical perf lines, and
forward on scallop end tabs.

39. Wrap and attach each collar in place at
the base of the stem so that stem is surrounding.

40. Position the stem/base unit on top of
the assembled pumpkin, aligning the hex shape
base with the post end hexagon, and covering
the wedge tabs.

41. Prepare to attach the two leaves using twine
or ribbon as desired. For the model, 14" lengths
of jute were formed into a loop, then inserted from
back, ends passed through the loop and pulled tight.

Jute ends were tied around stem, ends trimmed short.
Once final arrangement was determined, jute ends
and leaves were quick-dry glued in place.

Here is the completed pumpkin.

42. Add other embellishments as desired,
such as the berries stem and ribbon shown.

No comments:
Post a Comment