
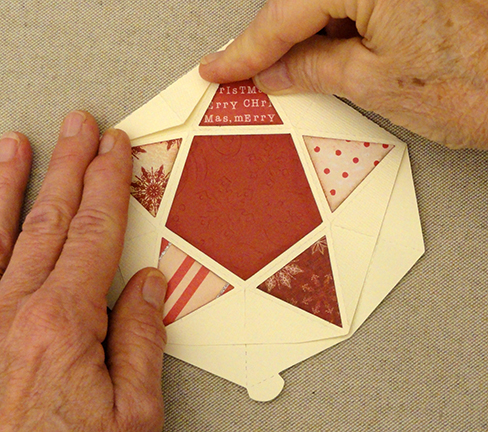
Multiple crease lines of the
single piece hull
create this shaped ornament.
Assembly
includes folding in half, overlapping
half diamond “flanges” and “puffing” out
to form its dimensional shape. Fill with gift contents
through unattached
bottom angle edge,
then close with a tab inserted into slot.

Top point has
circle cutout to insert
a knotted ribbon hanging loop.
Add mixed or matched
geometric “patch” shapes
on front and back as accents.
Measures approx. 4.75”
tall x 4.5” wide x
1.5” deep when assembled, puffed and closed.
ASSEMBLY:
1. Identify and cut the shapes:
A main star box hull
B patchwork accent shapes, 2 sets (pentagon - 1;
star points - 5)
 2. Prepare the main hull shape by bending forward
(valley folds) on the perforation lines marked in RED
in this diagram, and back (mountain folds) on
all other perforations.


 . . . around the center pentagon.
 Here is the completed hull with bending completed.
3. Locate and be familiar with the closure tab, and . . .

 . . . where the top center hole cut out is.
 4. Position and attach the accent "patchwork"
shapes onto the face of the hull for both front
and back.

 . . . so that it wraps over the back edge,
and glue the half diamond "tab" in place.
Repeat for the other two half diamond tabs.

 . . . the side where the closure tab is located.
 8. To close the box, bend the tab back
and insert it into the slot.
Open up the box to continue . . .


1. Identify and cut the shapes:
A main star box hull
B patchwork accent shapes, 2 sets (pentagon - 1;
star points - 5)

(valley folds) on the perforation lines marked in RED
in this diagram, and back (mountain folds) on
all other perforations.

One good way to do this is to place the shape
face side down on the work surface then fold
the edges where the full diamond side panels are,
(shown shaded in the diagram above) . . .

. . . also folding back on the center seam.

Next, bend on the short perf lines within
the side diamonds.

Finally, bend on all the star point lines and . . .


3. Locate and be familiar with the closure tab, and . . .

. . . slot opposite, and . . .


shapes onto the face of the hull for both front
and back.

5. Fold the hull in half on the center perforation,
then fold the side diamond center line . . .

and glue the half diamond "tab" in place.
Repeat for the other two half diamond tabs.
6. Puff the star box open by inserting a finger
inside through the un-attached half diamond tab,
and "pop" the side diamond shape inward.
7. Repeat this for all of the sides, including . . .


and insert it into the slot.
Open up the box to continue . . .

. . . to finish the ornament with a ribbon loop.
9. Prepare a ribbon loop with ends knotted together.
10. Prepare a "threading loop" tool of doubled
floral style wire as shown.

11. Hook the wire threader around the ribbon loop . .

. . . then insert the end of wire threader into the box
hull, across, and out the top circle opening.

Carefully pull the ribbon loop through the top
opening until . . .

. . . it is stopped by the knot at ends.
Glue in place if desired.

Here is the completed ornament with the ribbon hanger.

If additional embellishment is desired,
consider using this 2D Cedar Mini Sprig
that is shown in a different project tutorial with


No comments:
Post a Comment