
Large
double point three-layer pennant has
fold-over top bracket with four punch
holes
for threading ribbon streamers, bottom center
angle-span lace panel and
two offset ovals.
Include the double-layered letters L O V E with
accent punch
circles for a Valentine’s season,
Wedding, or Mother’s Day display.
Each
pennant measures approx. 5.8” wide x 9.25” tall
(fit two largest base shapes across
on 12x12 card stock).
Pennant can be paired with “Rosette 3D Bracket Ensemble,”
“Rosette Lace Oval Box Pleat” designs for
an
elaborate pennant banner decoration.
ASSEMBLY: 1. Identify and cut the shapes:
A main pennant base
B & C offset smaller accent pennant shapes
D top fold-over wrap bracket with punch holes
E eyelet lace arch span
F & G bracket medallion and offset accent
H oval accent panel
I letter base J letter with two circle punch "nailheads"

 3. Position the smaller pennants assembly onto
the front of the base pennant, with equal offset margins
on sides and along point angled edges, and attach in place.
NOTE that the top straight edge of the smaller pennants
will be overlapped by a tiny bit when the top bracket strip
is positioned.


 6. Prepare the other accent assemblies:
a) layer the bracket medallion shapes and attach;
b) layer the letter with base letter shape and attach,
with punch dots positioned and attached over the tiny
guide marks;
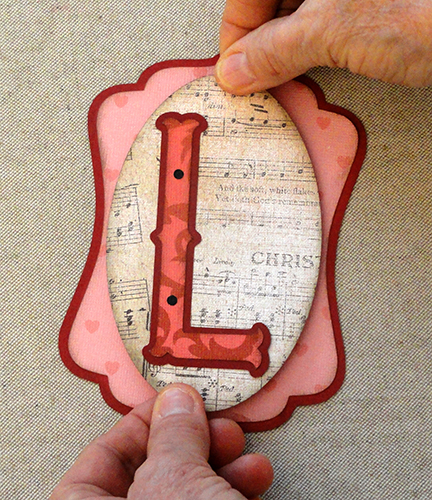
c) position and attach the letter over the oval accent.
 7. Position and attach the oval/letter assembly
on the front of the bracket medallion.
 8. Position the medallion assembly over front
of the pennant, centered from side to side
and with top tip barely below the bracket edge
as shown, then attach in place.
NOTE: you may wish to consider using dimensional
foam squares to attach the medallion at this step.
 Here is the completed 'L' pennant.
Complete three more with the other 'O',
'V' and 'E' letters, or cut different letters
from another source to spell out names,
'MOM' etc. as desired.


 Another option is to use the Rosette 3D Bracket Ensemble
as the pennant front decoration.
Here it is shown with a trimmed-to-size printed image.
 And here is that ensemble shown on the front
of the 5th pennant banner to go with . . .
(banner image with rosette here)
. . . the L O V E pennants ensemble as the center flag.
A main pennant base
B & C offset smaller accent pennant shapes
D top fold-over wrap bracket with punch holes
E eyelet lace arch span
F & G bracket medallion and offset accent
H oval accent panel
I letter base J letter with two circle punch "nailheads"

2. Position and attach the smallest pennant accent shape
on top of the middle pennant shape with
top straight edges even.

the front of the base pennant, with equal offset margins
on sides and along point angled edges, and attach in place.
NOTE that the top straight edge of the smaller pennants
will be overlapped by a tiny bit when the top bracket strip
is positioned.

4. Center the eyelet lace arch under the base pennant
edge, using the center top symbol to help position
the "valley" of the pennant, then adjust so that
the lace has the same portions showing on each side,
then glue in place where pennant overlaps edge.

5. Bend the top bracket back in half ("mountain" fold).
Position over the top edges of the pennant assembly,
centered, and so that all hole openings are aligned,
then attach front and back in place.

a) layer the bracket medallion shapes and attach;
b) layer the letter with base letter shape and attach,
with punch dots positioned and attached over the tiny
guide marks;
c) position and attach the letter over the oval accent.

on the front of the bracket medallion.
of the pennant, centered from side to side
and with top tip barely below the bracket edge
as shown, then attach in place.
NOTE: you may wish to consider using dimensional
foam squares to attach the medallion at this step.

Complete three more with the other 'O',
'V' and 'E' letters, or cut different letters
from another source to spell out names,
'MOM' etc. as desired.

Or, consider using alternate letters such as these
"Letters & Roses" pdf printed panels which match
the top rectangle panel size for this project.
(Find the purchase-for-download design in the etsy
store by following the attached link above.)

Here you can see that the 'L' letter panel from
Letters & Roses designs is the perfect cut-to-size
panel for the top layer of the rectangles for
the pennant design, and also for the rectangle frame
of the eyelet lace frame design.

That assembly fits nicely onto the pennant front.

as the pennant front decoration.
Here it is shown with a trimmed-to-size printed image.

of the 5th pennant banner to go with . . .
(banner image with rosette here)
. . . the L O V E pennants ensemble as the center flag.
No comments:
Post a Comment