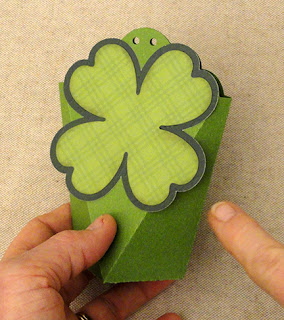
Dimensional, miniature treat box has
perforations
to bend lower hull walls to create container
for fun St. Patrick's Day gifting.
Top edges are shaped, with square “on point” bottom
where bend-n-latch flaps complete assembly.
Cut one- or two-layer
shamrocks to decorate hull
on front (and back as desired), with simple
two-layer
faux-stitched name tag in short or long sizes.
Two punch holes at top
allow for twine
or ribbon tied closure.
Measures approx. 4.7” tall x 3.3” wide
at top
x 1.5” square base.
ASSEMBLY: 1. Identify and cut the shapes:
A main box hull
B & C shamrock accent and base (cut 1 set for front;
a second set to decorate back if desired)
D tag with contrast back
2. Bend the hull shape back on all perforations for
panels, side flange tab and bottom latch panels.
3. Form the hull into a "tube" to align and joinalong the side seam.
NOTE that the hull can be pressed flat to
allow fingertip pressure to be applied along
the side seam.
4. Push the sides of hull inward slightly to allowthe box to take its volume shape, then . . .
. . . bend the bottom latch flaps inward to
form bottom. A) First bend the "slot" flap inward.
B) Next bend both diagonal edge sides toward center.C) Then bend tab side toward center . . .
. . . and allow it to press past perpendicular to let
the tab slide under the slot edge. Then . . .
. . . allow the bottom to re-adjust to the perpendicular
--or flat-- form. (This may require poking it from inside.)
Glue the overlapping edges in place, if desired.
Or leave them unglued so the box can be
un-assembled and flattened for storage and re-use.
5. Prepare and assemble the accent shamrocks
and tag shapes by . . .
. . . layering the fronts over the base shapesand gluing in place.
6. Position and attach the shamrock accent over
the front panel of the box, aligning the upper petal
edges with the matching edges of box.
(Repeat for the backside of the box, if two sets were cut.)
NOTE that the lower petals will extend beyondthe box edges at the angled perforations.
7. Push or squash the box sides slightly toward
the center to open for filling. Then . . .
. . . position the tag over front with punch hole
aligned with one of those of the box.
Thread ribbon or twine through holes to complete assembly.
Here is the completed shamrock mini tote.


No comments:
Post a Comment