
Unique
hostess gift or display box features
layered-for-thickness front and back
scallop-edge circles
with attached base or lid boxing walls that fit snugly
together.
Lid front panel features a dozen stylized turkey feathers
with offset
base shape, and center scalloped accent.
Include the “Season of Thanks” words
(with substituted
shorter feather pairs at upper and lower center)
to celebrate
the November holiday.

Coordinates as the gift container for
Pilgrim 3D Hat
Easel Card design.
Box measures approx. 6.15” in diameter
(scallop top and bottom)
x 3.25” deep
(interior measures approx. 5.25” diam.).

ASSEMBLY: 1. Identify and cut the shapes:
A contrast box LID rim layer (top)
B box LID rim middle layers (3)
C inner box LID rim layer with guide mark perfs
D LID main shape
E1 accent overlays for LID segments
E2 accent overlays for BASE segments
F contrast box BASE rim layer (top)
G box BASE rim middle layers (3)
H inner box BASE rim layer with guide mark perfs
I BASE floor shape J BASE wall sections (2)
K optional BASE interior contrast floor

L feathers offset base
NOTE: the sample box includes the word cuts
sentiment, with 8 tall and two pairs of shorter feathers.
When omitting sentiment, cut 12 feather sets
M feather shapes with cutouts (8)
N feather shapes underlay contrast (8)
O feather contrast tips (8)
P feather circle contrast accents
Q middle size feathers, underlays and accents (2 sets)
R short feathers with tip accents (2 sets)
S scallop center ring with contrast underday
T word cuts Season/of Thanks

2. Identify the rim scallop inner layer with 'F' cut into face . . .


middle layer, aligning outer edges as precisely
as possible.
 Also position and attach contrast top rim layer onto

the stack (face side out).
 While liquid glue is drying, press flat under a heavy

weight such as this wood plank, large book, etc., until
the glue is completely and thoroughly dry (may require
a few hours) to prevent warping and curling.
 3. Repeat step 2 for the BASE rim build up,

noting that the inner layer of the BASE includes
fewer guide marks.

 5. Align and overlap the straight end edge over

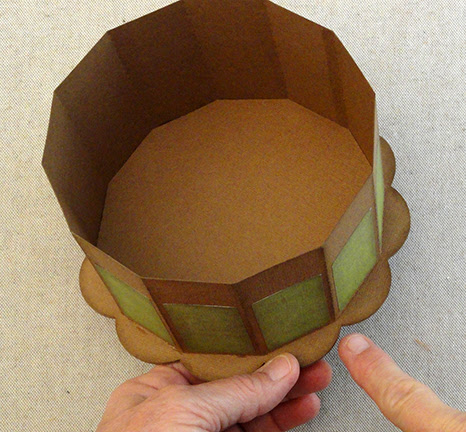
4. Prepare the BASE walls sections by bending back
slightly on vertical segment perforation lines, end flange
lines, and bottom tabs.

the flange tab opposite, adjust top and bottom,
and glue to join first seam.
 6. Position and attach the side accent shapes within

each perforation-defined segment, with sides and
bottom edges offset inward slightly, matching
the bottom inset to the side inset when the shape
is centered.

and join the second side seam.
 8. Bend the bottom tabs inward, place on flat surface,

and apply adhesive to the backside surface of tabs, then . . .
 . . . insert the 'floor' polygon shape into the ring and

press downward until it "seats" along the tab perforations
all around. Apply fingertip pressure all around until
the floor is thoroughly joined in place.
 9. If desired, insert the contrast polygon floor liner shape

and attach in place.

 11. Position and attach lid accent shapes into wall

10. Prepare the LID main shape by bending back
on all perforation lines for wall top edges and tabs.

segments with offset margin at top and sides,
and with straight bottom edge aligned at straight edge.
 12. Bend the LID wall sections down into position

so that the straight side edge overlaps the adjacent
tab to perf line, and join the seam. Join all 12 seams.

 14. Position and attach each long feather centered within

13. Prepare the tall and short feather assemblies
by positioning contrast underlays behind main
feather shape, attaching contrast rim and circle.

each extension of the feathers base shape, with narrow end
aligned at circle cutout edge.
NOTE: for the word cuts sentiment version, long feathers
are NOT attached at upper or lower center two positions.

Here is the layout for the 8-long feather assembly.

Position and attach the middle size feathers in
the lower center positions as shown, and the very
shortest at the top middle positions.
Position the word cuts into the open positions
on the feathers base (viewable in next frame).

15. Position and attach scallop circle and contrast, then . . .

. . . position it at center of assembly with circle
openings aligned.

16. Position and attach the LID decoration assembly onto
the front of the LID rim build up assembly
(see the next frame image to verify that the LID assembly
with multiple guide marks and 'F' are visibly on inner surface).
Press flat until dry.

17. Identify again the backside of the LID with 'F' and . . .

. . . base with fewer guide marks.

Position the LID assembly over the backside of LID
rim build up . . .

. . . with guide marks that will align at
straight edges of lid boxing edges, then position
and attach, adjust, then apply fingertip pressure
within walls to join thoroughly.

18. Repeat step 17 for BASE with BASE rim build up . . .

. . . positioning edges at intermittent guide marks,
adjusting, and gluing in place.

It may also be helpful to watch the angles between
wall segments to align at the valleys between scallops,
with even margin at these positions all around.
Apply fingertip pressure to securely attach together.

19. Complete the box by fitting the LID walls over/around
BASE walls and pushing together.

Here is the completed box.

If using as the gifting container for the Pilgrim 3D
Hat Easel Card, insert it into the interior of open box
then place and secure lid.

No comments:
Post a Comment