
Fashion one – or four to rotate and
stack!

Bird box features hull shape with “container” that
slides in from back.

Perfect as “Four Calling Birds” vessel for
Twelve Days of Christmas gifting.
Card
stock-wrapped .25” wooden dowel “post” passes down
through each bird’s boxing.

Platform base composed of scalloped and
plain circle layer stacks accepts the
bottom end of post,
topped off with a painted 1.25” diam. wooden craft ball.
Decorative overlays for body and individual boxing segments
feature
cutout decoration with contrast panels beneath.
Finished (approx.)
measurements:
hull 5.7” long x 4.14” tall x 1.25” deep; platform 3.75” diam.;
“container” 3.45” long x 1.83” tall x 1.8” deep.
Stacked, quartet of bird boxes
measures approx. 12.25”.
ASSEMBLY: 1. Identify and cut the shapes:
A bird body "hull" right side
B bird body "hull left side (with finger access)
C cover for 'B' finger access opening
D & E body boxing strips
F body accent overlays left & right
G wing accents left & right
H tail and contrast underlay accents l & r
I beak top & J beak bottom overlays
K-M boxing segments with contrast overlays
N, O, R boxing segments overlays
P upper beak & Q lower beak boxing overlays
(not shown: contrast tongue inset shape)
S "drawer" compartment left & right panels
T drawer boxing strip
U & W post hole reinforcements for drawer, soffit box
V soffit box

X stand top plain edge disc with build up shapes (5-6)
Y stand scallop disc with build up shapes (5-6)
Z post wrap with top tab
(not shown: testing post wrap stub)
AA opt. insert for painted wooden ball to layer (7-8)

2. Prepare the TEST post wrap shape by forming
into a square tube, with straight side edge overlapping
the tab on opposite side of shape, and joining seam.

Fit it snugly over the 1/4" wooden dowel, as
a replica post to help test the glue-up of stacks.

3. Prepare the base glue-up layers so they can be drying
during other assembly: layer and glue together the scallop
disc shapes, one at a time, into a stack, taking particular
care - here and throughout - to align ALL cut edges,
especially the post square hole edges.
(NOTE: see step 4 to use the test post to ensure that
the opening is accurate and will accept the post.)
Also layer and glue together the plain round top disc stack.

Place each stack under a heavy flat object that will
press the stacks flat until completely dried - several
hours or over night - to help avoid warping or
curling of the liquid glued-up layers.

4. When the base stacks are fully dried, place the plain
disc on top of the scalloped disc, lining up the post
hole openings as precisely as possible. Then press combined
stack under a heavy flat weight until dried.

5. Prepare the soffit collar and drawer collar stacks
by positioning and gluing together the duplicate layers
into stacks, taking care . . .

. . . to align the center openings and using the test post
assembly to ensure that the opening is precisely aligned
to accent the post.

6. Prepare the hull boxing strips by adding curl to
the multi-tab portions of each boxing section
(this is easier to accomplish before tabs are bent back)
using a rod tool such as the 1/4" wood dowel that will
be used for the post.

Then, bend the edge tabs back on both boxing strips,
also on cross-perforations between segments.

7. Join the two strips together by overlapping
the curled end straight edge of the long strip
over the end tab of shorter strip to form one length.

8. To assist visualization of where the boxing strip will
attach to the right hull body shape, bend or re-bend
the boxing strip assembly around the shape.
It may be helpful to begin at the tail end, identifying
the three long segments that will form
around the angular tail edges . . .

. . . with the shorter tab-end that is eventually bent
across the interior neck of the tail area.

Line up the under-tail hull edge along the corresponding
boxing edge segment, overlap the straight edge across
boxing flange, adjust to align ends of segment
and hull edge, then join the seam.

9. Bend the boxing to align and join the next segment
(tail end) and hull edge.

Then continue in the same manner to align
and join the next segments to hull edge.
For curved segments, align ends of boxing section
with curved edge ends, then adjust and fit the multiple
tabs to curve edge. NOTE it may be helpful for
curved and straight tabs to invert the assembly face down
on a flat surface and press with fingertips to ensure
that the seam is thoroughly joined in place.

10. Return to the initial end of boxing strip to re-direct
the first segment across the tail neck, bend the end
tab UP into the tail cavity, then glue the side and end
tabs into position in one operation.

11. Prepare the soffit box shape by bending back
on all panel and tab perforation lines.

12. Form the soffit shape into a box by bending sides
into position to tuck the side tabs inward and join
the four side seams.

13. Insert, position and attach the soffit collar
(post reinforcement) stack so that the post openings
align precisely. NOTE: the collar can be positioned
and attached while the soffit shape is still flat, when
it can be pressed while drying for complete attachment.

14. Bend the side tabs inward, "lid" down and join
to tabs for form the cubic soffit box.

NOTE it may be helpful to insert a flat blade tool such as
this spatula to provide something under the tab
to press against.

15. Position the soffit box, window side inward against
the underside of the top "roof" bird hull panel,
taking care that side edges of box and boxing strip align,
and that the post opening edges align precisely.

16. Bend all boxing tabs inward, then position
the left body hull shape over the hull opening.

NOTE it may be helpful to begin at the top panel
edge, joining that tab and edge, then working around
each side, aligning edges and tabs as for
the right hull body panel. Insert fingertips into
hull to help with adjustments and applying pressure
to the seams as they proceed.

17. Position cover panel - centered - over the hull
opening and attach in place.

18. Prepare the drawer (compartment) boxing in
a similar manner as hull boxing, adding curl to
the multi-tab segments.

Also bend back side tabs and cross perforation lines.

19. Position the drawer collar on the inside "floor"
panel, aligning sides and side perforation lines,
and taking care that the post opening cut edges
as aligned as precisely as possible.

20. Prepare drawer side wall panels by ending back
on the two cross perforations near the center
that form rim; bend forward on the inward edge tab.

21. Identify the arrow symbol in the tab near the FRONT
end of the boxing strip.

Also NOTE the 'F' letter cut into the inward flange
of the side wall panels.

Position the FRONT edge segment of boxing strip
along side the corresponding side panel edge,
overlap straight edge to tab perf line, and join first segment.

NOTE the small guide marks along the wall panel edge
that should assist in aligning the 'ends' of the boxing
segments and sections.

Continue to align and join segments of the boxing strip
along remaining edges of side panel.

NOTE (as mentioned previously) it may help joining
seams by inverting the assembly onto flat surface
to apply finger tip pressure along the seams.

Complete the joining from front edge to back.

22. Bend the top flange/rim into perpendicular position,
and the interior wall down, bottom flange to align
along the backside of the side wall. Double check that
rim is perpendicular to wall, then adjust and glue
the bottom flange in place.

23. Position, align, adjust and attach the second
wall to the bent-inward tabs. Use top opening to
reach inside to adjust and provide finger tip pressure.

24. Position and attach contrast panels behind
each of the boxing accent panels.
(NOTE that the shape being held at bottom of
this frame is the front panel, and DOES NOT have
a contrast panel.)

25. Position and attach the wing accent panels on top
of their respective bird body accent panels as shown,
with offset margin between faux stitching and wing
edge. Also position and attach the lower beak
and upper beak onto the body panel. Complete
accents for BOTH right and left panels.

26. Position and attach each boxing accent panel onto
the boxing segment to which it corresponds.
Begin with the top panel, as shown. NOTE there are
offset margins on the sides, but most accents
will reach to the perforation bends at ends.

For the two panels for the curved boxing segments,
add a slight curve first, then position and attach.
These are the top head crest, and . . .

. . . and the lower front body.

The top head panel has a bend that fits snugly over
the top crest, then attach.

Position and attach the beak upper and lower
panels where they correspond. Position and attach
the tongue shape into the cutout.

26. Position and attach the back accent panel
onto the back of the compartment.
27. Position the drawer at the back of body hull
and insert front end inward . . .

. . . then slide and push inward fully, to close the box.

Here is the completed bird box.

28. Mark the 1/4" wood dowel to match the length
of the post strip, NOT including the end tab.
Cut to size ("losing the line") and sand end(s).

29. Prepare post wrap shape by carefully bending
back on each of the lengthwise perforation,
and also at end tab.

30. Form the strip into a tube to overlap the straight
edge to opposite long flange tab and glue in place.

Apply pressure all along the seam edge until
joined along the FULL length.

31. Insert the cut-to-length dowel into the tube
and push fully into place. If deemed necessary,
glue the dowel into the tube.

Also bend the top tab back and glue in place
to the top of the dowel.

32. Apply strong adhesive into the base tunnel
and insert the post into the hole until bottom edges
of each align. Hold in place until glue is secure.

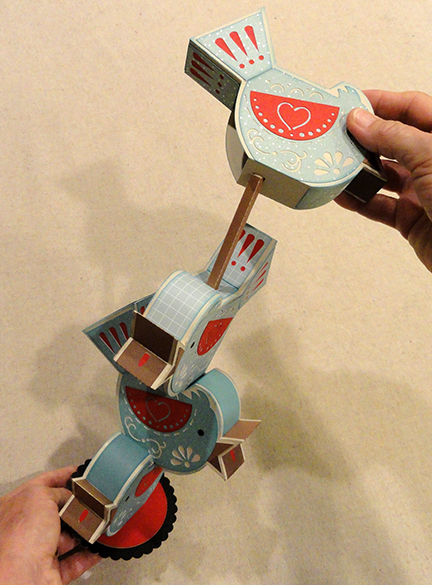
33. If creating a four-birds stack, assemble the stack
by sliding the boxes, one at a time, beginning with
bottom box, onto the post, "fishing" to be able to
feed post through body and drawer openings,
then slide fully down.

Alternating boxes will be positioned in perpendicular
orientation so that bottom panels and top panels
seat fully next to each other.
34. To prepare the 1.25" wooden ball to sit in place
on top of the post, position and securely glue the
post collar stack into the mouth of the ball's opening.
Allow to fully dry in place.

The prepared ball can then be slipped onto
the top end of the post and slid down into
position, resting on the top panel of top bird box.

Here is the completed four bird box stack.

No comments:
Post a Comment