
"Calling Birds" of the fourth day of
Twelve Days of Christmas.

at center of simple bird with Nordic style decorations.
Back panel bends away to reveal sentiment.
Tag measures approx. 3.45” wide x 2.72” when closed.
Four birds with varied cut out designs
are strung together on a twine loop.
Interior layers include a channel
where twine can
be laid.
Four birds tag measures approx. 5.125” long.
Larger, heart dangler tag will be explained first.
Four-birds tag will follow in Step 11.
ASSEMBLY: 1. Identify and cut the shapes:
A bird front with eye circle in place B bird beak
C contrast underlay
D front tag base
E interior buffer layers in halves (2 ea)
F backside of front assembly base
G tag back base
heart charm layering for thickness:
H front (2) I buffer in halves (2 ea.)
J back (2)
K string loop or tassel on strings

taking care to align the heart cut out edges as
precisely as possible. (Other edges are offset inward
from body front edge.)

such as this thick book, to help minimize warping
or curling.
 3. Position the bird body front onto the tag front base

with narrow offset margin visible all around.
Position and attach beak, with inner edge touching
front of body shape, other edges offset from base
edges. Position and attach eye circle.
 4. Layer the bird base interior buffer layers, and

glue together, taking particular care that ALL cut edges
are aligned as precisely as possible - here
and throughout the layering steps.

position and attach the interior layers on corresponding
halves of BACK base. NOTE there should remain
a channel between the two halves of the buffer layers
where tassel strings will be enclosed. Press under
a heavy flat weight while stacks dry thoroughly.
 4. In similar manner, stack and glue together pairs of

shapes for whole heart front and back, interior halves.
Press under heavy flat weight until dry.
 5. Position the left and right halves onto the back whole

heart, aligning outer edge precisely, leaving
the channel down the center.
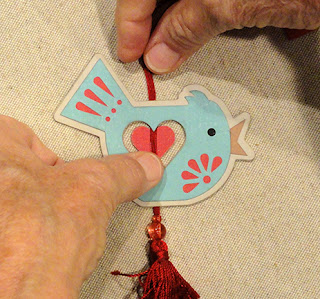
 6. Position and attach the tassel or other strings loop . . .


tassel is sufficiently below bottom of body edge,
and glue in place above and below heart cut out.
 8. Position and attach the body interior BACK

over the interior assembly and tassel strings channel,
aligning all outer edges as precisely as possible.
 9. Position the heart BACK assembly into the interior

of the heart window, centered between top and bottom,
with tassel strings nestled into the heart's channel.
Glue tassel strings into channel, then . . .
 . . . position whole front heart stack over top of

heart, aligning edges, and attach in place.
Press under a flat weight til dry.


10. Prepare tag BACK base by bending forward
(face to face - image shows inner face)
along perforation line.

11. Position the upper portion of tag back base
over backside of corresponding upper portion
of front tag multi-layer assembly, match edges
precisely and glue in place.

Here is the finished tag, with knotted
and trimmed top strings.

FOUR BIRDS TAG
11. Identify and cut the shapes; shapes are
identified for one bird - prepare four:
A bird front and back
B interior buffer layers in halves (2 of each)
C bird base offset shapes front and back

offset base shapes with tiny offset margin all around.
Also stack and glue together the interior buffer
layer halves, taking care to align ALL cut edges
as precisely as possible. Press under heavy flat weight.
 13. Position and attach the interior buffer halves

onto the "back" assembly, aligning outer cut
edges precisely.


(Complete all four birds to this point in assembly.)
14. Alternate birds left-right-left-right on work surfacespread barely apart, center channels aligned.
Position and lay the string(s) loop down the channel
and pull tight as it is attached in place.
Allow to dry.
 15. Position and attach paired "fronts" of the birds

over the "backs" and enclose loop strings.
Press under flat weight.
 Here is the completed tag.


No comments:
Post a Comment