
Stylized sunflower bloom is built with fancy petals
shaped by
curling and supported by a shallow “cup” behind,
with flattened
dome, front grille accent overlay in center.
Cubic card stock stem is stiffened
with .25” wooden
cut-to-size dowel inside, with attached layered leaves
(with embossed
veining), inserted into a three-tiered
platform stand with angled checker
accent panels
and thickened scallop edge base.
(Since stem can stay in place for display without
gluing, sunflower display can be conveniently stored
until next season's use.)

Two stem shape lengths included,
to create a paired ensemble for a summer or autumn display.
Tallest version
measures approx. 13.375”.
Platform base is 4.2” x 4.2”.
Blossom measures
approx. 4.75” across (when shaped).
ASSEMBLY: 1. Identify and cut the shapes:
A petals disc B blossom shaper cup with separate wall arc
C blossom dome walls arcs (2)
D dome floor disc E dome top disc with finger openings
F dome top solid disc and grille overlay
G blossom cup back panel H stem post
I leaves for embossing
J leaf base with stem K leaf reinforcement
L veins embossing form
M base scalloped squares to layer for thickness (4-5)
N base scalloped square top layer with column opening
O post collar 4-5 shapes to layer for thickness
P platform base tier 1 Q tier 2 angled platform
R & S checker base and accents (4 each)
T column hull U column post collar (4-5 shapes to layer)

to be drying as other assembly progresses:
A) layer and glue together scalloped square bases,
taking special care - here and throughout - to align
ALL cut edges as precisely as possible.
 Place the glued-up stack on a flat surface and place

a heavy flat object on top, such as a wooden plank or
the thick book shown here, until fully dried. This will
help minimize curling or warping when using liquid adhesive.
 B) layer and glue together each set of post collar shapes,

then press under a flat weight until dried.

 . . . adding back curl at middle to tip of each petal.
 The center of the petals disc should begin to resemble

NOTE: The petals and cup shapes originally included slots
for attachment to dome with tabs. Final design was
changed to remove slots and tabs;
some images will include them.
3. Prepare the petals by shaping with a narrow rod tool
adding forward curl at base of each petal, then . . .


a cup, that will later accept the blossom dome.
Apply distress ink to add color/shading at the base
of the petals as shown here, if desired.
 4. Prepare the blossom shaping cup by bending

arch strip between segments, and bending back
disc edge tabs, including . . .
 . . . the narrow wedge tab near welded arc connection.

NOTE: it may be helpful to "pinch" fold at that tab
perforation line.
 5. Position and join the arc at side seam, overlapping

the straight edge over opposite tab to perf line.
 6. Form the arch into a ring, to position and tuck

the arc free end tab under the opposite straight
boxing end edge and join the seam.

edge tab, then . . .
 . . . slide ring into position on top of the edge tabs,

adjusting to make sure that boxing edge and perforation
edges align precisely, and attach in place at each tab.
 8. Position petals shape over inside of shaper cup . . .


. . . using center hole to align both shapes, with each petal
aligning with center of one of the fourteen disc facets,
and glue in place.

more definition at cup edge, pressing all around.
To help with the attachment of the two components,
consider placing something columnar-shaped inside
the petals "cup" until glue dries, such as the bottom
of a full commercial water bottle of matched diameter.

slightly at each segment perforation, also bending top
and bottom edge tabs back (inward).
 10. Join the (dome) arch segments into a ring by overlapping

straight edge of one arch over the corresponding tab
to join first one side seam, then the other.
 11. Bend bottom tabs outward, then position the disc inside

tabs, apply adhesive to inward face of tabs, then . . .

rotating so that arch segments align each disc edges
all around.
 Invert the dome assembly onto a flat work surface

to insert finger- of thumb-tip into dome to apply
pressure all around until . . .

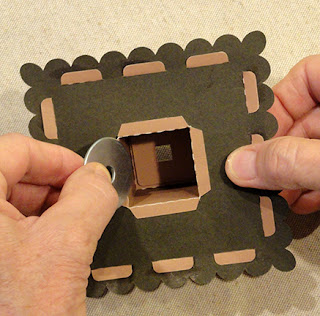
 12. Bend top dome tabs inward to perpendicular,

. . . tabs are completely attached.
(Remember, the tabs on bottom disc have been eliminated.)

then apply glue to tabs. Position the "hollow"
top panel, adjust for segment and panel facets adjustment,
and attach. Insert fingertips into openings to "pinch"
the panel and tabs to join thoroughly.
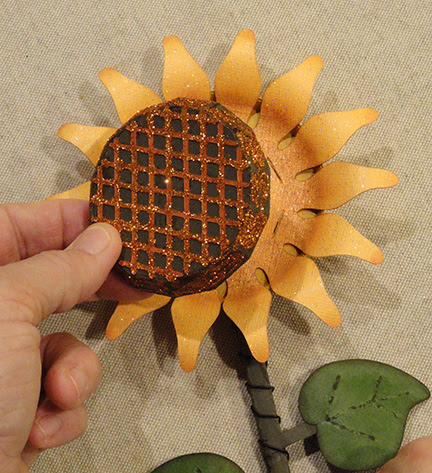
 13. Position the grille accent onto the top of

the solid top panel disc. Then position and attach
to the hollow top panel, matching edges precisely.
 14. Prepare tier 1 platform by bending back on all

perforations for center panel, walls, corner tabs;
also bend forward at bottom edge tabs.
 15. Bend the walls back at corners to align straight

edge over inward-bent corner tabs, and join
each corner seam.
 16. Prepare the tier 2 platform shape by bending similarly

to tier 1.

the checker cutouts on the contrast base trapezoids,
and attaching.
 18. Position each checker panel assembly onto

corresponding trapezoid area, centering with narrow
offset margin all around.
 19. Bend the platform walls into position to join

each angled side seam.

 . . . bending back on "lid" edge perforation, then

20. Prepare the column shape by bending back on
perforation lines for side wall panels, forward on
bottom tabs . . .

forward on the four lines around the lid square.
 21. Form the column shape into a tube to align

and join the side seam. NOTE that . . .
 . . . it is possible to press the column shape flat

to apply finger tip pressure along the seam edge.


22. Position and attach the two post collar stacks:
one is placed on the backside of the column "lid",
and the other on the top of the base scalloped square.
taking special care that the post square openings are
as precisely aligned as possible.
Press under a flat weight until thoroughly attached.

23. Prepare to bend the column "lid" into place by
applying glue to the wall between column and lid,
and to underside of three other edge flanges.
 . . . bend the lid into position to attach connected

wall onto inside of tube, also . . .


with top column edges.
 24. Prepare the post shape by bending back on each

of the long perforation lines for skinny panels
and side flange.
 25. Form the shape into a tube to overlap the straight

side edge across the opposite flange to perforation line.


Flatten the tube on work surface to apply fingertip
pressure all along the seam until completely attached.

26. Re-form the tube to insert the 1/4" wooden dowel
inside . . .

. . . and sliding into place so end of dowel is even
with non-tabbed end of tube.

At the other end, mark the dowel at end of tube
top edge (NOT tabs) with fine pencil.
Saw the dowel to that length.

 29. Position the post onto front of back disc to

27. Reposition the dowel inside the tube so that tube
and dowel ends align, adding adhesive to attach
in place.
28. Bend the top tab down into position to "cap"
the tube and glue in place to top of dowel.
NOTE: shaped tab with two holes should still extend
up from post.

align holes, with adhesive on back of holes tab,
AND also on post underside wall that can attach
to disc. NOTE: use dash guide marks to help align post.
Add small decorative brads through the two holes,
and press prongs as flat as possible on underside.


30. If desired, emboss the veining details onto leaf.
A) Position the vein form onto the BACKSIDE
of leaf, and hold in place.

B) Use a large ball stylus to press the veins location
into the leaf backside.

C) Invert the leaf with form underneath, then
use the same tool to press the vein lines down
into the leaf.

to carefully trace around edges of vein depressions.

leaf base with stem, then . . .
 . . . attach reinforcement shape (shorter stem)

behind leaf assembly. Press flat under weight
until dry.
 32. After glue has dried, shape each leaf by adding

back curl to the center of each leaf.
(NOTE the inked veins of the model leaf.)
 33. Insert column UP through bottom of base top layer.

Push fully into place until bottom tabs catch at
base square edge.
 Glue tabs to underside of base square.
 NOTE that it may be helpful to invert platform assembly


on flat surface to apply fingertip pressure all around
column edges.
 34. Assemble tiers assembly by inserting tier 2 tabs

through slots on top of tier 1.
 Bend center stand tab slightly so that it will support

tier 2. Also . . .

to underside of tier 1.
 35. Apply quick glue to outer bottom of column

outer surface approx. 1/2" above platform, then . . .
 . . . position and slide tiers assembly over column . . .
 . . . and slide downward into position so that bottom tabs


can be inserted into platform top slots.
 Apply glue to tabs, then bend outward and glue

to platform panel underside.
NOTE it will be helpful to place platform base-down
on flat work surface and apply finger pressure in
tab positions to help with attachment.
 36. The wide platform and light weight of the sunflower

makes it completely stable standing. However, if you
are concerned about it tipping over, consider hot melt
gluing a few large metal washers as weights onto
the interior walls of the column at this point in assembly.
 37. Apply adhesive to the underside of the platform

top accent layer. Then position it over the layered base,
and glue the platform together, taking care that outer
edges align as precisely as possible all around.

Apply pressure along all four edges to firmly attach.
If possible, place weights along the edge margins
to help avoid warping or curling of these edges
during the drying process.

craft wire. Beginning on backside, hide the top wire end
next to the post side behind the blossom disc.

Wrap the wire in an even, slightly angled spiral with
wire wraps spaced approx. 1/2" apart.
Pause the wrapping approx. 2.5-3" down . . .

on the sample project) by wrapping the stem around
post from front toward back. NOTES: A) position
the leaf so that it will fall between the wire wrap lines;
B) leaf face should be oriented toward FRONT of post, as
you may notice by the brad prongs showing on disc, above.
 39. Continue the wrapping of wire, pausing to

attach the second leaf on opposite side 1-1.5" below
the first, then . . .
 . . . complete the wire wrapping to the length

that post will remain exposed once bottom end is
inserted into stand. Complete the final wrap toward
one side or back, and cut. Apply a dab of quick-grab
adhesive neatly/invisibly at ends of wire, if desired.

then position (centered) on backside of petals assembly.
Hold in place until attached fully.
 41. Apply glue to dome assembly backside, then position

inside the petals cup with edge facets aligned
with petals. Hold in place until joined.
NOTE: glitter decoration has been applied to
the grille and to the dome edges of the sample project.
end through column opening and down through
column until it "seats" into . . .

. . . the anchor square hole of collar stack now
concealed inside on base surface. (Post end is seen
here slightly beyond the platform bottom surface.)
For a permanently-assembled project, the post end
could be glued inside the collar at bottom an top.
However, it may be convenient to be able to disassemble
for seasonal storage, then reassembled for later display.

Consider building a second flower using the shorter
stem tube length for a sunflower ensemble.


Awesome
ReplyDelete