
Trio
of crested, bottom-opening compartments connect
to form a “roll up” gazebo
shaped box which is side-tied
with 3/8” wide decorative ribbon.
Bottom nestles
into a scalloped circle “tray” base,
thickened for weight and sturdiness,
mirrored by
scallop edge peaked dome "lid".

Matched ribbon loop is strung
between top and bottom
which “tightens” into place with a 5/8” diam. painted
bead.
Accent shapes adorn outer and rolled-together walls,
dome edges and
panels, including the delicately detailed
checker panels, “hen” silhouette
cutout panel and fleur de lis.

This container carries well the “Three French
Hens” theme
for Twelve Days of Christmas gifting.
Combined unit measures
approx. 5.75” tall
x 4.89” wide x 4.89” deep which tied closed.
(Individual compartment
measures approx. 5.5” tall
x 3.25” across widest point x 1.875 across widest
point –
a five sided trapezoid.)
ASSEMBLY: 1. Identify and cut the shapes:
A box hulls: left, center, right
Base scalloped circles: B bottom layers (4);
C middle layers with ribbon slots (2);
D top accent layer with registration circles (1)
E bottom "tray" F tray accent strips (6)
G hull accent side panels (6)
H hen cut out accent panels (3)
I accent show-thru panels for hens (3)
J panel checker accents (3)
K gazebo "roof" L connector tabs (5)
M gazebo triangle whole panels (3)
with angled checker accents (3)
N gazebo triangle fleur de lis cut out panels (3)
with contrast show-thru triangles (3)
O gazebo roof rim accents (6)
P ribbon end anchor squares
Q interior double connector panels (2)
R interior accent panels (1 left, 1 right)
This project also requires: one 5/8" wooden bead,
painted in selected, coordinated color;
two 8-9" pieces of .375" wide grosgrain ribbon
for side ties;
and one 22" length of ribbon for top cinch loop.

the bottom 4 layers, one at a time, aligning scallop and
interior circle cut edges as precisely as possible,
here and throughout.
 While liquid glue is drying, place the glued-up panels

on a flat work surface then flatten with a heavy object on top,
such as this thick book (place something else heavy on top too)
until thoroughly dried - up to a few hours or overnight.

flat weight until dry.
 4. Assemble the base by positioning and attaching

the middle slot layer assembly on top of the base
assembly, then . . .
 . . . position and attach the top layer onto

the assembly.

 5. Prepare the "tray" shape by first disconnecting

Press under
flat weight until completely dry.

any remaining attached tab lower cut edges.
Bend back on all perforations.
 6. Position and attach the rim accent shapes on

the outside surface of tray, aligning straight bottom edge
at perforation, scallop edges, etc. Press flat until dry.


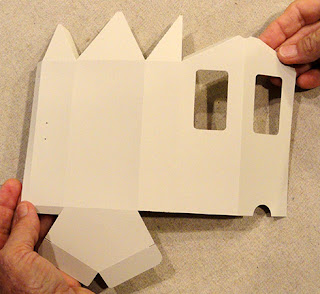 NOTE that you can identify each unique box hull

7. Bend walls back to overlap short straight edge
over adjacent tab to perforation line, and join for
each side seam.

8. Prepare each of the box hull by bending back
on all perforation lines for panels, tabs and flanges.

by locating the letter ID on the left side flange.
This one is 'L'; center is 'C'; right is 'R'.
 9. Prepare the outer decorations:

hen panel - position and attach checker accent
above base dash cuts; position and glue contrast
panel behind cutout
triangle panels - position and attach checker accent
on solid triangle panel above dash cuts;
position and attach contrast triangle panel
behind fleur de lis
Prepare three of each of these varied units.
 10. Position the hen panels on the center front of

each box hull, offset approx. .125" in from panel-defining
perforations.
11. Position and attach the narrow accent panels
on either side of center hull hen panel, and on panels
without the ribbon curved cut tab.
(This is the Left unit.)
 Before attaching the accent panels onto the ribbon tab

panels, disconnect the tiny bridge at center of cut
with a blade tool such as this spatula.
 Apply adhesive to edges of backside of accent,

except leave the area that will be next to the ribbon
curve cut without glue. Position and attach accents . . .
 . . . making sure that there is passage available

under the panel and through the slot . . .
 . . . as can be seen by the spatula blade inserted

under the tab from face side.
 12. Insert end of one side tie ribbon lengths

through tab slot and pull through until only .5 to
.625" remains on inside of box hull. Glue in place
with quick-grab, secure adhesive such as
Fabri-Tack. Then . . .
 . . . position and attach the anchor square

over the ribbon end to hide the ribbon end
and make inside of boxes neat.
Ribbon should be attached in this way to
both Left and Right box hulls.


13. Form the hull into a tube to bring straight side edge
to overlap flange to perforation line, adjust to align
tops and bottoms of adjacent panels, then join side seam.
Repeat for all three boxes.

NOTE it may be helpful to bend along the seam
perforation to apply fingertip pressure all along
to secure this seam completely.

Otherwise, the seam can be secured in its more "open"
position, especially with a pencil shaft or similar tool
placed behind the seam to press against.

14. At the top of the box, bend the side tabs inward,
then the side top wedge walls down into position
to align along the side tab perforation, and glue seam.
Repeat for both side seams.

15. Bend the center wedge panel into position
to align the angled side edges over the tabs at
perforation lines, adjust . . .

. . . and glue in place.
NOTE that access openings in interior walls
allow fingertips to reach inside to press behind
these seams during assembly.
Complete top seaming for all three boxes.

16. When boxes need to be closed, bend the wide tabs
at bottom inward as shown, then tuck sides into position . . .

. . . until bottom panel is flush.

17. In preparation to attach the three boxes into
their "roll-up" configuration, lay them out in order
L-C-R; also prepare the connector panels by bending
forward along the center perforation.
Position the left or right single interior accents on ends
with matched crest angle shaping;
position each connector double panel between
boxes.
18. Position and attach the single panels onto their
corresponding box faces, covering up the access
openings, with approx. .1 offset narrow margins around.

19. Position the appropriate half of the double panel
over the interior face to which it corresponds . . .

. . . folding the panel in half to align . . .

. . . perforated fold along the box panel edge,
with offsets at top, bottom and side as shown.
Glue this half of the connector panel in place.

20. Position the remaining half of the connector
over the adjacent box panel, adjust so that the box
perforated edges abut snugly, with margins matching
opposite box panel, and glue in place.
The two boxes are now attached with a "hinge".

21. Repeat for the final box to attach in same fashion.

This is how the roll-up box looks from the front.

The boxes ensemble can also be "rolled" as shown.

22. Prepare the roof shape by bending back on all
perforations for triangle panels, rim edge walls and
flange or tab.
23. Position and attach contrast rim edge walls.

24. Position and attach the accent panel assemblies
in alternating design type order, centered within
the perf-defined panel edges (narrow offset all around).
Press under flat weight if desired.

25. Form the shape into a dome by overlapping
straight edge across the flange to align at flange
perforation line, adjust top and bottom, and glue the seam.

26. Bend the two rims next to seam down to
complete the short seam with edge and tab.

27. Bend the five tab connectors forward slightly
at the center perf line. Position each behind
the other rim "seam" positions with bend aligned
at rim edges - rim side edges should abut snugly . . .

. . . and attach in place.

28. Begin the finishing of the project by threading
the ribbon loop length down and back up through
base center slots, then even out the ends.

Pull the loop away slightly from underside of base
assembly to apply strong adhesive dab (such as
the Fabri-Tack glue shown here), then pull the loop
into place again to attach within the underside's depression.

29. Thread ends through bottom of tray . . .

. . . and pull ribbon through as tray is slid into place
(bottom of tray to touch top surface of base assembly).
Before tray is snug in place, apply adhesive to underside
of tray without getting it on ribbon, and ease
tray into position, using the trio of positioning holes
in tray and on face of base to align, and glue the two
surfaces together. Consider using something
heavy to help press down tray edges while attaching.

30. Thread ribbon ends through dome center
opening, then . . .

. . . thread 'stop' painted bead onto ends
(this should be a snug fit).

31. With bead moved to within 1.5 inches or so of
ribbon ends, there should be enough space between
dome and tray base to wrap roll up box around
the ribbon, allowing the ribbon to pass through
the conduit formed when boxes are rolled.

Close the box into hexagon position and . . .

. . . fit bottom of box ensemble into tray.
Next position and fit dome over tops of
boxes, then . . .

. . . slide bead down to snugly hold the dome
in position, which keeps the assembly together.

Tie the side ribbon into knot and bow.

Here is the completed project.

Consider creating and using
the coordinated gift tag if packaging
the roll-up box - in cellophane, for instance -
for Twelve Days of Christmas (or other) giving.

No comments:
Post a Comment