
Use recommended printed paper weight or lightweight
cardstock not heavier than 65 lb. to cut
two sizes of six-pointed snowflakes dress up
this ornament ball. Top layer of each size has
offset inner shapes that includes position circle cut outs
for adding “bling”
jewels.
Bottom layer snowflake also has tiny circle cut outs at diamond tips
and
near neck for attaching dangling crystals.
Together, they fit over ball stem, and “drape” (curl added)
around the top of a plain glass
ornament, rotated so that
long points and diamonds line up .
(Sample shown is a 4” diameter ball with 7/8” diam. stem;
enlarge shapes for
bigger balls.)
Main upper snowflake measures approx. 5.5” wide x
6.375” tall
flat shape (lower snowflake shapes slightly larger
to allow for dangling
crystals). Alternate snowflake shapes
are included in cut file which have a
narrower 1/2”
hanger stem center opening.
ADJUSTING THE SIZE FOR LARGER GLASS BALL:
Use a ratio mathematic application to change shapes sizes
using "lock aspect ratio" option in Silhouette or other
die cutter design software. Here is the formula:
target ball size
divided by
original 4" ball size
Then convert the resulting formula to a percentage number
by moving the decimal two positions to the right.
Example: for changing to a 5" diameter ball --
5" divided by 4" = 1.25
1.25 becomes 125%
125% is the figure keyed into the SCALE function,
then applied to all the shapes at once,
with "lock aspect ratio" box checked.
NOTE that the center opening for ball stem
will also be enlarged.
ASSEMBLY: 1. Identify and cut the shapes:
A upper snowflake base B upper snowflake inner shape
C lower snowflake base D lower snowflake inner shape
E jewel fringe yardage* F self-adhesive jewels
* Jewel fringe can be found in the home-decoration sections of
some of the fabric and craft outlets. The jewels used for sample
was purchased from Hobby Lobby, then re-strung into
the lengths desired.

use a rod-like tool such as this narrow dowel to carefully
and gently draw the backside of each snowflake arm extension
across to add back curl. Complete this process for each arm
of each lower and upper snowflake shape.
NOTE: the curl needs to be added when the shapes are
separate, not layered and glued together.
 3. Layer the inner shapes onto the base shapes,
aligning the center circle cut edges (and needle holes
for the lower snowflake shapes), while centering
the arms so that the narrow offset margin of base shape
is even and consistent, except where the top shape
tapers outward to align at the center "collar" area.

shapes, use a blunt needle to poke through the needle
holes of both layers, near the collar area . . .

. . . as well as at the ends of diamond extensions.
Then join the two layers together.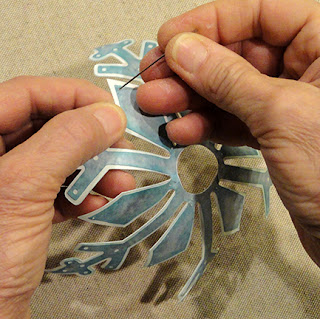
and set aside until end of snowflake assembly.
 5. NOTE that the snowflake layers retain their curl
 6. A) Pull or clip threads to separate the bead fringe
throughout the layering and glue-up.
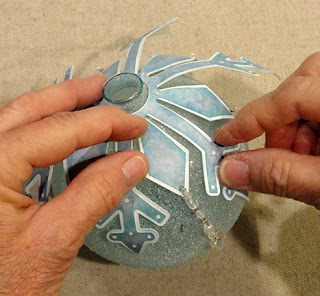
As needed, place the glued-up snowflake layers onto
the ball then use hand pressure all around to further
shape the snowflake arms to fit the ball's shape.
strands of beads, taking care to work where they can
be collected for re-stringing.
 B) Use a fine hand sewing needle that will fit through
the fringe beads, then thread up a color match,
doubled (for strength) length of thread, large-knotted at end.
NOTE: A very long length such as doubled 50" length
(cut around 100" inches) may allow ALL the stitching
to be completed on the one length without tying off
and beginning again with second length.
The longer length does pose tangle challenges.
 C) Begin at first selected diamond extension
to position knot end at center of backside
and tape in place with a small piece of cello tape.
Press tape in place securely.
 D) Insert needle back to front at diamond end
and pull thread length fully through without pulling
paper out of shape.
 E) Experiment to "audition" selected jewel length
configuration, with the "finial" dangler jewel as final jewel.
Use the original configuration of the fringe as guide.
The sample project's selected fringe included
a pair of small beads on each side of dangler jewel.
Sample project has danglers of 2" length.

past the finial dangler, pass the needle back UP
the beads length . . .
 . . . then front-to-back through the same hole in
end of the same diamond extension
then draw thread through fully.

Here is the first length in place.

G) On the backside of snowflake, insert needle into
the lower needle hole of the pair directly above
previously-stitched hole and pull fully through . . .

. . . down through the top hole of same pair
(and pull thread through fully - here and throughout,
taking care NOT to pull up or distort the paper shapes) . . .

. . . then move across to the top hole above the next
diamond extension and insert needle through
back to front.

H) Insert needle front to back through hole below
the last hole inserted through in step G above.

I) Insert needle back to front through hole at bottom
of same diamond, then add the determined bead
length configuration.
J) Repeat steps D-I to continue adding bead danglers
then stitching to get needle into position for
the next dangler to be added.

K) When all danglers have been added, and thread
is in position behind the final diamond extension,
add a small piece of cello tape to firmly and
securely attach thread in place. Trim excess thread
length.
NOTE: this process can be used if additional
thread length needs to be added.

7. Add appropriate, thick and quick grab clear
adhesive such as the Fabri-Tack used here to
backside of lower snowflake. NOTE glue should be
only applied to half-way down arms, leaving tips
unglued. Then . . .

. . . position assembled, jewels-added lower snowflake
onto ball, center opening fitted over glass stem . . .

. . . and press arms in place until they are securely
attached to ball.
8. While easy access is possible, position and attach
self-adhesive jewels over position guide holes.

9. Follow similar process to add glue only around
center opening and .25" along arms and diamond tops,
position upper snowflake onto ball assembly,
rotating so that arms are aligned at centers of
diamond extensions of lower snowflake underneath,
and attach, leaving arms and diamonds unattached
except around center opening.
10. Add jewels at guide holes.

11. Re-attach the spring loop and collar.
If desired, add a row of small jewels around
the base of collar . . .

. . . and decorative hook with jewels,
soft ribbon bow as desired.
Here is the completed ornament.

No comments:
Post a Comment