
Decorative ornament to hang from tree branch,
chandelier,
holiday swag or from hook stand on shelf or table.
This Antarctic
friend is fashioned as eight-faceted sphere halves,
fit together at the middle,
with reinforced hexagon tube that adds
structure and strength in tandem with
interior dome octagon disc collar.
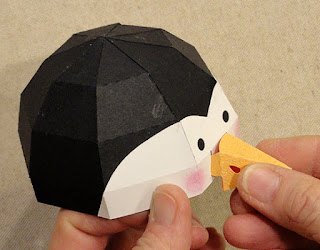
Upper “face” overlay creates “mask” that
aligns with
lower body dome color divisions.

Other features include dimensional beak,
hexagonal top hat with band, wrapped scarf strip
with wrap-over ends,
layered-for-thickness feet.
Add hanger loop by passing cord or twine on long
doll needle –
attached to a multi-layer “stop” bottom button –
through dome and
tube centers and out through top of hat.
Completed ornament measures approx.
5.5” tall
x 3.875” wide x 5” deep (includes beak length).
ASSEMBLY: 1. Identify and cut the shapes:
A sphere hull upper shape
B & C sphere hull lower shapes
D face overlay E beak F feet (4 for thickness)
G stop button (5-6 for thickness)
H sphere interior collar I post tube J post struts
K left & right wings (3) and contr. inner wings
L scarf strips (2) M scarf bend-over tails
N heart (3 for thickness)
O & P(7) hat crown shapes
Q hat brim inner & outer R hat brim rim circle
S hat band

and press under heavy flat weight:
A) layer and glue together the feet shapes,
taking care to align ALL cut edges as precisely
as possible. Then . . .
 . . . place on flat work surface and press flat with
flat heavy object such as one or several books.


B) Position and attach brim rim ring onto exterior
brim shape.
C) Layer 3 left and 3 right main wing shapes, then . . .
 . . . position and attach inner wing onto "inner" face
of main wing stack, with top edges aligned, and
side edges offset, as shown.
 D) Layer heart shapes, and layer stop button shapes.
 3. Prepare hull shape by bending back on ALL perforation
lines and sections and tabs, including narrow wedge
tabs along edges near segment connections.
 4. Begin at one (left) edge to bend adjacent wedges
inward, to overlap straight left edge across adjacent
narrow wedge tab to perf line, and glue first segment
of seam.
 5. Continue up the same edges to bend, align and
join the next seam segment, then . . .
 . . . then top segment.
 6. Continue the same process to align and join the three
segments of each seam until the final two between-wedge
seams remain.
7. Skip one seam (fifth), and complete the sixth seam.
This will make it a bit easier to finish the dome.

8. (The next three images are from the similar Santa sphere
ornament project.)
Align and complete the final remaining seams . . .

at the top segment of seam and work . . .
 . . . downward to complete all four segments in sequence.

 . . . complete ALL the seams of the two sections.
9. Repeat the sphere dome assembly steps as shown
above, except . . .
Then . . .
 . . . position and attach to complete the final two seams.
NOTE: it may be helpful to join the two sections from
the center/top downward.
 10. Prepare the face shape by bending back on
perforation lines.
 11. Position face over the front segment of upper dome
where beak slots can be aligned, and glue in place. Then . . .
 . . . bend and attach the upper center, side lower
and upper side panels, taking care that the abutted
seams above cheeks come together fully.
 12. Prepare beak shape by bending back on all
perforation lines, except upper side tabs, which are
bent forward.

13. Form the beak shape into a pyramid to overlap
the straight side edge over bottom side tab to
perforation line and glue seam.
NOTE it may be helpful to complete this seam
by placing a narrow rod tool such as a bamboo skewer
or narrow dowel inside the beak behind seam
to press against.

13. Bend bottom flange up into position, then
position the beak to insert the tabs into slots of
face/upper dome.
On the inside, apply glue to the outside face of tabs,
then bend tabs outward and hold in place until
attachment is secure.

14. Prepare the support post shape by bending back
on all long section perforation lines, as well as
end tabs and "cover" hex shapes.

15. Form the shape into to tube to overlap straight
side edge across flange tab to perf line, and glue seam.

NOTE that the symmetry of the tube will allow
it to be pressed flat to apply pressure in flat form.

16. Re-form the post into tube form, bend wedge tabs
at one end inward to perpendicular and apply glue
to top surfaces. Bend "cover" hexagon down into position,
adjust edges and wall ends to align, then glue in place.

17. Interlock the strut interior post supports
by sliding the slots together as shown,
and push fully together so that all ends align.

18. At open end, insert the struts in 'X' formation
so that the legs tucking into the angles of pairs of
adjacent angles. Then gently push the strut
assembly fully down . . .

. . . so that it is fully inside the post tube.

Refer to step 16 to bend end tabs inward
and glue end "cover" in place.

19. Prepare the interior support collar by bending
edge flange tabs forward. Push the center wedge
tabs back to open up the post hole.

20. Insert one end of the post through the collar
center opening, pausing when it is approx. half
way though.

21. Prepare the hat shapes by bending back side tabs,
top tabs or octagon panel, and slightly forward at
midway perf line. Also bend the bottom tab forward.

22. Begin hat crown assembly by positioning bottom
panel lower segments, then overlapping the straight
edge (left edge of right panel here) across the tab
to the perf line and glue in place.

23. Continue up the seam to bend and adjust
the two edges so that the upper portion of seam
straight edge aligns along tab's perf line,
and glue seam segment.

24. Continue adding the sections until all eight
are joined together, then form the assembly into
a tube to join the final seam in the same manner.

25. At the top, bend the tabs inward to perpendicular
angle, apply adhesive to the top tabs, then
bend the top "cover" down in position.
Adjust the top edges of walls so that perforation
lines match up with cover edges. Hold in place
until top is semi secure, then invert on a flat surface
and reach fingertips inside to apply more pressure
around the inside at each tab.

26. Bend crown assembly bottom tabs straight then
insert through top center opening . . .

. . . then bend tabs outward and attach to underside
of top layer of brim (with ring attached).

NOTE it will be helpful to apply fingertip pressure
all around the edge of crown to secure connections
all around.

27. Position and attach the second brim shape
on the underside of the hat to cover and hide
the previous seam tabs.

28. Prepare the hat band shape by bending back
on each of the perforation lines.

29. Locate the "front" of the hat, then on one side,
position and attach band, beginning with tabbed end,
aligning perforation angles of band and crown.

When the band is completely positioned, the final
segment should be attached to overlap the beginning tab.
NOTE: the sample project had a double-sided adhesive
strip centered down center of band with glitter added.

30. Prepare to assemble the sphere by applying thick
quick-grab glue to the underside of upper dome
where the post end will rest, then . . .

. . . position the collar with post assembly so that
front modified tab is align with beak front panel,
then slide into position so that collar tabs slip inside
the edge of dome.

Push the post inward until it touched underside
of dome and adheres where glue was applied.

Continue to gently urge the collar perf angles inward . . .

. . . until it aligns with the perforation line at top of
rim section, all around.

31. Position lower dome so that the "white" section
aligns to be centered below beak at center front.
Insert bottom dome rim edge into the upper dome
and apply glue between layers to attach in place.

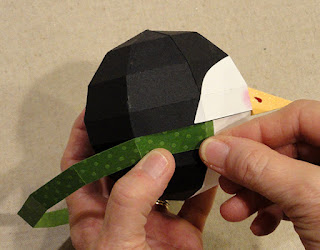
32. Prepare the scarf shaped strip by bending back
slightly in each perforation line, then overlapping and
joining two lengths into one.

33. Position band below the sphere-to-spheres seam,
with tab perf at a side wedge panel angle. Continue
to wrap the scarf around and attach each segment
along each wedge all around, then . . .
. . . before final segment is positioned and attached,
position the bended ties shape to wrap over
the final segment as shown, then complete attachment.

34. Prepare to string the attachment twine through
the stop bottom, sphere and hat by threading a 45"
length of twine on a long, fine gauge doll needle.
Thread the single ply through the button holes,
then pull ends through to line up and thread through
needle eye. Next, insert the needle through the bottom
dome's center "opening" where wedges come together,
direct needle up through center of post and out
through the top dome center opening.

Pull the thread through until the stop button is
flush with dome surface. Next, insert the needle
through inside of hat and out the top center needle hole.

Before pulling twine all the way taut, apply quick-grab
thick blue under the brim at crown bottom edge,
then pull taut. Tie a stop knot and hang loop at top
to keep twine tight, or hold in place until hat
is secure in place. Thread twine loop through
a painted bead at top of hat, if desired.

35. Position and attach each wing in place as shown
on side panel.

Position and attach thick heart as shown.

Also position and attach thick feet unit onto dome
bottom, with stop button centered in cutout opening.

36. Finish by attaching a decorative hook to top loop.

No comments:
Post a Comment