
Slightly
kooky Halloween ghost figure box is composed
of “tombstone” LID that fits
snugly over shorter BASE.
Angular striped hat rests on head top, with med.
gauge craft wire crazy hair spirals.
Arms are composed of .125” diam.
paper-wrapped
wood dowels, with a miniature pumpkin “sack”
dangling from one.

Design
can function as a joined decoration,
or with LID and BASE detachable to fill as
a shallow treat box.
Finished size is approx. 4.25” wide (incl. arm sticks)
x
6.25” tall (incl. hat) x 1.75 deep when
fully assembled and closed.
ASSEMBLY: 1. Identify and cut the shapes:
A body front panel
B body front contour panel with smile & eye openings
C contrast eye & smile inserts
D face contour panel
E body back panel with bottom edge notch
F & G body sides boxing strips
H wire reinforcement strips to stack (2 sets of
4 each single and 2-hole strips)
I interior arm stick brace boxes (2)
J brace box wall thickeners (2 sets of 3)
K arm stick wrap strips with end circle covers (2 sets)
L bottom compartment insert
M hat crown N crown stripe overlays (2)
O hat brim top layer P brim build up layers (7)
Q1 - Q8 pumpkin "sack" layers (see step 2 below)
Also shown are wire spiral "curls" (6)

NOTE that the body front and back panels can be
distinguished from each other by locating
the bottom "notch" cut from the back.

2. For pumpkin sack, cut the following layer
quantities (l to r) to be stacked in order:
front layer with second cut-out
layer and contrast insert - 1 ea.;
whole shapes - 3; handle; whole shape - 1;
compartment 'U' shapes - 4; whole - 1;
handle; whole shapes for back - 4

3. Obtain a narrow gauge moderately soft craft wire
to create the "curls". The wire should fit through
the receptacle holes cut into the body boxing as
shown here. For the sample, a physical gauge was
measured at .5" for 14 wire widths/diam. (side by side).

PREPARATION AND GLUE UP
4. Layer one by one the hat brim stack shapes and
attach together, taking care to align all outer cut edges
as precisely as possible.

Immediately place under a heavy flat shape such as
this fabric-covered repurposed weight machine bar,
and allow to be pressed until liquid glue is completely
dried. This may require several hours or overnight.
Pressing will help minimize or prevent warping or
curling when using liquid glue.

5. Layer and attach the arm stick brace box
reinforcement strips in similar manner, into
2 sets of 3 each, taking care to align all cut edges,
especially the stick insertion holes. Press until dry.

6. Prepare the body side boxing strips by bending
back on all cross perforation lines and side edge tabs.

7. Layer and attach the wire reinforcement mini strips
into stacks of 4 each, to yield 2 stacks that have
single holes, and 2 stacks that have 2 holes.
Press with weight until dry.

8. On the backside of each of the boxing strips,
position the corresponding wire stack over
punched segment, taking care that holes line up
precisely. Position and attach both one and two hole
stacks for each boxing strip; press until dry.

9. Complete the body side boxing assembly by
positioning and joining the top head seam,
overlapping the straight end edge across the opposite
tab, adjust for top-to-bottom alignment at seam edge,
then attach. NOTE that the tiny arrowhead symbol
on end tabs will act as guide to which ends are joined.

10. Position the body contour shape on top of
the front body panel, centered and with bottom edges
aligned.

11. Insert and glue the contrast shapes into cut outs,
then position and attach the face panel over the top of
the assembly, centered and with bottom edges aligned.

BODY ASSEMBLY
12. Beginning with back panel, position the top segment
edge at "1" symbol tab, overlap body straight edge across
boxing tab to perf line, adjust for alignment, then attach.

13. Bend the first tab of one side down into position
to align panel edge with boxing tab perf line,
adjust and glue in place.

14. Repeat the step 13 process to position and join
two more segments of the seam in the same manner
for 3 segments total.
15. Move to the opposite side of panel and complete
the positioning and joining of 3 segments on
that side.

16. Prepare the brace boxes by bending back on
all perforation lines for panels and tabs.

17. Position the interior stack (see step 5) on
backside of box shape so that the mostly-centered
holes line up. Also check that stack edges will NOT
interfere with side or end perfs bending.

NOTE that the "arrow" notch should be nearest
the square end box panel - this is the BOTTOM end.

18. Form the shape into a box, with sides inward,
flanges inward, bottom end inward and top end
wrapped upward. Then . . .

. . . glue seams.

Bend bottom end tabs inward, square end down
and glue in place to complete box.
(Complete second box in same manner.)

19. Prepare to glue the brace box to the inside
surface of body boxing by identifying the "centered"
hole side - which will be aligned and joined to
the boxing wall, and . . .

. . . and the opposite "lower" end hole which will
help secure the stick arm in its angled position.
NOTE that the uncentered hole will be
toward bottom of body.

Apply glue to the "centered" hole side of brace,
then position, align holes, adjust for centering,
and attach in place.

NOTE that it will be helpful to view the boxing
from face side in order to see if hole edges
are accurately aligned.
Repeat for the second body side and brace.

HAIR CURLS PREPARATION
20. Cut 6 wire lengths of 7" each.
Prepare curls by using uncut arms dowel as
wrapping form. Leave approx. .75"
insertion end (shown at left here), then wrap
the wire around form for 8-9 wraps. Cut excess.

Gently "stretch" the wire spiral so that it measures
approx. 2" between first and final twist as shown.
Repeat to prepare 6 total hair curls.

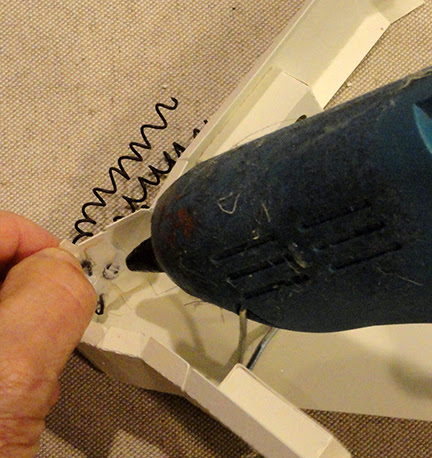
21. Insert the straight end of first coil into wire hole
of boxing, then . . .

. . . on inside, use needle nose pliers tool to bend
the end into a tight twist just behind wall.

Use a dab of hot melt glue to secure the twist end
in place. (This image shows all 3 curls in place.)
22. Repeat the insertion and glue-securing steps
for remaining 2 curls for first side, then repeat
for the second side.
23. Measure and cut the .125" diam wood dowel
into (2) two-inch segments.

24. Use an intermediate diam. rod tool such as this
knitting needle to begin to shape the arm cover strips
into final tight roll. Then . . .

. . . roll the strip around the dowel to achieve
nearly-final tight roll form.

25. Apply glue to the inside face of the strip
excluding the end tabs . . .

. . . then place dowel segment inside the "tube",
adjust so that it is flush with non-tab end,
and tightly roll the strip around dowel until paper
is as tightly formed as possible, possibly rolling
between fingers around and around until
this is achieved. Straighten the
exposed paper seam edge if necessary.
NOTE the tube edge should overlap interior
edge to completely hide dowel inside.
Complete second stick arm.

26. Insert the non-tab stick arm end from inside to
outside through brace box holes . . .

. . . until stick is fully through with only tabs
extending beyond brace box. Bend tabs outward
and glue in place.
Repeat for second stick arm.

27. Position the body front panel over front boxing
tabs in manner similar to what was done for back
panel, and complete . . .

. . . the top and first 3 segment seams
on each side of top.

28. Next, complete the remaining seam segments
for both front and back panels.

29. Position and glue the stick-covering end circle
on end of each arm.

HAT ASSEMBLY
30. Prepare the hat crown by bending back on
all perforations for vertical bends, top panel and
tabs, except bend the bottom (narrow) tabs outward.

31. Fold the crown shape to bring the straight edge
to overlap opposite tab to perf line, adjust,
then glue seam. NOTE that the symmetry of
this shape will allow the seam to be aligned at
center or side to complete the seam.

32. At top, bend the tabs inward, top panel down,
adjust to align straight edges with tab perf lines,
then glue in place.

NOTE that to help secure the top edge seams,
it may be helpful to insert a rod-like tool end
into the inverted opening and apply pressure
along the seaming edges inside.

33. Prepare the two stripe shapes by bending back
on the center perf cuts.

34. Apply glue to the backside of each stripe,
leaving the "sprue" ends free from glue.

Position the first stripe unit with bend at corner edge
of hat crown, adjust top to bottom to center the stripes
over the panel (black/gray stripes should be even),
then press into place.
Next, bend the second half into place on the adjacent
crown panel, keeping stripes parallel to top edges,
and attach in place.

35. When stripes are secure in place, hand-trim
the "sprue" away by cutting precisely along
the hat corner edge.

36. Repeat the process with the second stripe unit,
taking care as first edge and then second are
positioned and attached that stripes line up as
precisely as possible at the trim corner.

37. Insert the narrow end of crown through opening
of brim top layer . . .

. . . then on the underside, bend the tabs outward
and glue in place.

NOTE that it may be helpful to place the brim
underside-down on work surface and apply
prolonged pressure along the crown to secure tabs.

38. Apply glue to the underside of brim top layer,
then position and attach to brim stack unit,
taking care as always that all cut edges are
aligned as precisely as possible.

Apply steady direct pressure all over the brim.
If possible, place heavy objects onto glue-up areas
of brim, snugged up next to the crown and allow
to dry to achieve consistent, flat attachment.

39. Apply glue to the top of the head, then
position the hat, centered in all directions,
and attach in place.
It may be necessary to adjust and bend curls
out of the way.

PUMPKIN SACK ASSEMBLY
40. Assemble the face unit by positioning and
attaching the backside rim shape to back of
face panel, then . . .

. . . inserting the contrast panel into the recess
and attaching in place. Press until dry.

41. Assemble each of the stacks of multiple layers
(see step 2 for quantities). Press until dry.

42. Begin to layer and stack the units, with cut edges
precisely aligned where they match up,
by attaching the whole stack of 3 behind the front
unit, first handle shape next . . .

. . . then in sequence the single whole shape,
compartment 'U' stack, single whole, handle #2,
and finally the whole stack of 4.
Press until thoroughly dry.

Here is a view of the completed sack.

FINISHING
44. Prepare the base insert by bending back
on all perforation lines for walls, bottom, tabs.
NOTE that there is a cut-in half-circle tab that
can assist in pulling the insert out of the body.
If you plan to use the box as a container instead
of a glued-closed decoration, break free the curved
edge of the tab at this point and bend on perf line.

segments, one by one, then . . .

. . . glue each in place in sequence.
Complete all 4 seams.

for each "hand". Position pumpkin behind one arm
and secure handles together and to arm with
dabs of quick grab glue. Wrap wire through handle
and around stick for 2-3 wraps. Add a dab of glue
to secure wire, if necessary, placing it discretely
behind or under stick arm.
Wrap wire around second arm in similar,
matched manner.

If deemed necessary to blunt wire ends,
apply 1-2 coats of clear nail polish.

47. Position and slide insert into bottom of body . . .

. . . and push up fully into place.
NOTE that the insert is intended to fit snugly.

Here is the completed ghost.

Oh my so perfect. Can we please have more of these figures - with the same facial expression and style (stick hands and wire hair) but for other occasions as well: Christmas, Easter and some ordinary ones like girl and boy. Pretty please with a cherry on top <3
ReplyDeleteI will put your request in my "brain mill" but I can only see him as a ghost in my head. So nice to know you are out there watching and reading and imagining!
Delete