
slanted
crown top is decorated with
scallop slotted “eyelet” trim for threading 5/8”
ribbon
(or included shape for paper strip).
Underneath, a short round box
“base” slides upward
into crown cavity to fill with a note of appreciation
or
loose goodies.
Leafy overlays for brim and crown top
add more details.

Embellish further with included shapes of leafy sprig,
multiple serrated edge
leaves, small butterfly.
Fun gift or decoration for Mother’s Day,
birthdays,
springtime, May Day, etc.
Add purchased florals as desired.
Hat measures
approx. 6.125” diam. brim x
2” crown tallest point,
box compartment 1.5” tall x
2.82” diam. when
fully assembled (separate from embellishments).
ASSEMBLY: 1. Identify and cut the shapes:
A hat brim B brim overlay
C optional under-brim reinforcement arcs (3)
NOT SHOWN: underside crown opening ring
D crown strip E crown top disc
F crown top disc overlay
G crown top overlay with opt. center heart
H opt. embellishments: leaf (3), sprigs (2)
butterfly with body
I ribbon or ribbon strip from paper
K "eyelet" strip
L compartment wall strip
M compartment interior bottom disc
N push through tab with concealing disc
O compartment bottom overlay disc

2. Turn the brim shape face down, then position and
attach the three partial rims with ends abutted, curved
edges aligned as precisely as possible with brim edge.

3. Prepare the crown walls strip by adding back curl
by running a rod tool behind the strip and applying
thumb pressure as strip is drawn across rod.

4. DO NOT bend the end flange - dash cuts are
guide marks only. Form the strip into a ring to
overlap straight edge across flange to dash marks,
adjust top to bottom, then join seam.

5. At top (slant shaped),bend the tabs inward.

Apply dab of adhesive to underside of each tab.

6. Identify the center cut guide marks on the interior
crown top disc, then . . .

. . . slip the disc into the crown tube and rotate to align
top center and bottom center guide marks aligned
at center top of strip and at seam at bottom.

Push all the way into place, double check guide mark
alignment, then apply fingertip pressure all around
until the seam is secure.

Double check outside for full attachment, and
add glue as needed to join all tabs in place.

7. Prepare the crown top disc cover by centering and
attaching the decorative overlay. Add optional little heart
in the center (oriented north/south)
Press under flat weight until fully secure, then . . .

. . . position and attach on top of crown assembly.

8. Bend the tabs at bottom of crown assembly outward.
Apply dab of glue to upper surface of each tab.

9. Insert the crown assembly upward through brim's
center opening . . .

. . . and push fully through until tabs catch even with
brim opening edge. Apply pressure to attach securely
all around.

10. Apply adhesive to underside of brim decorative
overlay, then carefully slip it over top of crown
and push down into position to glue into place.

Apply pressure to help minimize or overcome warping.

11. Position and attach crown opening concealing ring
on brim underside to cover glued-in-place tabs.

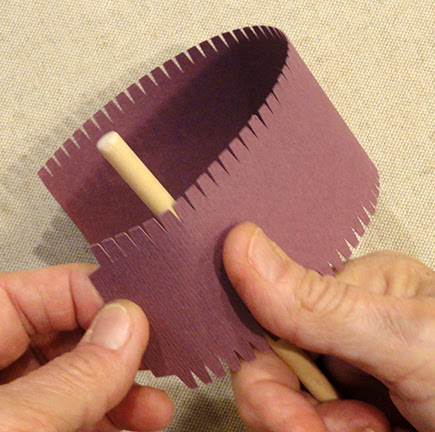
12. Add some back curl to the eyelet strip, then
thread the ribbon paper strip or actual ribbon through
oval openings, beginning by taking it under the lead
end and up through first oval slit.

Attach ribbon at ends with a dab of glue between.
Trim excess so that ribbon is slightly shorter than
eyelet.

13. Position eyelet assembly with center unit at
center front of crown, then wrap around so that
seam is near center back.

Overlap straight end across tab end and glue.

NOTE that the compartment wall strip was modified
in the final cut file to eliminate the top rim bend tabs.
14. DO NOT bend the end flange - dash cuts are
guide marks only.
Add back curl to the compartment wall strip, then . . .
. . . form into a tube to overlap straight end edge
across flange to guide marks, and join seam.

15. Bend bottom tabs inward.

16. Prepare the bottom pull tab unit by bending
the cut-in tab forward.

Add glue to the edge of the tab disc, then place behind
bottom disc circle cut out. Push up so that tab so that
tab extends through hole.

On underside, position and attach the concealer disc
to cover the half circle hole.

17. Apply a dab of glue to the underside of each
compartment tab, then slip the compartment bottom
disc into the tube, with tab facing outward.
Push down into position fully, adjust then apply fingertip
pressure all around to secure seam.
Check bottom for total attachment of tabs.

18. Apply adhesive to underside of bottom disc overlay,
then position and attach in place, taking care that
tab is inserted through hole again.

19. To close the box, insert compartment into
bottom of crown opening and push up fully.
NOTE that the slat top will cause the compartment
to tip inward slightly.

20. Position and attach purchased floral embellishments,
as well as sprigs and serrated leaves around florals
as desired.

21. Prepare the butterfly by bending wings forward
at the narrow connections near fused body shape.
Position and attach body where it matches on wings.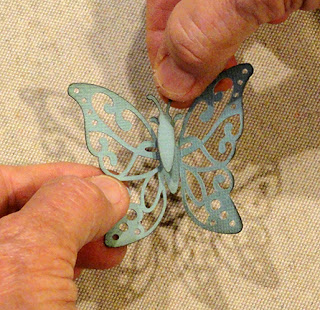

Here is the sample hat box with decorations.

No comments:
Post a Comment